SuiteSpot
 |
SuiteSpot is the Xenial Suite Catering fan-facing component.
SuiteSpot Registration
Users can register with SuiteSpot either as authorized users or guests.
Register as Authorized User
To register as an authorized user for the SuiteSpot:
Follow instructions in Add Authorized User to add an authorized user.
Access the inbox of the email address used to register for the SuiteSpot.
Locate and open the SuiteSpot welcome email.
If not located in the inbox, check spam or junk folders.
In the email, select Complete Registration.
In the New Password field of the SuiteSpot page, type a strong password.
In the Confirm Password field, type the password again.
Select Continue.
Register as Guest (for Mobile Users Only)
Scan the suite QR code.
For more information, see Export Scan to Order Code and Use Scan to Order Code.
From the SuiteSpot login page, select REGISTER AS GUEST.
This button is available only when the Enable Registration toggle in Suite Admin Settings is on. For more information, see Configure General Settings.
In the email field, type the email address used to register the guest account.
Select CONTINUE.
Alternatively, select Back to login.
If the email address is already registered with other companies, follow the prompted actions.
In the First Name, Last Name, and Phone Number fields, type the corresponding details for the guest account to be registered.
Select CONTINUE.
After selecting CONTINUE, a password setup email is sent to the specified email address of the guest account.
Access the inbox of the email address used to register.
If needed, select RESEND EMAIL on the page that that confirms the password setup email has been sent to resend the email.
Locate and open the SuiteSpot password setup email.
If not located in the inbox, check spam or junk folders.
In the email, select Complete Registration.
In the New Password field of the SuiteSpot page, type a strong password.
In the Confirm Password field, type the password again.
Select Continue.
After successful registration, the guest user will appear in the guest user list. For more information, see Guest User List.
SuiteSpot Login
Users can log in to SuiteSpot as authorized users or guest users.
The SuiteSpot login page allows users to:
Operation | Description |
|---|---|
Log in to SuiteSpot as an authorized user. | |
Login to SuiteSpot as Registered Guest User (for Mobile Users Only) | Log in to SuiteSpot as a registered guest user. |
View Privacy Notice | Select Privacy Notice to view the privacy policy in a new tab. |
Select Forgot Password to reset the password. | |
View Menu | Select View Menu Here to view the menu in a new tab. |
View Event | Select View Upcoming Events to check upcoming events in a new tab. |
Contact Primary Suite Representative | Select Contact Signature Services to contact the primary suite representative. For details about how to configure the primary suite representative, see Configure Suite Representative. |
Note
On the login page, View Menu Here , View Upcoming Events, and Contact Signature Services are hidden for registered guest users.
Login to SuiteSpot as Authorized User
To login to SuiteSpot as an authorized user:
In the email field, type the email used to register for SuiteSpot.
In the password field, type the password.
Select Sign In.
The post-‘Sign In’ response varies based on how the login account relates to domain-bound companies and suite ownership.
Account-Domain-Company Relationship
Suites Owned and Rented by Account
Screen
Action
Account not added to domain-bound company
NA
Login error
Account added to single domain-bound company
None
Login error
One
Welcome To SuiteSpot popup
More than one
Account added to more than one domain-bound company
One
Company selection popup
Select the company to visit.
More than one
Company and suite selection popups
Select the company and suite to visit.
Domain bound to more than one company
NA
Suite representative's email link
Select the link to contact the suite representative for help.
From the Welcome To SuiteSpot popup, select the company to visit.
From the Welcome To SuiteSpot popup, select CONTINUE.
On the Email Verification page, type the code sent to email used to register for SuiteSpot.
This page appears if MFA is enabled for the site. For details, see Configure General Settings.
If necessary, select Do not ask again for 45 days on this device.
On the Email Verification page, select SUBMIT CODE.
Alternatively, select RESEND CODE.
The account locks after multiple failed MFA attempts.
From the Welcome To SuiteSpot popup, select the information to access.
EDO banner: During the EDO period, the buttons for START NEW ORDER, EDIT ORDER, or VIEW ORDERS appear based on site conditions. For details, see Distinct Order Links Based on Varying Conditions.
Note
This banner is hidden for inactive accounts.
VIEW EVENTS & CREATE ORDERS: navigates to the event calendar
MANAGE EXISTING ORDERS: navigates to the order history
MANAGE MY ACCOUNT: navigates to My Account
Contact a Guest Services Coordinator: triggers a popup that display coordinator's contact information
Note
The text displayed here is customizable. For more information, see Edit Appearance Template.
If the splash screen is enabled, the SuiteSpot release notes are displayed. For more information, see Configure Splash Screen Settings.
From the Welcome To SuiteSpot popup, select CONTINUE.
If the login account has multiple suites and none is selected upon login, the suite selection popup appears when suite information is needed, such as when placing an order.
Login to SuiteSpot as Registered Guest User (for Mobile Users Only)
To login to SuiteSpot as a registered guest user:
Scan the Scan to Order code.
For more information, see Export Scan to Order Code.
Type the email and password used to register for SuiteSpot.
Select Sign In.
On the Email Verification page, type the code sent to email used to register for SuiteSpot.
This page appears if MFA is enabled for the site. For details, see Configure General Settings.
If necessary, select Do not ask again for 45 days on this device.
On the Email Verification page, select SUBMIT CODE.
Alternatively, select RESEND CODE.
The account locks after multiple failed MFA attempts.
Reset Password
To reset a SuiteSpot password:
Navigate to the SuiteSpot login page.
Below the password field, select Forgot Password.
In the email field, type the registered email.
Select Continue.
Alternatively, select Back to login.
Review the confirmation screen, then select Continue.
Navigate to the inbox for the registered email.
Locate the Password Reset email and follow the instructions.
SuiteSpot Homepage
The SuiteSpot homepage displays:
Area | Description |
|---|---|
Header | Displays the EVENT CALENDAR, MY ACCOUNT, and LOG OUT links. |
EDO Banner | Displays a collapsible EDO banner during the EDO period. Note
|
Event Calendar | Allows users to view events occurring within the next year across different calendar views. Note
|
Footer | Displays the name and address of the stadium, copyright information, a link serving as the primary point of contact for your orders, the company's time zone, a link to new features, a menu link, and a privacy link. All these texts, except for the new feature link, are customizable. For more information, see Edit Appearance Template. |
Switch Between Views of Event Calendar
To switch between views of the event calendar:
From the upper-right of the event calendar, select the circular icon on the left to switch to the calendar view
Use the calendar view dropdown to switch between MONTH VIEW and WEEK VIEW.
Use the left and right arrows beside the current Month/Year to switch to the desired time period. Note that navigation is limited to 60 days back from today.
Use the Today button to quickly return to the current date.
From the upper-right of the event calendar, select the circular icon on the right to switch to the list view
Closed events are not visible in the list view.
Distinct Order Links Based on Varying Conditions
The order links displayed for events on the event calendar depend on specific conditions.
Only valid orders are considered for displaying these links; orders in the deleted, purged, voided, and voided-post-payment states are excluded.
The following table lists the order links displayed under different conditions when only one suite is assigned to the event.
Account State | Place ADO Permission | Place EDO Permission | Order Present | Shopping Cart Touched | Before ADO Start (All Links Disabled) | Before ADO Cutoff | Before EDO Start | Before EDO Cutoff | After EDO Cutoff | Event Closed |
|---|---|---|---|---|---|---|---|---|---|---|
Inactive | N/A | N/A | N | N/A | Event not displayed | |||||
Inactive | N/A | N/A | Y | N/A | VIEW ORDER | |||||
Active | N | N | N | N/A | NO ORDER | |||||
Active | N | N | Y | N/A | VIEW ORDER | |||||
Active | N | Y | N | N | NO ORDER | NO ORDER | NO ORDER | START ORDER | NO ORDER | NO ORDER |
Active | N | Y | N | Y | NO ORDER | NO ORDER | NO ORDER | EDIT ORDER | NO ORDER | NO ORDER |
Active | N | Y | Y | N/A | VIEW ORDER | |||||
Active | Y | N | N | N | START ORDER | START ORDER | NO ORDER | NO ORDER | NO ORDER | NO ORDER |
Active | Y | N | N | Y | EDIT ORDER | EDIT ORDER | NO ORDER | NO ORDER | NO ORDER | NO ORDER |
Active | Y | N | Y | N/A | REVIEW ORDER | REVIEW ORDER | VIEW ORDER | VIEW ORDER | VIEW ORDER | VIEW ORDER |
Active | Y | Y | N | N | START ORDER | START ORDER | NO ORDER | START ORDER | NO ORDER | NO ORDER |
Active | Y | Y | N | Y | EDIT ORDER | EDIT ORDER | NO ORDER | EDIT ORDER | NO ORDER | NO ORDER |
Active | Y | Y | Y | N/A | REVIEW ORDER | REVIEW ORDER | VIEW ORDER | VIEW ORDER | VIEW ORDER | VIEW ORDER |
Note
In the above table, Y (Yes) indicates the presence of the item or permission, N (No) indicates the absence of the item or permission, and N/A (Not Applicable) indicates that the item or permission is not relevant to the situation.
Orders mentioned above include account orders created on the Suite Catering Admin Portal, SuiteSpot, and POS. Notes and Questions of account orders created on POS are blank.
If an event does not have an ADO cutoff time, it's assumed to have already passed the ADO cutoff time.
When multiple events share the same event date, the calendar displays SHOW ALL EVENTS for that date.
If ADO transition is enabled for an event, Transition Cutoff Date and Transition Cutoff Time serve as the new ADO cutoff date and time. For more information, see Advanced Day Ordering (ADO).
When multiple suites are assigned to an event, the button display priorities are as follows:
During EDO: VIEW ORDER > START ORDER > NO ORDER
Other periods: REVIEW ORDER > START ORDER > VIEW ORDER > NO ORDER
For example, during EDO, if one suite displays the "VIEW ORDER" button and another displays "START ORDER," the "VIEW ORDER" button will be shown on the calendar.
ADO Orders
This chapter covers the key actions related to Advanced Day Ordering (ADO) orders, including placing, editing, and viewing orders. It provides step-by-step instructions to help efficiently manage and track ADO orders.
Place ADO Order
→ →
Inactive accounts are unable to place orders.
To place an ADO order for an event and suite:
From the Welcome to SuiteSpot popup that is displayed upon login, select VIEW EVENTS & CREATE ORDERS.
In the event calendar, select the START ORDER or REVIEW ORDER link of the event for which you want to place an order.
For more information, see Distinct Order Links Based on Varying Conditions.
From the event detail page on the right, select the START NEW ORDER link for the suite where you want to place an order.
If the selected suite is a target suite after reassignment, the menu from the source suite is used. For multiple source suites, the menu from any source suite may be used.
To change the event, select the left or right arrow located on the respective side of the event image.
On the Build Order page, select START ORDER.
To go back to the event calendar, from the upper-left of the Build Order page, select BACK TO CALENDAR.
To change the event, select the CHANGE EVENT dropdown.
Only events occurring within the next year are available.
To view details of placed orders, select Order Summary.
To mark an order as the favorite, from the Start With a Recently Placed Order area, select the star icon next to the event name.
After selecting the star icon, a pop-up will appear, requesting a name for the favorite order.
If the provided name matches an existing favorite order, a pop-up will appear, providing the option to confirm overwriting the existing favorite.
If the total number of favorite orders equals or exceeds eight, a pop-up will prompt for the replacement of an existing favorite.
If needed, deselect the star icon to remove the favorite status from the order.
To place an order based on an existing order, from the Start With a Recently Placed Order area, select START WITH THIS ORDER.
Follow the procedure to add desired items.
Note
For more information about the SuiteSpot menu display, see Mapping Between Data Management Menu Configuration and SuiteSpot Menu Display.
The priorities for displaying the Advanced Day Ordering (ADO) online menu on the SuiteSpot are as follows:
Suite ADO online menu configured in Create New Suite.
Event ADO online menu configured in Advanced Day Ordering (ADO).
Event type ADO online menu configured in Online Menu Override.
Default ADO online menu configured in Configure Menu Settings.
If the first menu is not configured, the second menu will be applied, and so on in sequence.
The priorities for displaying the ADO transition online menu on the SuiteSpot are as follows:
Event ADO transition online menu configured in Advanced Day Ordering (ADO).
Event type ADO transition online menu configured in Online Menu Override.
Default ADO transition online menu configured in Configure Menu Settings.
Default ADO online menu configured in Configure Menu Settings.
If the first menu is not configured, the second menu will be applied, and so on in sequence.
Follow the procedure to edit the item quantity.
Follow the procedure to remove unnecessary items.
Select REVIEW ORDER.
On the Review Order page, review order details and select CONTINUE.
Alternatively, select CONTINUE SHOPPING to go back to the menu or select CANCEL ORDER to revoke the order.
Edit quantities of items or remove unnecessary items if necessary.
If there are unavailable items, the CONTINUE button remains disabled until those items are removed.
On the Questions and Allergens page, answer questions, type event special instructions, and select allergens if there is any.
If the allergen management function is disabled, this page functions as the Questions page. For more information, see Configure Allergen Settings.
The secondary question, if available, is shown based on the response to the primary question. For more information, see Configure Question.
If you select BACK TO REVIEW ORDER in the upper-left of this page, the content typed this page will not be lost.
If you log out of SuiteSpot before proceeding to the next step, the content typed on this page will not be saved to this order.
Select CONTINUE.
Alternatively, select CONTINUE SHOPPING to go back to the menu or select CANCEL ORDER to revoke the order.
If you log out of SuiteSpot after selecting CONTINUE, the content typed on this page will be saved to this order.
On the Payment Details page:
If needed, select Modify to update the information about the Point of Contact. For details, see Modify Point of Contact.
Use the Select Payment Method dropdown to select a payment method.
If a credit card payment method is selected, select an existing credit card or select Add New Credit Card. For details about how to add a new credit card, see Add Credit Card on the Payment Details Page.
Select COMPLETE ORDER to submit the order.
Selecting a credit card that expires before the event starts disables the COMPLETE ORDER button.
Alternatively, select CONTINUE SHOPPING to go back to the menu or select CANCEL ORDER to revoke the order.
Once the order is submitted, a confirmation email is sent to the user's SuiteSpot login email address.
On the Order Confirmation page:
select Save As PDF to save the order confirmation information to the local computers.
select SAVE AS FAVORITE ORDER to mark the order as the favorite.
select PRINT CONFIRMATION to print the order confirmation information.
select the can be modified link to edit the order.
type an email address and select SEND CONFIRMATION to send an order confirmation email to the provided address.
Only the primary user of the account, point of contact of the order, and the specified email address will receive the order confirmation email. Other users involved in updating and submitting the orders will not receive the order confirmation email.
select START A NEW ORDER to place more orders.
Mapping Between Data Management Menu Configuration and SuiteSpot Menu Display
![[en] Menu configuration on the data management](../image/167fc15e595d6d.png)
1 | Menu | |
2 | First-level menu category | |
3 | Second-level menu category | |
4 | Menu item group | |
5 | Individual product |
![[en] SuiteSpot menu display (1)](../image/167fc15e59fc0e.png)
1 | Menu | |
2 | First-level menu category | |
3 | Name of the object selected in the left menu | 'Menu' is selected in the above figure. |
4 | SuiteSpot menu header | |
5 | First-level menu category | |
6 | Small image of the first-level menu category | |
7 | Short description of the first-level menu category |
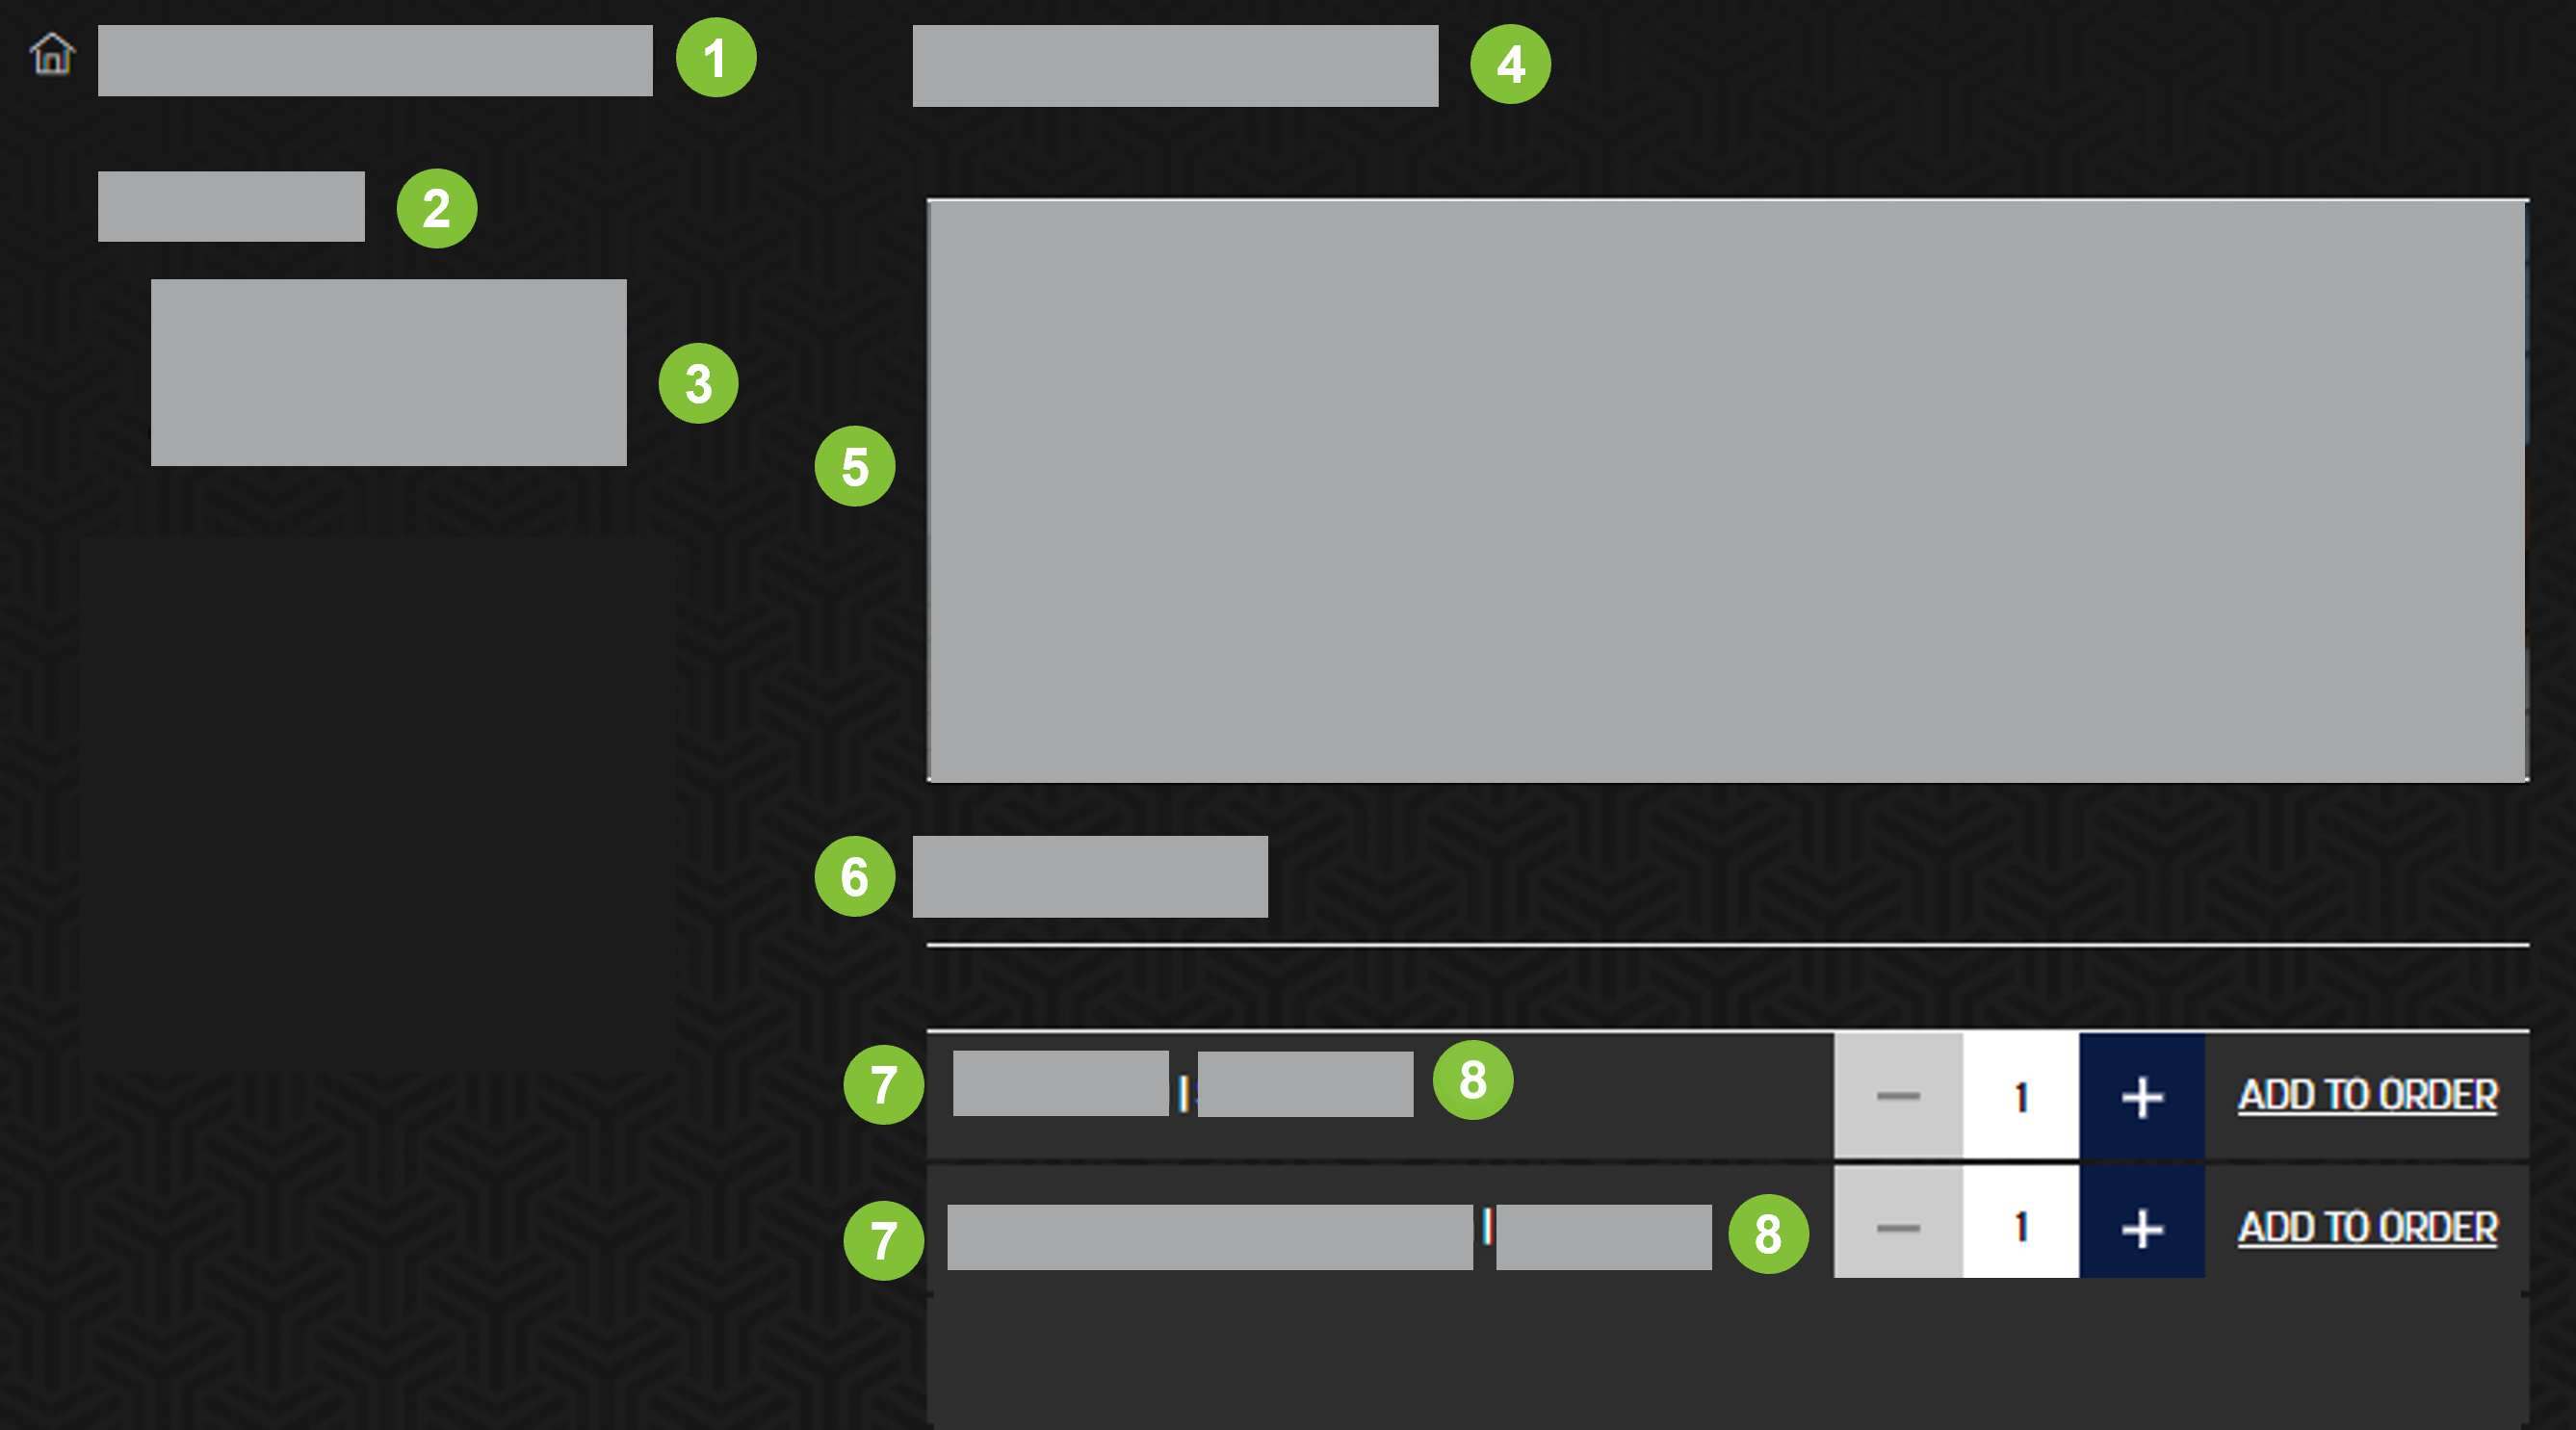
![[en] SuiteSpot menu display (2)](../image/167fc15e5a9d2b.png)
1 | Menu | |
2 | First-level menu category | |
3 | Second-level menu category | |
4 | Name of the object selected in the left menu | The 'first-level menu category' is selected in the above figure. |
5 | Large image of the first-level menu category | |
6 | Long description of the first-level menu category | |
7 | Second-level menu category | |
8 | Small image of the second-level menu category | |
9 | Short description of the second-level menu category |
![[en] SuiteSpot menu display (3): panel view](../image/167fc15e5b56c9.png)
SuiteSpot menu display (3): list view
1 | Menu | |
2 | First-level menu category | |
3 | Second-level menu category | |
4 | Name of the object selected in the left menu | The 'second-level menu category' is selected in the above figures. |
5 | Large image of the second-level menu category | |
6 | Long description of the second-level menu category | |
7 | Product name and preference icons | Short description and preference icons of the product. For more information, see Additional Information and Product Tags |
8 | Product price | |
9 | Half-size image of the product | ImportantProduct images are displayed only when the menu category is in the panel view. For more information, see Suite Catering. |
10 | Item description of the product | |
11 | Preference icon |
Add Item
→
To add an item to an order:
In the event calendar, select the START ORDER, REVIEW ORDER, or EDIT ORDER link of the order for which you want to add items.
On the menu page, use the left-navigation pane to browse the menu.
If the REVIEW ORDER link is selected, on the Order Receipt page, select ADD NEW ITEM to browse the menu.
To efficiently locate desired items, in the upper-right of the page, type keywords in the search box to initiate a search for them.
To find items with specific allergen and preference tags, from the Allergen and Preference dropdowns on the upper-right of the page, select the desired tags.
Filtering criteria, including allergen and preference tags, apply only to first-level products.
For instructions on adding an allergen to a product, refer to Allergens. Note that if Option of an allergen is set to Does Not Contain , this allergen is not displayed.
For instructions on adding a preference tag to a product, refer to Product Tags. Note that the Suite Catering supports only the following eight tags: Dairy Free, Gluten Free, Vegetarian, Vegan, Halal, Kosher, Keto, and Paleo.
Select ADD TO ORDER to add the desired item to the order.
If a menu category includes subcategories, select SEE DETAILS to explore further.
If an item has a Modify link, select the link to modify the item.
To clear all the items from the shopping cart, select the trash bin located beside New Items at the top of the cart.
Note
If the event's menu:
Manually updated and refreshed
Automatically switches to the ADO transition online menu
This occurs only when ADO transition is enabled for the event. For more information, see Advanced Day Ordering (ADO).
In both cases, if the event's shopping cart already contains items from the previous menu:
Items with a product ID not found in the new menu are no longer available.
Items with a product ID that still exists in the new menu but has a changed name or price will remain available, with their details updated to match the new menu.
Modify Item
During the transition period with the Modify SuiteSpot ADO Items toggle off, the logged-in user cannot change the quantities or modifiers of items not in the transition menu.
Note
For more information about ADO transition, see Advanced Day Ordering (ADO).
For information about how to activate the Modify SuiteSpot ADO Items toggle, see XCAT Ordering Settings - Obsolete.
To modify an item, you can do so on the menu page, in the shopping cart, on the review order page, or on the order receipt page. There are several ways to modify an item:
On the menu page, use the "-" and "+" buttons to increase or decrease the item quantity.
In the shopping cart, use the dropdown to select the desired quantity of the item.
Select Modify next to the item, change the quantities or modifiers of the item, and then select UPDATE ORDER.
If the price of an item changes after it has been submitted, please keep the following in mind:
If you try to increase the item quantity using the "+" button in the shopping cart, on the review page, or on the order receipt page, you will see an Item Price Change popup. You will need to go back to the menu to increase the item quantity.
If you select Modify for the item in the shopping cart, on the review page, or on the order receipt page, you can only set modifiers on the Modify popup.
If the price of an item remains unchanged but the prices of its modifiers are changed after the item is submitted, the old prices of the modifiers will still apply when increasing the item quantity.
Remove Item
Remove items from the Shopping Cart, Review Order page, and Order Receipt page (which is unavailable when registered guest users place EDO orders).
During the transition period with the Modify SuiteSpot ADO Items toggle off, the logged-in user cannot remove items not in the transition menu.
Note
For more information about ADO transition, see Advanced Day Ordering (ADO).
For information about how to activate the Modify SuiteSpot ADO Items toggle, see XCAT Ordering Settings - Obsolete.
To remove an item:
Select Remove for the item that you want to remove.
On the Confirm popup, select REMOVE.
Alternatively, select CANCEL.
This popup does not display when removing an item from the Shopping Cart.
Modify Point of Contact
To modify the point of contact:
To modify the point of contact, in the event calendar, select the START ORDER, REVIEW ORDER, or EDIT Order link.
Follow the procedure in Place ADO Order, Review Order, or Edit ADO Order to go to the Payment Details page.
On the Payment Details page, locate the Point of Contact area and select Modify.
On the Modify Point of Contact popup, locate the Point of Contact dropdown and select an authorized user or Type in a different contact.
When selecting an authorized user, its information automatically populates the remaining fields, which cannot be edited.
If selecting Type in a different contact, manually complete the remaining fields.
In the lower-right area of the Modify Point of Contact popup, select CONFIRM to save the settings.
Alternatively, in the lower-left area of the Modify Point of Contact popup, select CANCEL to discard the changes.
Add Credit Card on the Payment Details Page
Adding a credit card that expires before the event starts is not feasible.
To add a credit card:
Use the Select Payment Method dropdown on the Payment Details area to select a credit card payment method.
Select Add New Credit Card.
This link is hidden if a payment method other than credit card is selected.
On the Add New Credit Card popup, type required information.
On the Add New Credit Card popup, select SAVE This Card.
If selecting SAVE This Card, this card is saved to the account; otherwise, it is saved to the order only.
The SAVE This Card option is not visible to logged-in authorized users that do not have the Add/Edit Cards on File permission.
Select SAVE.
Alternatively, select CANCEL.
Remove Credit Card on the Payment Details Page
To remove a credit card:
Use the Select Payment Method dropdown on the Payment Details area to select a credit card payment method.
To the right of the credit card number, select Delete.
The Delete link is not visible if the credit card has been:
saved to the account
assigned as the current payment method of the order
used to make any payments for the order
From the Confirm popup, select YES.
Alternatively, select CANCEL.
View ADO Order Details
→ →
To view an ADO order:
In the event calendar, locate the event.
Select the VIEW ORDER link of the event.
For more information, see Distinct Order Links Based on Varying Conditions.
From the event detail page on the right, find the suite with existing orders.
To change the event, select the left or right arrow located on the respective side of the event image.
Select the right arrow next to the suite.
In the expanded area, select VIEW of an existing order.
View order details on the Order Receipt page.
For details about the order receipt, see Order Receipt Details.
Order Receipt Details
The order receipt displays:
Section | Description |
|---|---|
Questions Notes and Allergens NoteEDO orders do not have this section. | Allows users to view and edit owner notes, questions, and allergens of the order, and provides the capability to save them as a PDF document. Note that the Modify button is only available if the order is editable.
|
Related Orders NoteGuest EDO orders do not have this section. | Lists order number links (navigating to the Order Receipt page) and order totals of orders that share the same event, suite, and account with this order. This area is displayed only when there are such orders. |
Point of Contact |
|
Email Order Receipt | Enables users to send a copy of the receipt to designated email addresses. |
| |
Order Totals | Displays a breakdown of the total food and beverage cost, discounts applied, administrative fees (excluding tip), pre-payment tip (displayed for POS orders with fee tip or gratuity), tip, and various types of taxes (itemized separately and exclusive of inclusive taxes), culminating in the final total order cost. |
Payment |
|
Displays payment details. This area is displayed only after at least one payment record is added to this order. | |
Order Total | Total value of the order, displayed only after at least one payment record is added to this order |
Tip | Sum of tips, displayed only after at least one payment record is added to this order |
Payment | Sum of payments, displayed only after at least one payment record is added to this order |
Order Balance | Order Total + Tip - Payment, displayed only after at least one payment record is added to this order |
Refund Detail | Displays refund details. This area is displayed only when there are refund orders. Currently, the refund function is exclusively accessible through POS. |
SAVE AS PDF | Enables users to save the order receipt as a PDF file on their local computer when clicked. |
CANCEL ORDER | Enables users to cancel the order when clicked. Note that this button is hidden for POS orders or when a payment has been added to the order. |
Note
Logged-in authorized users that do not have the Place Advanced Day Orders permission cannot edit order receipts.
Order Breakdown
In the Order Breakdown area:
Select - or + to increase or decrease the item quantity, or directly type the required number. This field accepts numbers 1-99.
Select Modify to edit an item.
If an item is not a bundle product and does not have modifiers, the Modify link is hidden.
Select Review to check the details of an item.
If an item is not a bundle product and does not have modifiers, the Review link appears.
Select Remove to delete an item.
Select Add New Item to add an item.
If ADO transition is enabled for an event:
If the event has not passed its ADO cutoff time, it allows all the above operations.
If the event is within the transition period:
When the Modify SuiteSpot ADO Items toggle is activated, the logged-in user can perform all the above operations. But note that only items existing in the transition menu can be added.
When the Modify SuiteSpot ADO Items toggle is deactivated, the logged-in user is restricted to adding only those items found in the transition menu, and other operations are not allowed.
Note
For more information about ADO transition, see Advanced Day Ordering (ADO).
For information about how to activate the Modify SuiteSpot ADO Items toggle, see XCAT Ordering Settings - Obsolete.
Payment Detail
The Payment Detail area displays:
List Header | Description |
|---|---|
Method | Displays information dependent on the payment method.
|
Amount | Amount paid by this payment record |
Order Tip | Tip paid by this payment record |
Invoice Tip | Tip paid by this invoice |
Transaction Type | Categorization of a transaction |
State | State of the payment record |
Time | Time the payment record was created |
Payment Total | Total amount paid per this payment record |
Refund Detail
The Refund Detail area displays:
List Header | Description |
|---|---|
Refund Number | System-generated refund order ID This link navigates to the details of the refund order. |
State | State of the refund order |
Refund Total | Refund Amount + Refund Tip |
Refund Tip | Amount of tip that is returned to the customer |
Reason to Refund | Explanation or cause for why the refund is requested |
Edit ADO Order
→ →
An ADO order cannot be edited if:
The event of the order has passed its ADO cutoff time or has been closed.
If ADO transition is enabled for an event, Transition Cutoff Date and Transition Cutoff Time serve as the new ADO cutoff date and time. For more information, see Advanced Day Ordering (ADO).
The order is in the closed, deleted, purged, voided, voided-post-payment, or fully-paid-but-not-closed state.
To edit an ADO order:
In the event calendar, locate the event.
Select the EDIT ORDER or REVIEW ORDER link.
For more information, see Distinct Order Links Based on Varying Conditions.
From the event detail page on the right, select the right arrow next to the suite whose orders are to be edited.
If selecting EDIT ORDER, go to step 5 directly.
To change the event, select the left or right arrow located on the respective side of the event image.
In the expanded area, select EDIT of an existing order.
Follow the procedure to:
Review Order
→ →
Inactive accounts are unable to review orders.
To review an order:
In the event calendar, locate the event.
Select the REVIEW ORDER link.
For more information, see Distinct Order Links Based on Varying Conditions.
From the event detail page on the right, find the suite with existing orders.
To change the event, select the left or right arrow located on the respective side of the event image.
Select the right arrow next to the suite.
In the expanded area, select EDIT or VIEW of an existing order.
If an existing order has been fully paid or closed, the VIEW button is displayed; if an existing order is in Open, Saved, or Committed state, the EDIT button is displayed.
Alternatively, select START NEW ORDER. For more information, see Place ADO Order.
On the Order Receipt page, review details of the order.
For details, see Order Receipt Details.
Cancel Order
Only orders that do not have payment records and do not pass the Advanced Day Ordering (ADO) cutoff time can be canceled.
Either on the Review Order or Order Receipt page, select CANCEL ORDER to cancel an order.
The following table lists the access paths of the Order Receipt and Review Order pages.
Page | Access Path |
|---|---|
Order Receipt | → → → → → |
→ → → → | |
Review Order | → → → → → → → |
→ → → → → → → → |
EDO Orders
This chapter covers the key actions related to Event Day Ordering (EDO) orders, including placing, editing, and viewing orders. It provides step-by-step instructions to help efficiently manage and track EDO orders.
Place EDO Order as Authorized User
Inactive accounts are unable to place EDO orders.
To place an EDO order as an authorized user:
Log in to the SuiteSpot as an authorized user.
For more information, see Login to SuiteSpot as Authorized User.
Use one of the methods listed below to open the Build Order page:
Location
Button
Follow-up Steps
EDO banner in the Welcome to SuiteSpot popup or at the top of the calendar
START NEW ORDER
From the Select Suite popup, select a suite to place an EDO order.
If the login account has only one suite, the Build Order page opens directly without the popup.
Select Continue.
VIEW ORDERS
From the event detail page on the right, find the suite to an EDO order.
Select START NEW ORDER next to the suite.
Calendar
START ORDER
From the event detail page on the right side, find the suite to place an EDO order.
If the login account has only one suite, the Build Order page opens directly without the event detail page.
Select START NEW ORDER next to the suite.
VIEW ORDER
From the event detail page on the right, find the suite to an EDO order.
Select START NEW ORDER next to the suite.
Note
In the event detail page on the right, the event can be changed by selecting the left or right arrow located on the respective side of the event image.
If the selected suite is a target suite after reassignment, the menu from the source suite is used. For multiple source suites, the menu from any source suite may be used.
Follow the procedure to add desired items.
Follow the procedure to edit the item quantity.
Follow the procedure to remove unnecessary items.
Select REVIEW ORDER.
On the Review Order page, review order details and select CONTINUE.
Alternatively, select CONTINUE SHOPPING to go back to the menu or select CANCEL ORDER to revoke the order.
Edit quantities of items or remove unnecessary items if necessary.
If there are unavailable items, the CONTINUE button remains disabled until those items are removed.
On the Payment Details page:
If needed, select Modify to update the information about the Point of Contact. For details, see Modify Point of Contact.
In the Tips field, type the tip to pay.
Use the Select Payment Method dropdown to select a payment method.
If a credit card payment method is selected, select an existing credit card or select Add New Credit Card. For details about how to add a new credit card, see Add Credit Card on the Payment Details Page.
Select COMPLETE ORDER.
Selecting a credit card that expires before the event starts disables the COMPLETE ORDER button.
Alternatively, select CONTINUE SHOPPING to go back to the menu or select CANCEL ORDER to revoke the order.
From the Confirm popup, select CONFIRM to submit the order.
Once the order is submitted, a confirmation email is sent to the user's SuiteSpot login email address.
Alternatively, select CANCEL to revoke the order.
On the Order Confirmation page:
select Save As PDF to save the order confirmation information to the local computers.
select PRINT CONFIRMATION to print the order confirmation information.
select the can be viewed here link to view the order's receipt.
type an email address and select SEND CONFIRMATION to send an order confirmation email to the provided address.
select START A NEW ORDER to place more orders.
Place EDO Order as Registered Guest User
To place an EDO order for an event and suite as a registered guest user:
Scan the Scan to Order code.
For more information, see Export Scan to Order Code.
Log in to the SuiteSpot as a guest user.
For more information, see Login to SuiteSpot as Registered Guest User (for Mobile Users Only).
From either the ASSIGNED SUITES or OTHER SUITES tab of the Select Suite page, select the suite to place an EDO order.
To quickly find the desired suite, type the suite name in the search box.
Select CONTINUE.
On the Build Order page, use the top-navigation pane to browse the menu.
To change the suite, click the down arrow next to the suite in the upper-right corner, then select a new suite from the Change Suite popup.
To efficiently locate desired items, in the upper-right of the page, select the search icon and type keywords in the search box to initiate a search for them.
To find items with specific allergen and preference tags, in the upper-right of the page, select the filter icon and then select the desired tags.
Filtering criteria, including allergen and preference tags, apply only to first-level products.
For instructions on adding an allergen to a product, refer to Allergens. Note that if Option of an allergen is set to Does Not Contain , this allergen is not displayed.
For instructions on adding a preference tag to a product, refer to Product Tags. Note that the Suite Catering supports only the following eight tags: Dairy Free, Gluten Free, Vegetarian, Vegan, Halal, Kosher, Keto, and Paleo.
Select ADD TO ORDER to add the desired item to the order.
If a menu category includes subcategories, select SEE DETAILS to explore further.
If an item has a Modify link, select the link to modify the item.
To clear all the items from the shopping cart, select the shopping cart and then select the trash bin located beside New Items at the top of the cart.
Modify the items if necessary.
On the menu page or in the shopping cart, use the "-" and "+" buttons to increase or decrease the item quantity.
Select Modify next to the item, change the quantities or modifiers of the item, and then select UPDATE ORDER.
Follow the procedure to remove unnecessary items if necessary.
Select REVIEW ORDER.
On the Review Order page, review order details and select CONTINUE.
Alternatively, select Continue Shopping to go back to the menu, or select Cancel Order (upper-right corner) to revoke the order.
Edit quantities of items or remove unnecessary items if necessary.
If there are unavailable items, the CONTINUE button remains disabled until those items are removed.
On the Payment Details page, use the Select Payment Method dropdown to select a payment method.
Currently, only credit card payment is supported.
Select an existing credit card or select Add New Credit Card. For details about how to add a new credit card, see Add Credit Card on the Payment Details Page.
Select COMPLETE ORDER.
Selecting an expired credit card disables the COMPLETE ORDER button.
Alternatively, select Continue Shopping to go back to the menu, or select Cancel Order (upper-right corner) to revoke the order.
On the Confirm popup, select CONFIRM to submit the order.
Alternatively, select CANCEL.
Once the order is submitted, a confirmation email is sent to the user's SuiteSpot login email address.
On the order confirmation page:
select Save As PDF to save the order confirmation information to the mobile phone.
select the can be viewed here link to view the order's receipt.
type an email address and select SEND CONFIRMATION to send an order confirmation email to the provided address.
select START A NEW ORDER to place more orders.
View EDO Order Details
To view an EDO order:
From EDO banner in the Welcome to SuiteSpot popup that is displayed upon login, select VIEW ORDERS.
Alternatively, select VIEW EVENTS & CREATE ORDERS to access the calendar. Then, select VIEW ORDERS from the EDO banner at the top or select VIEW ORDER directly from the calendar.
From the event detail page on the right, find the suite with existing orders.
To change the event, select the left or right arrow located on the respective side of the event image.
Select the right arrow next to the suite.
In the expanded area, select VIEW of an existing order.
View order details on the Order Receipt page.
For details about the order receipt, see Order Receipt Details.
Edit EDO Order
Inactive accounts are unable to place EDO orders.
To edit an EDO order:
From EDO banner in the Welcome to SuiteSpot popup that is displayed upon login, select EDIT ORDER.
Alternatively, select VIEW EVENTS & CREATE ORDERS to access the calendar. Then, select EDIT ORDER from the EDO banner at the top.
From the Select Suite popup, select a suite.
If the login account has only one suite, the Build Order page opens directly without the popup.
If the selected suite is a target suite after reassignment, the menu from the source suite is used. For multiple source suites, the menu from any source suite may be used.
Select CONTINUE.
On the menu page, use the left-navigation pane to browse the menu.
Follow the procedure to:
My Account
→
The My Account page displays:
Menu | Sub-menu | Action |
|---|---|---|
User ADMIN | CONTACT DETAILS | |
LOGIN DETAILS | ||
AUTHORIZED USERS NoteThis menu is invisible to guest users. | ||
ORDERS & BILLING | ORDER HISTORY | |
INVOICES NoteThis menu is invisible to guest users. | ||
PAYMENT METHODS | Update Expired Primary Credit Card NoteGuest users cannot add, edit, or remove gift cards at this time. | |
SUITE ADMIN Note
| PAR STOCK | |
OWNER NOTES | ||
ALLERGENS | ||
APPEARANCE | ||
MENU PREVIEW |
Update Contact Information
→ → →
To update contact information:
Navigate to SuiteSpot MY ACCOUNT.
From the menu on the left, select CONTACT DETAILS.
In the Point of Contact area, update the first name and last name of the contact person.
Updates will be synchronized to the Suite Catering Admin Portal.
In the Additional Contact Methods area, type the business number, home number, or mobile number of the contact person.
Select the Primary radio button of one phone number to set it as the primary phone number.
From the Mailing Address area, select Edit.
The Add link is displayed if the contact person has no mailing address.
On the Mailing Address popup, use the Country dropdown to select a country.
Options of the Country dropdown now include Canada and United States of America.
Type the address line 1, address line 2, and city.
Use the State dropdown to select a state.
In the Zip Code field, type the zip code.
From the lower-right of the Mailing Address popup, select CONFIRM to save your settings.
Alternatively, select CANCEL to discard your changes.
From the lower-right of the Contact Details page, select SAVE CHANGES to save your changes.
Change Login Password
→ → →
To change the login password:
Navigate to SuiteSpot MY ACCOUNT.
From the menu on the left, select LOGIN DETAILS.
From the Change Password area, type the current password, new password, and confirm password.
From the lower-right of the Login Details page, select SAVE CHANGES.
Authorized User
→ → →
The AUTHORIZED USERS menu appears only if the login user has the "Manage Authorized User" permission. For more information, see Assign/Remove Admin User Status.
Authorized users with the "Manage Authorized User" permission can:
Add Authorized User
→ → →
To add an authorized user:
Navigate to SuiteSpot MY ACCOUNT.
From the menu on the left, select AUTHORIZED USERS.
From the Authorized Users page, select ADD USER.
In the New User popup, type the email address of the new user.
From the lower-right of the New User popup, select CONFIRM.
If the user to be added has been added as an authorized user of an account on the Suite Catering Admin Portal in another company but has not been added as an authorized user of an account in the current company yet, a message is displayed, asking whether to import the information of this user. Select Import to import all the information of the user.
If the user to be added has already been added as an authorized user of an account in the current company, an error message is displayed, stating that its email already exists.
Alternatively, select Cancel.
Under the Basic Information area, type the first name and last name of the user in the respective fields.
Required information is indicated by an asterisk.
Under the Phone Numbers area, type a valid phone number for the user. Type only numbers.
At least one phone number is required.
Assign one phone number as the user’s primary phone number by turning on the corresponding Primary toggle. If only one phone number is typed, its Primary toggle is turned on by default. If no country code is typed, the United States country code is used by default.
Under the Address area, select Edit.
In the Mailing Address popup, type required information.
Required information is indicated by an asterisk.
From the lower-right of the Mailing Address popup, select CONFIRM.
Alternatively, select CANCEL.
Under the Permissions area in the New User popup, use the toggle switches to enable or disable user permissions.
When the site-level Enable EDO from SuiteSpot or the account-level Place EDO from SuiteSpot permission is disabled, Place Event Day Orders becomes inactive. For more information, see XCAT Ordering Settings - Obsolete and Setup or Edit Account.
The Manage Par Stock toggle cannot be turned on if the Edit Par Stock Template permission is not granted for the account. For more information, see Add Authorized User.
The Manage Allergens toggle is not visible if the allergen management function is disabled. For more information, see Configure Allergen Settings.
From the lower-right of the New User popup, select SAVE.
Alternatively, select BACK TO PREVIOUS STEP.
After selecting Save, a SuiteSpot registration email will be sent to the email address of the user to be added.
Edit Authorized User
→ → →
To edit an authorized user:
Navigate to SuiteSpot MY ACCOUNT.
From the menu on the left, select AUTHORIZED USERS.
From the Authorized Users page, select Edit located beneath the authorized user.
In the Edit User popup, update user information, as necessary.
Note
If the login user is not a primary user, it cannot edit primary users.
Email addresses of authorized users are not editable.
From the lower-right of the Edit User popup, select SAVE.
Alternatively, select BACK TO PREVIOUS STEP.
Reset Password for Authorized User
→ → →
Resetting passwords for authorized users in the Invite Expired state is not possible.
To reset the password for an authorized user:
Navigate to SuiteSpot MY ACCOUNT.
From the menu on the left, select AUTHORIZED USERS.
From the Authorized Users page, select RESET PASSWORD located beneath the authorized user.
This button link is invisible for authorized users in the Invite Expired state.
From the Reset Password popup, select COPY LINK or SEND EMAIL.
Alternatively, select CANCEL.
Visit the copied link or refer to the received email to reset the password.
Resend Invitation for Authorized User
→ → →
Only resend invitation for authorized users that are in the Invite Pending or Invite Expired state.
To resent invitation for an authorized user:
Navigate to SuiteSpot MY ACCOUNT.
From the menu on the left, select AUTHORIZED USERS.
From the Authorized Users page, select RESEND INVITATION located beneath the authorized user.
This button link is invisible for authorized users not in the Invite Pending or Invite Expired state.
From the Resend Invite popup, select COPY LINK or SEND EMAIL.
Alternatively, select CANCEL.
Visit the copied link or refer to the received email to complete the registration of the authorized user.
Delete Authorized User
→ → →
To delete an authorized user:
Navigate to SuiteSpot MY ACCOUNT.
From the menu on the left, select AUTHORIZED USERS.
From the Authorized Users page, select DELETE located beneath the authorized user.
No authorized user can delete itself.
A non-primary authorized cannot delete primary authorized users.
From the Confirm popup, select YES.
Alternatively, select CANCEL.
View Order History
→ → →
To view order history:
Navigate to SuiteSpot MY ACCOUNT.
From the menu on the left, select ORDER HISTORY.
In the Order column on the ORDERS , FAVORITE, or CANCELLED tab page, select an order number link.
For details about the Order History page, see Order History Details.
To filter orders, see Filter Orders.
To search for orders, see Search Orders.
On the Order Receipt page, view order details.
For details about the Order Receipt page, see Order Receipt Details.
Note
Account orders created on POS are also displayed in this list.
Unclosed EDO orders placed on SuiteSpot are excluded from this list.
Filter Orders
→ → →
To filter orders:
Navigate to SuiteSpot MY ACCOUNT.
From the menu on the left, select ORDER HISTORY.
On the ORDERS or CANCELLED tab, filter orders by Event Name or Suite.
To filter orders by Event Name:
To the right of Event Name, select the triangular icon.
From the Event Selector popup, search for and select the desired events.
Only events occurring within the next year are available.
Select CONFIRM.
Alternatively, select CANCEL or RESET.
To filter orders by Suite:
To the right of Suite, select the triangular icon.
From the dropdown menu, select the desired suites.
Select APPLY.
Alternatively, select RESET.
Note
Notes for order filtering:
The FAVORITE tab does not support order filtering.
To clear filtering criteria, select Clear All from the upper left of the order list.
Search Orders
→ → →
To search orders:
Navigate to SuiteSpot MY ACCOUNT.
From the menu on the left, select ORDER HISTORY.
Search orders by:
keyword
In the search box in the upper-right of the orders list, type keywords.
last four digits of a credit card used as the payment method for orders:
From the upper-right of the ORDERS tab on the Order History page, select SEARCH BY CARD.
In the Search By Card popup, type the last four digits of a credit card.
From the Search By Card popup, select CONFIRM.
Alternatively, select RESET.
To clear the search criteria, select Clear All or select the cross icon from the upper-left of the orders list.
Order History Details
→ → →
The Order History List allows users to quickly:
View a list of all existing orders on the ORDERS tab;
Only orders with the statuses Open, Saved, Committed, Suspended, Closed, and Voided (only those voided on SuiteSpot) are visible.
View a list of all favorite orders on the FAVORITE tab;
View a list of all archived orders on the ARCHIVED tab;
Use the Show Cancelled Orders toggle to control the display of cancelled orders.
Only orders canceled from SuiteSpot are displayed as Cancelled, while orders canceled from SCP or POS are displayed as Uneditable.
Select the star icon to mark orders as favorite orders;
Select an order number link to view order details.
Note
Logged-in authorized users who belong to inactive accounts or lack the Place Advanced Day Orders permission can only view the order history.
List Header | Description |
|---|---|
Order | System-generated order ID Selecting the order ID link in this column to view the receipt of the order. For more information, see Order Receipt Details. |
Event Name | The event occurring for the day/time of the order |
Suite | The suite to deliver the order |
Status | Indicates if the order is editable. Orders that have not passed the ADO cutoff time are indicated by a green dot. This column is hidden for inactive accounts and is not visible on the FAVORITE and ARCHIVED tab pages. NoteIf ADO transition is enabled for an event, Transition Cutoff Date and Transition Cutoff Time serve as the new ADO cutoff date and time. For more information, see Advanced Day Ordering (ADO). |
Event Date | Indicates the day on which the event is scheduled to take place |
Total | Total value of the order |
Balance | Unpaid balance of the order This column is hidden on the FAVORITE and ARCHIVED tab pages. |
Favorite Order Name | The name given to an order when marking it as a favorite To mark an order as a favorite or remove it from the favorite status, simply click the star icon in this column. For more information, see step 3 in Place ADO Order. |
View Invoice History
→ → →
To view invoice history:
Navigate to SuiteSpot MY ACCOUNT.
From the menu on the left, select INVOICES.
In the Invoice column on the UNPAID or PAID sub-page, select an invoice number link.
For more information, see PAID and UNPAID Details.
On the Invoice page, view invoice details.
If necessary, in the Order column on the UNPAID or PAID sub-page, select an order number link to view the order receipt.
For more information, see Invoice Details and Order Receipt Details.
PAID and UNPAID Details
→ → →
The PAID and UNPAID sub-pages allow users to quickly:
View a list of all existing invoices,
Search and sort invoices,
Select an invoice number link to view invoice details,
Select an order number link to view order details.
The PAID and UNPAID sub-pages displays:
List Header | Description |
|---|---|
Invoice | System-generated invoice ID Selecting the invoice number link in this column to view the invoice receipt. For details about the invoice receipt, see Invoice Details. |
Order | System generated order ID Selecting the order number link in this column to view the order receipt. For details about the order receipt, see Order Receipt Details. |
Suite | The suite to deliver the order |
Event Name | The event occurring for the day/time of the order |
Event Date | Indicates the day on which the event is scheduled to take place |
Payment | Amount that has been paid for the invoice |
Balance | Unpaid balance of the invoice NoteThis column is visible on the Unpaid sub-page only. |
Invoice Total | Total value of the invoice NoteThis column is visible on the PAID sub-page only. |
Due Date | The specific date by which the invoice must be paid Note
|
Action | Invoice payment link NoteThis column is visible on the Unpaid sub-page only. |
Pay Invoice
→ → →
An invoice payment is possible only when the online invoice payment toggle is on. For details, see Enable Invoice Payment.
To pay an invoice:
Navigate to SuiteSpot MY ACCOUNT.
From the menu on the left, select INVOICES.
In the Action column on the UNPAID sub-page, select a Pay Invoice link.
This column is hidden if the online invoice payment toggle is off.
In the Pay Invoice popup, type the amount to pay in the Amount field.
Alternatively, select the Pay All link to pay off the balance.
In the Additional Tip field, type the tip to pay.
In the Notes field, type remarks on this payment.
In the Payment Method field, select either Credit Card or Gift Card from the dropdown.
Alternatively, select Pay by a New Card to add a new credit card or gift card. For more information, see Add Credit Card and Add Gift Card.
The Gift Card option is visible only when one or more active gift card payment profiles (with Givex as the provider) are configured for the current site.
If Gift Card is selected, select Balance Inquiry to check the gift card balance if necessary.
(Optional) Select Save This Card to save the card to the account.
This option is visible only when the logged-in authorized users have the Add/Edit Cards on File permission.
Select Capture for credit card payments or Process for gift card payments.
Alternatively, select CANCEL.
After payment, an Invoice Payment Confirmation email is automatically sent to the primary user, the SuiteSpot login user, and the Point of Contact of the order.
Invoice Details
The Invoice page displays:
Area | Description |
|---|---|
Order Summary | Displays the order number, suite name, and due date of the invoice. NoteThe Due Date field is visible for an unpaid invoice only. If an invoice's Due Date Range is set to None, the Due Date remains blank. |
Point of Contact | Displays contact information of the order. The name, email, and phone numbers of the authorized user who placed the order are displayed. If Phone (Business), Phone (Home), or Phone (Mobile) is not configured, the field is hidden. |
Email Invoice Payment Receipt | Allows sending the invoice receipt to specified email addresses. NoteThis section is only visible for fully or partially paid invoices. |
Displays payment details. | |
Invoice Total | Total value of the invoice. |
Tip | Tip included in the invoice. |
Payment | Amount that has been paid for the invoice. |
Balance | Unpaid balance of the invoice. |
SAVE AS PDF | Enables users to save the invoice receipt as a PDF file on their local computer when clicked. |
Enable users to pay the invoice. NoteThis button is hidden for fully paid invoices. |
Payment Details
The Payment Details area displays:
List Header | Description |
|---|---|
Method | Credit card brand and the last 4 digits of the credit card number |
Amount | Amount paid by this payment record For refund records, the amount is displayed as negative. |
Tip | Tip paid by this invoice |
State | State of the payment record |
Transaction Type | Categorization of a transaction |
Time | Time the payment record was created |
Payment Total | Total amount paid per this payment record |
Add Credit Card
→ → →
Logged-in authorized users that do not have the Add/Edit Cards on File permission cannot add a credit card.
To add a credit card:
Navigate to SuiteSpot MY ACCOUNT.
From the menu on the left, select Payment Methods.
From the Credit Cards tab on the Payment Methods page, select Add New Credit Card.
In the Add New Credit Card area, type required information.
From the lower right of the Add Credit Card area, select Save to add the credit card.
Alternatively, select Cancel to cancel adding this credit card.
Note
The newly added credit card is saved both to the order and the order's account.
Set Primary Credit Card
→ → →
To set a credit card as the primary for an account:
Navigate to SuiteSpot MY ACCOUNT.
From the menu on the left, select Payment Methods.
From the Credit Cards area on the Payment Methods page, select the circular dot next to Primary of a credit card to set it as primary.
Note
If a primary credit card is already assigned to open orders, a popup will appear.
To update both the primary card and the payment method for those orders, select Update Card & Payment. If the new card will expire before the event date of any orders, this button is disabled.
To update only the primary card while keeping the current payment method for open orders, select Update Card Only.
To cancel the process, close the popup.
Update Expired Primary Credit Card
If the primary credit card expires, an error message prompting an update is displayed in the following locations:
At the top of the event calendar
At the top of the Payment Methods page (accessible via My Account > ORDERS & BILLING > PAYMENT METHODS)
To update an expired primary credit card:
From the error message at the top of the screen, select Update.
From the Update Credit Card popup, select a credit card.
Alternatively, select Add New Credit Card.
From the lower-right area of the popup, select CONFIRM.
Alternatively, in the Add New Credit Card popup, type information about the credit card to be added and select SAVE.
Note
If the expired primary credit card has been assigned to orders in the Committed, Open, Saved, Suspended, or Pending states, the new primary credit card will automatically become the payment method for these orders after the update.
Edit Credit Card
→ → →
Logged-in authorized users that do not have the Add/Edit Cards on File permission cannot edit a credit card.
To edit a credit card:
Navigate to SuiteSpot MY ACCOUNT.
From the menu on the left, select Payment Methods.
From the CREDIT CARDS tab on the Payment Methods page, select Edit for the credit card to modify.
In the Edit Credit Card area, type card description.
The card brand and card number are not editable.
From the lower right of the Edit Credit Card area, select Save to save your changes.
Alternatively, select Cancel to discard your changes.
Remove Credit Card
→ → →
Logged-in authorized users that do not have the Remove Cards on File permission cannot remove a credit card.
Primary cards and cards assigned as a payment method for orders in the Committed, Open, Saved, Suspended, or Pending states are not eligible for removal.
To remove a credit card:
Navigate to SuiteSpot MY ACCOUNT.
From the menu on the left, select Payment Methods.
From the CREDIT CARDS tab on the Payment Methods page, select Remove for the credit card to delete.
The Remove button link is invisible to logged-in authorized users that do not have the Remove Cards on File permission.
On the Confirm popup, select YES to confirm the removal.
Alternatively, select CANCEL to revoke the removal.
If the credit card to be removed is the assigned payment method for orders in the Committed, Open, Saved, Suspended, or Pending states, an information popup appears, prompting the selection or addition of a replacement credit card.
Note
If a user removes a credit card at the account level and then re-adds it after a few days, the ongoing order will be paid using this credit card, resulting in the display of two credit cards with the same brand and last 4 digits.
Add Gift Card
Logged-in authorized users that do not have the Add/Edit Cards on File permission cannot add a gift card.
To add a gift card:
Navigate to SuiteSpot MY ACCOUNT.
From the menu on the left, select Payment Methods.
From the Payment Methods page, select GIFT CARDS.
The Gift Cards tab is visible only when one or more active gift card payment profiles (with Givex as the provider) are configured for the current site. For more information, see Gift Provider Profiles.
From the GIFT CARDS tab on the Payment Methods page, select Add New Gift Card.
In the Add New Gift Card area, type required information.
PIN is required only when the PIN toggle is enabled in BIN Ranges. For more information, see BIN Ranges.
(Optional) Select Balance Inquiry to check the gift card balance.
From the lower right of the Add Gift Card area, select Save to add the gift card.
Alternatively, select Cancel to cancel adding this gift card.
Edit Gift Card
Logged-in authorized users that do not have the Add/Edit Cards on File permission cannot edit a gift card.
To edit a gift card:
Navigate to SuiteSpot MY ACCOUNT.
From the menu on the left, select Payment Methods.
From the Payment Methods page, select GIFT CARDS.
The Gift Cards tab is visible only when one or more active gift card payment profiles (with Givex as the provider) are configured for the current site. For more information, see Gift Provider Profiles.
From the GIFT CARDS tab on the Payment Methods page, select Edit for the gift card to modify.
In the Edit Gift Card area, type card description.
The card number is not editable.
From the lower right of the Edit Gift Card area, select Save to save your changes.
Alternatively, select Cancel to discard your changes.
Remove Gift Card
Logged-in authorized users that do not have the Remove Cards on File permission cannot remove a gift card.
To remove a gift card:
Navigate to SuiteSpot MY ACCOUNT.
From the menu on the left, select Payment Methods.
From the Payment Methods page, select GIFT CARDS.
The Gift Cards tab is visible only when one or more active gift card payment profiles (with Givex as the provider) are configured for the current site. For more information, see Gift Provider Profiles.
From the GIFT CARDS tab on the Payment Methods page page, select Remove for the gift card to delete.
On the Confirm popup, select YES to confirm the removal.
Alternatively, select CANCEL to revoke the removal.
Par Stock Template
→ → →
Users with the Manage Par Stock permission may:
Users without the Manage Par Stock permission may only View Par Stock Template.
For more information, see Add Authorized User and Setup or Edit Account.
Par Stock Template States
The following table lists possible states of a par stock template along with suggested actions.
State | Description | Suggested Action |
|---|---|---|
Not assigned | Indicates that the template has not been assigned to a suite | |
No item | Indicates that the template does not include an item | |
Invalid | Indicates that all the items in the template are invalid |
Add Par Stock Template
→ → →
Only those with the Edit Par Stock Template toggle activated possess the authorization to add and edit par stock templates. For more information, see Setup or Edit Account.
To add a par stock template:
Navigate to SuiteSpot MY ACCOUNT.
From the menu on the left, select PAR STOCK TEMPLATE.
From the Par Stock Template page, select ADD TEMPLATE.
From the Enter Template Name popup, type the template name.
From the Enter Template Name popup, select OK.
Alternatively, select CANCEL.
From the Build Par Stock Template page, select ADD to add items.
If a menu category includes subcategories, select SEE DETAILS to explore further.
To efficiently locate desired items, in the upper-right of the page, type keywords in the search box to initiate a search for them.
To find items with specific allergen and preference tags, from the Allergen and Preference dropdowns on the upper-right of the page, select the desired tags.
Filtering criteria, including allergen and preference tags, apply only to first-level products.
For instructions on adding an allergen to a product, refer to Allergens. Note that if Option of an allergen is set to Does Not Contain , this allergen is not displayed.
For instructions on adding a preference tag to a product, refer to Product Tags. Note that the Suite Catering supports only the following eight tags: Dairy Free, Gluten Free, Vegetarian, Vegan, Halal, Kosher, Keto, and Paleo.
From the lower-right of the Build Par Stock Template page, select REVIEW TEMPLATE.
From the Review Par Stock Template page, review added items.
Changing a product's ID after adding it to the par stock template will result in a not available tag next to the product. If certain added items are tagged as "not available," they cannot be opened but can be removed.
From the Review Par Stock Template page, execute the necessary operations as follows:
Adjacent to items for alternations, select Modify.
Adjacent to items for review, select Review.
Adjacent to items for removal, select Remove.
In the Qty column, use the plus (+) and minus (-) signs, or directly type the quantity in the field to adjust the quantity of items.
To add new items, select EDIT PAR STOCK and perform step 6 again.
From the lower-right of the Review Par Stock Template page, select SAVE TEMPLATE.
A Par Stock template can be saved even if it contains items with "not available" and "modifier required" tags.
Alternatively, select DISCARD CHANGES to abandon the changes or select EDIT PAR STOCK to continue editing this template.
Note
If the Par Stock template menu is not set up, an error message displays, indicating that there is no menu for the Par Stock. For more information, see Configure Menu Settings.
From the lower-right of the Confirm popup, select YES to initiate template assignment.
Alternatively, select NO.
Follow the procedure in Assign Par Stock Template to Suite to assign the template.
Edit Par Stock Template
→ → →
Only those with the Edit Par Stock Template toggle activated possess the authorization to add and edit par stock templates. For more information, see Setup or Edit Account.
To edit a par stock template:
Navigate to SuiteSpot MY ACCOUNT.
From the menu on the left, select PAR STOCK TEMPLATE.
From the Par Stock Template page, select the pen icon to edit the template name.
From the Par Stock Template page, select the Edit link located beneath the template.
Perform steps 9 and 10 in Add Par Stock Template to edit the content of the template.
View Par Stock Template
→ → →
To view a par stock template:
Navigate to SuiteSpot MY ACCOUNT.
From the menu on the left, select PAR STOCK TEMPLATE.
From the Par Stock page, select the View link located beneath the template.
The View link is displayed only for those with the Edit Par Stock Template toggle deactivated.
Remove Par Stock Template
→ → →
To remove a par stock template:
Navigate to SuiteSpot MY ACCOUNT.
From the menu on the left, select PAR STOCK TEMPLATE.
From the Par Stock Template page, select Remove located beneath the par stock template to be removed.
From the Remove Par Stock Template popup, select REMOVE to confirm removal.
Alternatively, select NO to cancel removal.
Note
If using the par stock template, an error message is displayed indicating that this par stock template cannot be deleted.
Assign Par Stock Template to Suite
→ → →
To assign a par stock template to a suite:
Navigate to SuiteSpot MY ACCOUNT.
From the menu on the left, select PAR STOCK ASSIGNMENT.
From the list of suites, locate the desired suite.
From the list of suites, locate the Current Par Stock Template column.
From the Current Par Stock Template dropdown, select the template.
By default, event types inherit the template assigned to the suite at the suite level, while still allowing customization for individual event types.
If the suite-level template is selected but the event type-level template is not selected, the suite-level template applies to the event type.
For more information, see Par Stock Allocation Display Variations.
From the bottom of the suite list, select SAVE CHANGES.
Alternatively, select DISCARD.
Allergens
→ → →
To select and add allergens:
Navigate to SuiteSpot MY ACCOUNT.
From the menu on the left, select ALLERGENS.
The Allergens menu is invisible if the allergen management function is disabled. For more information, see Configure Allergen Settings.
From the Allergens page, select the allergens to be aware of.
Only users with the Manage Allergens toggle activated can select and add allergens. For more information, see Add Authorized User.
If the logged-in user lacks the permission to manage allergens:
A read-only allergen page displays, showing the selected allergens.
If the user's account has no allergens, it shows "None".
Select SAVE CHANGES.
Type or Modify Owner Notes
→ → →
Logged-in authorized users that do not have the Manage Owner Notes permission cannot type or modify owner notes.
To type or modify owner notes:
Navigate to SuiteSpot MY ACCOUNT.
From the menu on the left, select OWNER NOTES.
In the field under the suite name, type or modify owner notes.
From the lower-right of the Owner Notes page, select SAVE CHANGES.
Owner notes updates on this page will be synchronized to suite-level owner notes on the Suite Catering Admin Portal. For more information, see Suite-Level Notes.
Appearance
→ → →
The appearance customization function is exclusive to administrative accounts but is hidden when those accounts are inactive. For more information, see Setup or Edit Account.
Appearance templates enable customization of text fields, colors, and images within SuiteSpot.
Create Appearance Template
→ → →
Upon company-domain binding, the Suite Catering Admin Portal auto-generates the default appearance template. For additional information, see Configure General Settings .
To create a new appearance template:
Navigate to SuiteSpot MY ACCOUNT.
From the menu on the left, select APPEARANCE.
From the Appearance page, locate the appearance template to be used as a basis for creating a new one.
From the Appearance page, select the COPY link of the appearance template.
On the Enter Template Name popup, type a unique name.
On the Enter Template Name popup, select OK.
Alternatively, select CANCEL to revoke the creation.
Rename Template
It is impossible to rename the default or published appearance template.
To rename an appearance template:
Navigate to SuiteSpot MY ACCOUNT.
From the menu on the left, select APPEARANCE.
From the Appearance page, select the pen icon adjacent to the name of the appearance template intended for renaming.
On the Edit Template Name popup, type a unique new name for the appearance template.
On the Edit Template Name popup, select OK to finalize the template renaming.
Alternatively, select CANCEL to revoke the template renaming.
Edit Appearance Template
→ → →
The default and published appearance templates are not editable.
To edit an appearance template:
Navigate to SuiteSpot MY ACCOUNT.
From the menu on the left, select APPEARANCE.
From the Appearance page, select the EDIT link.
In the Edit Mode, select Settings.
On the Customization Settings popup, select the COLORS, TEXT FIELDS, or IMAGES tab to customize the settings.
On the TEXT FIELDS tab, certain fields don't support multiple lines. Pressing Enter won't create new lines in them. When pasting from the clipboard into these text fields, all formatting, including new lines, is removed (multi-line text becomes a single line). In text fields that do support multiple lines, pasted text retains its structure but loses formatting.
For more information about each setting, refer to the tool tips available on the user interface (UI).
In the lower-right of the Customization Settings popup, after completing customization, select SAVE.
The customization settings apply to the real-time preview of the UI, but they will only take effect once this template is published.
Alternatively, select CANCEL.
In the Edit Mode, select Preview to see a preview of the SuiteSpot login page.
The preview pages mirror the actual pages in terms of UI interactions. However, any links or buttons associated with business flows will not trigger further actions.
In the Edit Mode, select Exit Edit.
Alternatively, select Settings to continue customizing the preferences.
Publish Appearance Template
→ → →
The system automatically publishes the default appearance template. Be aware that only one appearance template can maintain a Published status concurrently.
To publish an appearance template:
Navigate to SuiteSpot MY ACCOUNT.
From the menu on the left, select APPEARANCE.
From the Appearance page, select PUBLISH of the appearance template intended for publication.
On the Confirm popup, select YES to confirm the publication.
Alternatively, select CANCEL to revoke the publication.
Delete Appearance Template
→ → →
The default and published appearance template are not eligible for deletion.
To delete an appearance template:
Navigate to SuiteSpot MY ACCOUNT.
From the menu on the left, select APPEARANCE.
From the Appearance page, select DELETE.
On the Confirm popup, select YES to confirm the deletion.
Alternatively, select CANCEL to revoke the deletion.
Preview Menu
→ → →
The menu preview function is exclusive to administrative accounts but is hidden when those accounts are inactive. For more information, see Setup or Edit Account.
To preview a menu:
Navigate to SuiteSpot MY ACCOUNT.
From the menu on the left, select MENU PREVIEW.
From the Menu Preview page, use the Select Menu dropdown to select the menu.
Options in the Select Menu dropdown are the same as those in the Advanced Day Order Online Menu dropdown. For more information, see Configure Menu Settings.
Below the Select Menu dropdown, select PREVIEW.
Note
To find items with specific allergen and preference tags, from the Allergen and Preference dropdowns on the upper-right of the page, select the desired tags.
The preview page does not allow adding items to the shopping cart.