Purchases
Use the Purchases utility to receive electronic invoices and add manual invoices.
Purchases Form Overview
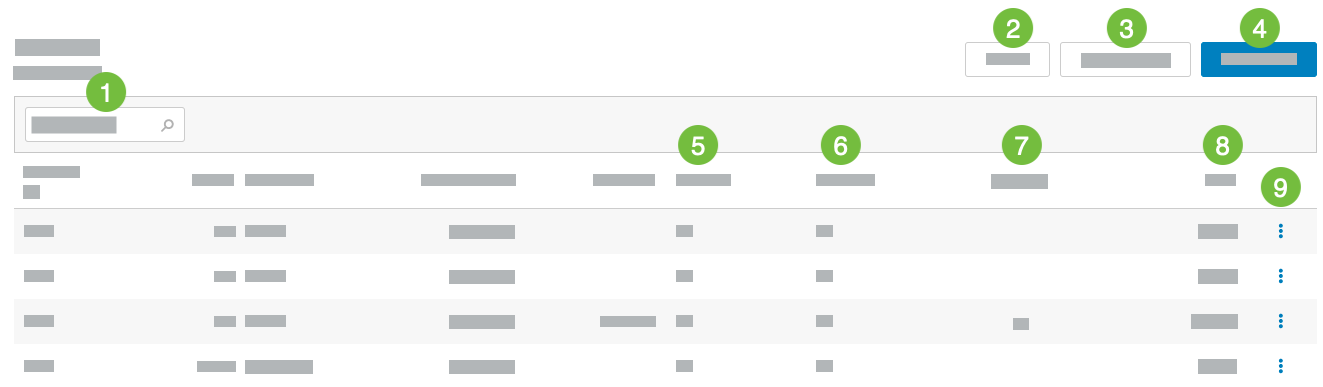 |
1 | Search | Look for purchases based on Vendor, Store, Store Name, Invoice No. |
2 | Print All | Prints every purchase that meets the search criteria. |
3 | Receive Delivery | Receive invoices from vendors that are set up for electronic invoicing. |
4 | Add Purchase | Adds a new purchase. |
5 | eInvoice? | Shows whether the purchase is an order that was sent to a vendor electronically. |
6 | Unlinked? | Shows whether the purchase contains an inventory item that has not been linked to a vendor's equivalent item. |
7 | Approved | Users designated as Purchase Administrators can approve a purchase. Approved purchases can be exported to an accounts payable system. |
8 | Total | The total monetary amount for the items added in the purchase. |
9 | 3-Dot Menu | Use to Change, Delete, Approve, UnApprove, or Print a purchase. |
Things to Know
- Can a menu item be manually added to the Add Purchase form?
- Is it possible to change the UOM/Case value for an item on the Add Purchase form?
- When receiving a delivery, what are the possible notes that may appear in the Invoice Notes column of the Receive Delivery form?
- Why are invoices missing on the Receive Delivery form?
- Is it possible to make adjustments to item details on an electronic invoice?
- Is it possible to change the date on an electronic invoice?
- What happens if a purchase record is accidentally deleted?
- What is the difference between Expected Deliveries and Future Deliveries?
Can a menu item be manually added to the Add Purchase form? | |
From the lower-left of the form, select +Add Item, and then select the item from the dropdown. If the item is not available from the +Add Item list, contact the Xenial Back Office Administrator. | |
Is it possible to change the UOM/Case value for an item on the Add Purchase form? | |
This field cannot be edited if the "Purchase items from this vendor in UOMs" field is selected in Vendor setup. Changes made here are automatically applied to the item throughout the database, even if the purchase is deleted and begun again. | |
When receiving a delivery, what are the possible notes that may appear in the Invoice Notes column of the Receive Delivery form? | |
The possible notes that may appear include:
| |
Why are invoices missing on the Receive Delivery form? | |
To view all invoices for any date, set the Show Future Deliveries toggle to Yes. | |
Is it possible to make adjustments to item details on an electronic invoice? | |
Yes. Make the adjustments in Xenial Back Office to that specific eInvoice record. The Invoice Number is appended with "-ADJ" to indicate it is an adjusted invoice. | |
Is it possible to change the date on an electronic invoice? | |
The ability to change the date varies depending on system configuration by the Xenial Back Office Administrator. Security options govern whether the date may be changed to a date in the past or to a future date. An additional option governs the maximum number of days into the future to which the date can be changed. | |
What happens if a purchase record is accidentally deleted? | |
Before deleting a purchase record, confirm the correct purchase is selected. If the wrong purchase is deleted, it will need to be added again as a new purchase. | |
What is the difference between Expected Deliveries and Future Deliveries? | |
Expected Deliveries are defined as all orders due on or before the current system date. Future Deliveries shows all orders that have not been received yet (i.e., orders for future dates). |
Purchases - Instructions
Step by step instructions for managing purchases are provided here:
Search - Purchases
→ →
To search for a specific site, type the Store # or Store Name into the Search field.
Select the box next to the target site(s) in the Store List. To select all sites in the Store List, select the box to the left of Store # at the top of the list.
With the target site(s) selected, select the calendar icon in the date selector to choose a date range for the search.
From the calendar popup, define the date range, and then select Apply.
It is also possible to select Period / Week, Today, or Yesterday as the search date or date range.
Select Search. Any records that match the Search Criteria will display in the utility to the right.
Add Purchases Form Overview
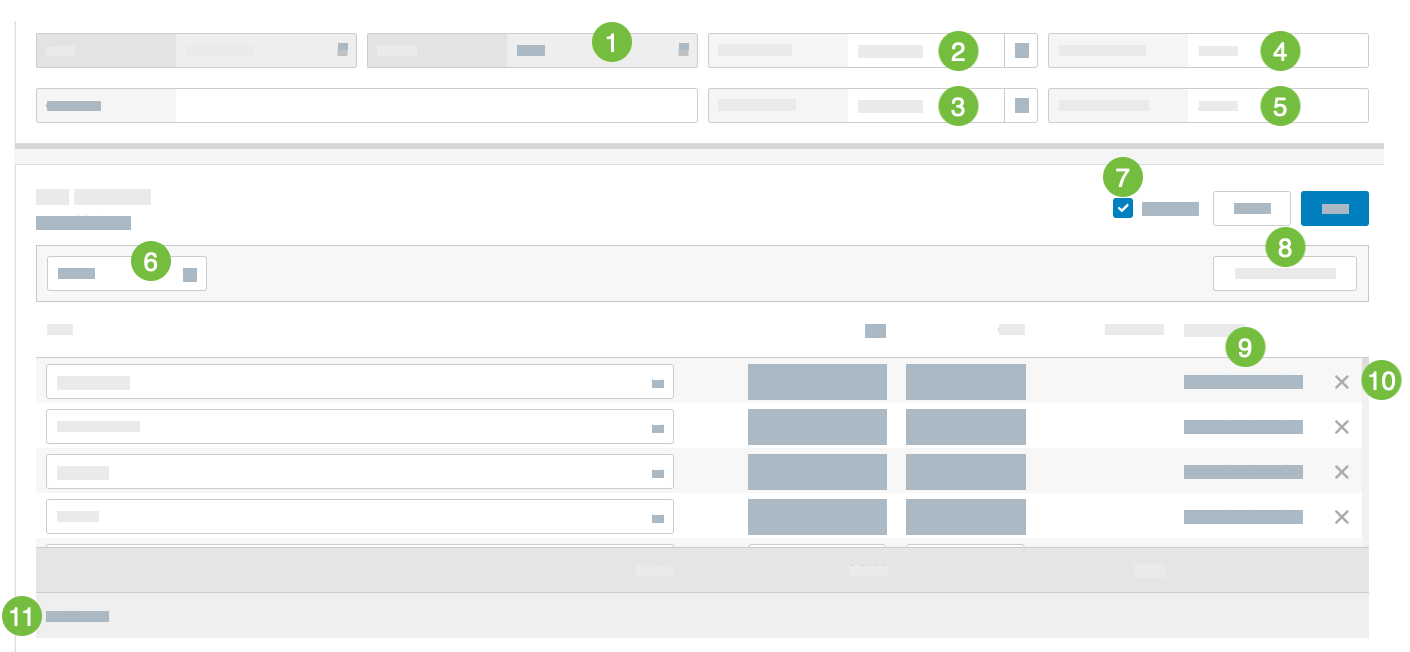 |
1 | Vendor | Select the vendor linked to the inventory items being received. |
2 | Invoice Date | Add the delivery/invoice date. Make sure the correct date is entered, because this date is used for reports |
3 | Date Entered | Select the business date when the purchase was added into inventory. |
4 | Invoice Number | The invoice number from the vendor's paper invoice. |
5 | Balance Amount | Type the invoice (or balancing) total. Subtract any costs that are not being tracked—for example, paper items, tax, and shipping. However, if the Vendors parameter Force Invoice to Balance is enabled, then the Balance Amount must match the Total Cost field. |
6 | Search | Look for inventory items by their item name. |
7 | Approved | If the company uses the "purchase approval" feature, the screen will have a checkbox entitled Approved. This field must be selected by the manager before purchases can be processed and exported. Once approved, only a manager can change or unapprove a purchase. Once exported, these purchases cannot be changed by anyone other than the manager. |
8 | Load Default Items | Select to list all items normally supplied by this vendor, as defined in the Vendors parameter Standard Inventory Items. All items in a standard invoice will appear with the last cost that was added on the last purchase. To remove an item, select X next to the inventory item line. |
9 | UOM/Case | Select this field to make a change in the number of items per case. |
10 | X | Select X to remove the the item from the purchase. |
11 | + Add Item | Use to add an item to a purchase. |
Add Purchases
→
Select Add Purchase.
For each invoice, adjust the settings outlined in Add Purchases Settings.
Select Save.
Add Purchases Settings
Setting | Description |
|---|---|
Store | Select the site. |
Vendor | Select the vendor name. |
Invoice Date | Add the delivery/invoice date. Make sure the correct date is added, because this date is used for reports. |
Invoice Number | Type the invoice number from the vendor's paper invoice. |
Date Entered | Select the business date when the purchase was added into inventory. |
Balance Amount | Type the invoice (or balancing) total. Subtract any costs that are not being tracked—for example, paper items, tax, and shipping. However, if the Vendors parameter Force Invoice to Balance is enabled, then the Balance Amount must match the Total Cost field. |
Approved | If the company uses the "purchase approval" feature, the screen will have a checkbox entitled Approved. This field must be selected by the manager before purchases can be processed and exported. Once approved, only a manager can change or unapprove a purchase. Once exported, these purchases cannot be changed by anyone other than the manager. |
Comment (Optional) | Use this field to explain items or circumstances that are not part of a usual vendor order. |
Load Default Items | Select to list all items normally supplied by this vendor, as defined in the Vendors parameter Standard Inventory Items. All items in a standard invoice will appear with the last cost that was added on the last purchase. To remove an item, select X next to the inventory item line. |
Once the purchase fields have been configured, select + Add Item to add items to the purchase. Adjust the following settings for each selected item:
Setting | Description |
|---|---|
Item | Select the inventory item from the dropdown or type the item's name into the dropdown to search for the item. |
Qty | Type the number of items delivered by order unit (case, gallon, etc.). |
Cost | The last unit cost recorded for this item appears. If there has been a price change for this item, type the new unit cost here. |
Total Cost | The system calculates and displays the total cost for all UOMs ordered. |
UOM/Case | This field cannot be edited if the "Purchase items from this vendor in UOMs" field is selected in Vendor setup. Select this field to make a change in the number of items per case, e.g. if there were previously 303 patties in a case, but now there are 334. The most recent inventory item information added for this item appears. In this popup it is possible to change the order unit for this inventory item. Changes made here are automatically applied to the item throughout the database, even if the purchase is deleted and begun again. Make any necessary changes to the following:
Select OK. |
Change Purchases
→
Use the Change option to change purchases that were added incorrectly, or to correct or remove incorrect entries from a specific invoice. It is also possible to adjust eInvoices.
Search for the desired purchase using the techniques outlined in Search - Purchases.
Select the 3-dot menu next to the target purchase.
From the dropdown, select Change.
Make the necessary changes/adjustments. If the Vendors parameter Force Invoice to Balance is enabled in → → , then after these changes/adjustments are made, the Balance Amount at the top must match the Total Cost at the bottom.
To remove an item, select X next to the inventory item line.
To add an item, select + Add Item.
Select OK.
Delete Purchases
→
Search for the desired purchase using the techniques outlined in Search - Purchases.
Select the 3-dot menu next to the target purchase.
Select Delete. Make sure this is the correct purchase to delete. If the wrong purchase is deleted, it will need to be re-added as a new purchase.
Select Yes.
Print Purchases
Purchases (and associated Comments) are printed either by group or individually.
Print All
→
Use the Print All option to print or view a list of invoices, by site, for a date range.
Search for the desired purchases using the techniques outlined in Search - Purchases.
Purchases for the selected date will be listed. Select Print All.
Print Individually
→
Use the Print option to print a single Purchase.
Search for the desired purchase using the techniques outlined in Search - Purchases.
Select the 3-dot menu next to the target purchase.
Select Print.
Receive Delivery
→ →
The Receive Delivery function enables selecting an outstanding order and moving it into Purchases. Once a delivery is “received” the order is no longer an order, but rather a purchase.
The screen displays a list of all the Expected Deliveries for the site(s).
Expected Deliveries are defined as all orders due on or before the current system date.
Future Deliveries shows all orders that have not been received yet (i.e., orders for future dates).
To display and receive Future Deliveries, toggle the Show Future Deliveries to Yes.
Select Receive next to the desired order. The system copies the order to Purchases and displays the new purchase in the Add Purchase screen. If required, add a valid Balance Amount.
Select Save.