Tills
Use the Tills utility to add and manage cash till records. Forms are provided to account for the various pay types and other items included in a till, and to reconcile the currency amounts with the expected values reported by the POS.
Tills Form Overview
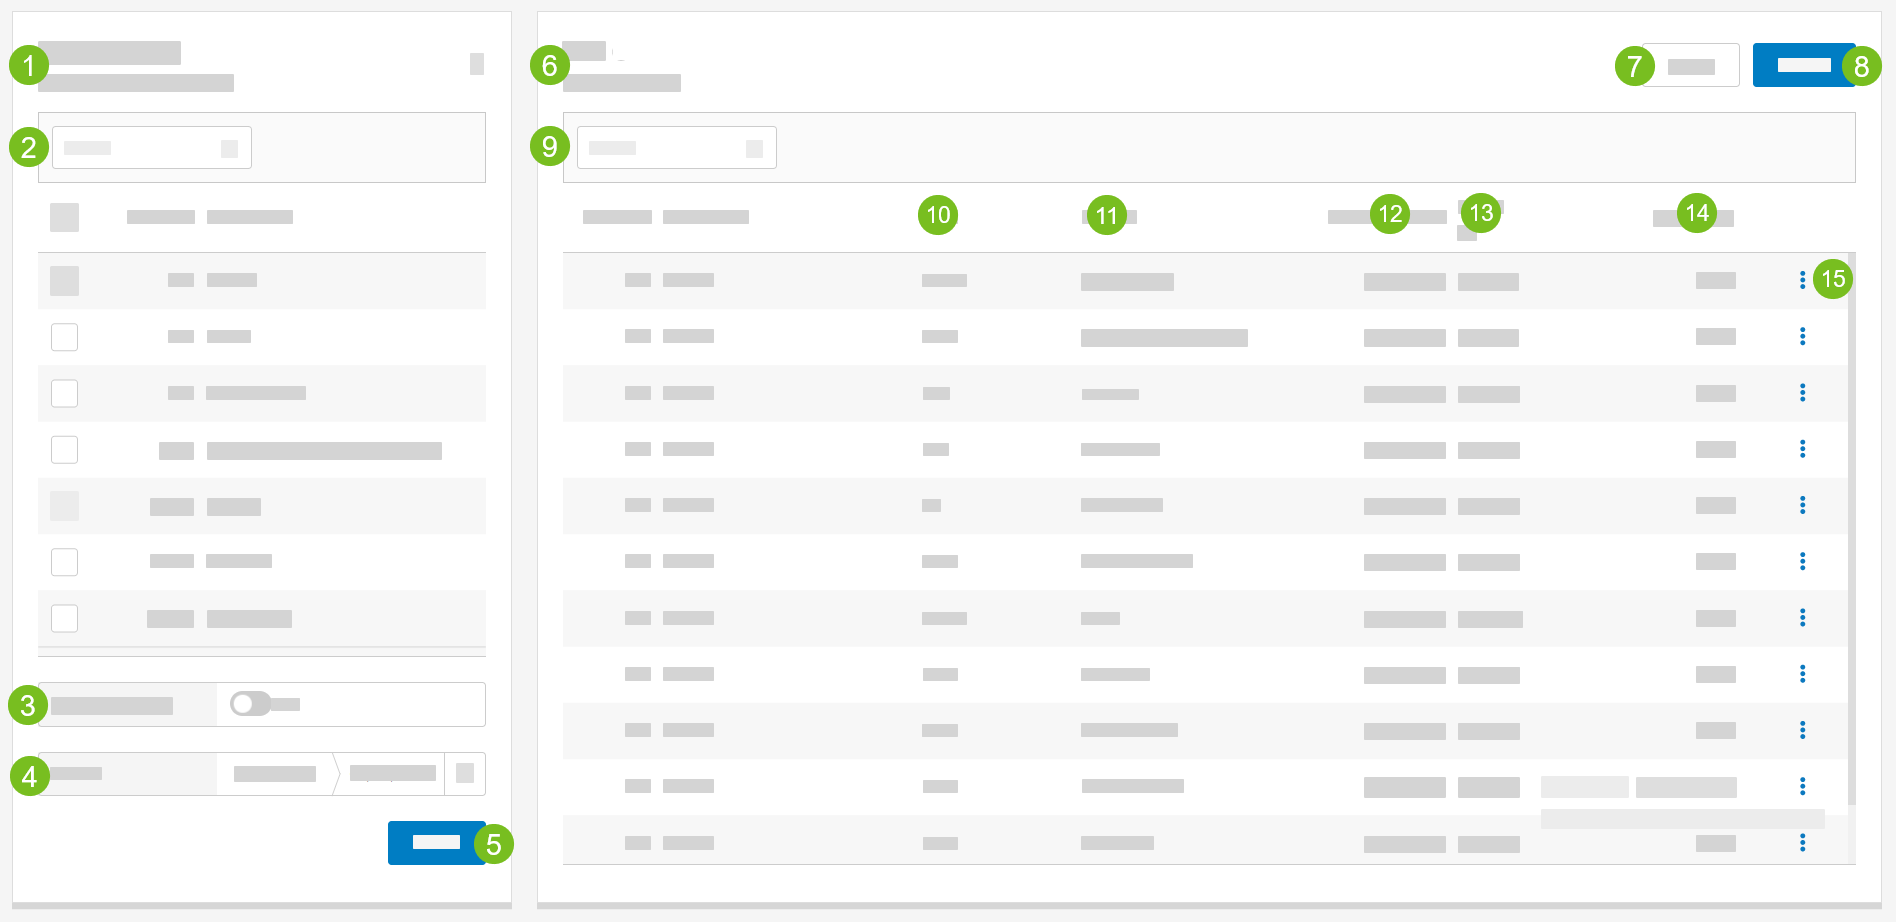 |
1 | Stores / Dates | Select a store and business date to view the list of associated cash till records. |
2 | Search Stores | Look for a specific store based on Store # or Store Name. |
3 | Pending Tills Only | Set the toggle to the desired value:
|
4 | Period / Week | Type the starting and ending dates to view or select the calendar icon to open the period / date picker. |
5 | Search Tills | Select Search to view the cash till records associated with the specified store(s) and date(s). |
6 | Tills | The cash till records associated with the specified store(s) and date(s) are listed here. |
7 | Import a cash till record. | |
8 | Add a new cash till record. | |
9 | Search Entries | Search the list of cash till records based on Store # or Store Name. |
10 | Till # | Specifies the number assigned to the till. |
11 | Cashier | Identifies the name of the cashier assigned to the till. |
12 | Business Date | Specifies the business date associated with the till. |
13 | Status | Identifies the record type:
|
14 | Over / Short | Specifies the difference between the employee count and the system count of the cash till. |
15 | 3-Dot Menu | From the dropdown, select an action to perform on the cash till record:
|
Things to Know
- Is it possible to edit the details of an existing cash till?
- What are the different status types for a cash till?
- Is there a way to filter the till list on the homepage to only list tills in a "Pending" status?
- What are paid in/out transactions?
Is it possible to edit the details of an existing cash till? | |
Yes. Cash till details can be changed, including the pay type count and currency values. See Change Till.
| |
What are the different status types for a cash till? | |
The cash till status types include:
| |
Is there a way to filter the till list on the homepage to only list tills in a "Pending" status? | |
Yes. From the Search form on the homepage, set the Pending Tills Only toggle to the desired value:
| |
What are paid in/out transactions? | |
Paid In transactions maintain an audit record for currency added to a physical cash drawer that is not associated with a sales transaction. Paid Out transactions maintain an audit record for currency removed from a physical cash drawer and used for business expenses. |
Tills - Instructions
Step by step instructions for managing cash tills are provided here:
Search Tills
→
To search for cash tills:
From the Stores / Dates field in the upper-left, select the store numbers / names.
From the Custom field, select the calendar icon to choose a date range for the search.
Set the Pending Tills Only toggle to the desired value:
Yes - Only list cash tills with a status of "Pending".
No - List all cash tills regardless of status.
From the calendar popup, define the date range, and then select Apply.
It is also possible to select Period / Week, Today, or Yesterday as the search date or date range.
From the lower-right of the Stores / Dates field, select Search.
Add Till
→
To add a cash till:
From the upper-right of the Tills screen, select Add Till.
From the upper-section of the screen, define the following:
Note
Depending on how the application is configured by the system administrator, some of the fields described below may not be available to be edited.
Field
Description
Store
From the dropdown, select the store associated with the cash till (if applicable).
Business Date
Type the business date associated with the cash till -OR- select the calendar icon to select a date from a popup calendar.
This field is populated with the current business date by default.
Till #
Type the Till Number assigned to the cash till.
Cashier
From the dropdown, select the name of the cashier assigned to the cash till.
Comments
Type any comments or notes about the cash till.
Counted By
Type the name of the employee who counted the cash till.
POS Employee ID
The POS ID for the employee associated with the cash till.
This field value is imported from the POS system and cannot be edited.
Till Reconciliation
To account for items included in the till:
From the Add Till section, select the Till Reconciliation tab (if necessary).
In the POS field, type the currency value as reported by the POS for each listed item.
In the Till field, type the currency value that is present in the till for each listed item.
Forms are provided for the following items to facilitate the counting process:
The following describes the additional fields on the Add Till section:
Field | Description |
|---|---|
Difference | Specifies the difference between the POS and Tills fields. |
Funds Accounted For | Specifies the total currency of the items in the till that were counted by the user. |
Funds To Account For | Specifies the total currency of the items as reported by the POS. |
Over/Short | Specifies the difference between the funds accounted by the user and the funds reported by the POS. |
Funds Available For Deposit | Specifies the total currency of the items that are identified as items to include in the deposit. |
Final Skim | Specifies the difference between the total cash value in the till minus the "Starting Bank" amount. |
Count Cash
To count the cash in the till:
From the Till Reconciliation tab, locate the Cash item.
From the Till field of the Cash item, select the currency amount link.
From the Cash window, type the quantity of each listed denomination in the Item Count column.
The Amount field value is updated automatically.
The Total Amount field specifies the total currency amount.
From the lower-right of the Cash window, select OK.
Count Credit Cards
To count the credit cards in the till:
From the Till Reconciliation tab, locate the Total Credit Cards item.
From the Till field of the Total Credit Cards item, select the currency amount link.
From the Total Credit Cards window, type the quantity and currency amount for each listed credit card type:
In the Count field, type the total number of transactions.
In the Amount field, type the total currency amount.
The Total field specifies the total count and currency amount for all credit card types.
From the lower-right of the Total Credit Cards window, select OK.
Add Cash Skim
To add a cash skim:
From the Till Reconciliation tab, locate the Skim item.
From the Till field of the Skim item, select the currency amount link.
From the lower-left of the Skim window, select + Add Item.
Define the following:
Field
Description
Skim Time
Type the time when the cash skim was performed OR select the calendar icon to select the time from a popup clock.
Amount
Type the currency amount of the cash skim.
Note
The Total Amount field below the grid specifies the total currency amount of all cash skims in the till.
Manager
Type the name of the manager who approved the cash skim.
Comments
(optional) Type comments or notes about the cash skim.
From the lower-right of the Skim window, select OK.
Add Paid In
To add a Paid In transaction:
From the Till Reconciliation tab, locate the Paid Ins item.
From the Till field of the Paid Ins item, select the currency amount link.
From the lower-left of the Paid Ins window, select + Add Item.
Define the following:
Field
Description
Description
Type a description of the Paid In.
Account
From the dropdown, select the applicable account for the Paid In.
Amount
Type the currency amount of the Paid In.
Note
The Total Amount field below the grid specifies the total currency amount of all Paid Ins in the till.
From the lower-right of the Paid Ins window, select OK.
Add Paid Out
To add a Paid Out transaction:
From the Till Reconciliation tab, locate the Paid Outs item.
From the Till field of the Paid Outs item, select the currency amount link.
From the lower-left of the Paid Outs window, select + Add Item.
Define the following:
Field
Description
Description
Type a description of the Paid Out.
Account
From the dropdown, select the applicable account for the Paid Out.
Amount
Type the currency amount of the Paid Out.
Note
The Total Amount field below the grid specifies the total currency amount of all Paid Outs in the till.
From the lower-right of the Paid Outs window, select OK.
Other Information
Note
Depending on how the application is configured by the system administrator, the Other Information tab may not be available.
To define the value for items that are not included on the Till Reconciliation tab:
From the Add Till section, select the Other Information tab.
In the Value field, type the currency value for each listed item.
From the upper-right of the Add Till section, select Save.
Change Till
→
To update a cash till record:
Search for the till using the techniques outlined in Search - Tills.
From the 3-dot menu on the row of the cash till, select Change.
Make the necessary changes/adjustments.
The Store associated with a till cannot be modified.
"Finalized" tills are included in a deposit and cannot be modified.
From the upper-right of the Change Till window, select Save.
Print Till
→
To generate a cash till report to download and print:
Search for the till using the techniques outlined in Search - Tills.
From the 3-dot menu on the row of the cash till, select Print.
Delete Till
→
To delete a cash till record:
Search for the till using the techniques outlined in Search - Tills.
From the 3-dot menu on the row of the cash till, select Delete.
When prompted, select Yes to delete the cash till.
Import Till
→
To import a cash till record:
From the upper-right of the Tills screen, select Import.
From the Active Store dropdown, select the store.
A till can only imported from stores that support the Import Till function.
To the right of the Active Store dropdown, select Clear to clear the current store selection.
From the lower-right of the Select Active Store popup, select OK.