Employee Maintenance
Use the Employee Maintenance utility to add and manage employee records including contact information, associated sites, availability, and fixed schedules. Using the Employee Details editor, add time card entries for an employee and specify the associated department and pay rate.
Employee Maintenance Form Overview
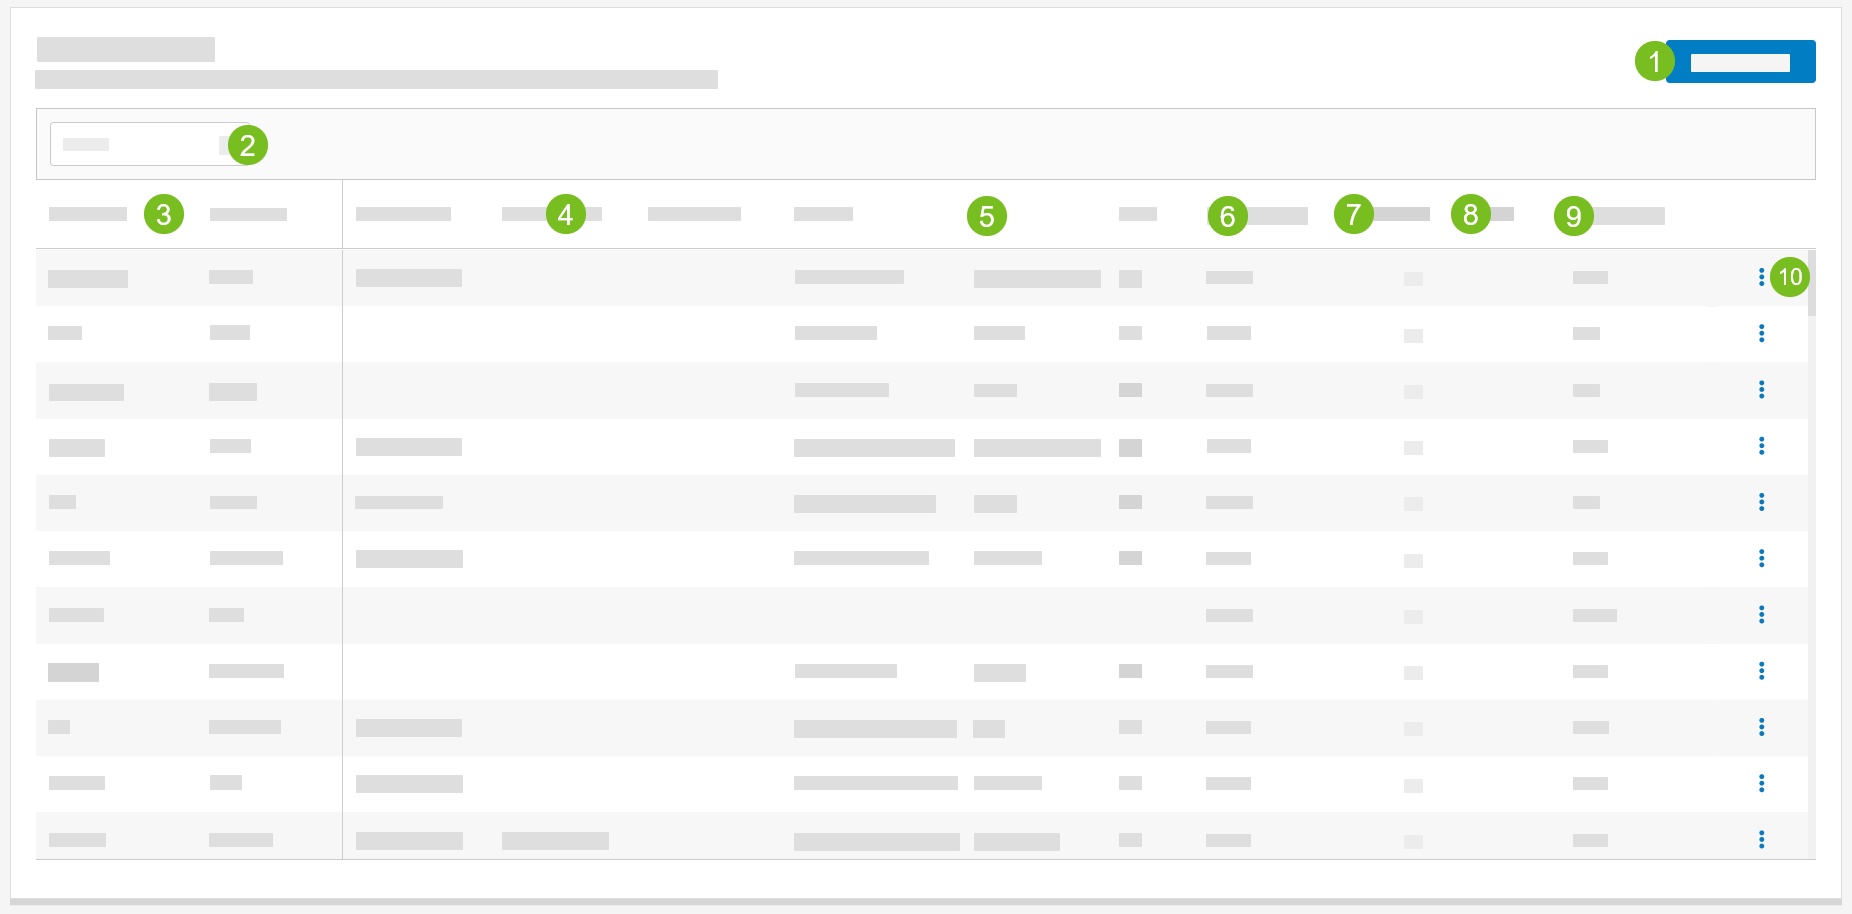 |
1 | Add Employee | Add a new employee record. |
2 | Search | In the Search field, type criteria to search for an employee record. |
3 | Employee Name | Employee's first and last name. |
4 | Employee Phone | Home, Mobile, and Other phone numbers for the employee. |
5 | Employee Address | Address for the employee. |
6 | Primary Store | Identifies the site where the employee works most frequently. |
7 | Active | A check mark indicates an Active employment status. |
8 | Minor | A check mark indicates the employee is a minor. |
9 | Employee ID | ID assigned to the employee. |
10 | 3-Dot Menu | From the dropdown, select an action to perform on the employee record:
|
Things to Know
- Is it possible to access employee records from multiple sites?
- Is it possible to filter the employee search results on the Search page to only include employees with pending time off requests?
- Is it possible to associate an employee with more than one site?
- Where is an employee's scheduling availability specified?
- When creating a Fixed Schedule for an employee, is it possible to include breaks?
Is it possible to access employee records from multiple sites? | |
Yes. From the Search Options field on the Search page, select one of the following:
| |
Is it possible to filter the employee search results on the Search page to only include employees with pending time off requests? | |
From the Time Clock field, select Pending availability changes to set the following search criteria:
| |
Is it possible to associate an employee with more than one site? | |
Yes. From the Stores page of Employee Details, identify the stores where the employee is available to work. The Primary Store field on the Stores page identifies the store where the employee works most frequently. | |
Where is an employee's scheduling availability specified? | |
Specify an employee's availability for scheduling from the Availability page of Employee Details. For each day of the week, specify the starting and ending time of the availability period. | |
When creating a Fixed Schedule for an employee, is it possible to include breaks? | |
Yes. From the Fixed Schedules page of Employee Details, toggle Schedule Breaks to Yes to add breaks to fixed employee schedules. Toggle Allow Shift Extension to Yes to automatically extend a shift by the duration of the break time when a break is added to the shift. |
Employee Maintenance - Instructions
Step by step instructions for managing employees are provided here:
Search - Employee Maintenance
→ →
To search for a specific employee:
In the First Name field, type the employee's first name.
In the Last Name field, type the employee's last name.
In the Employee ID field, type the ID number assigned to the employee.
From the Employee Status field, select one or more employment statuses to filter the search results.
From the Search Options field, select one of the following:
Option
Description
Search ALL Stores
Results include employees from all sites.
Search Only "My Stores"
Results only include employees from sites that are associated with the user.
Search Specific Store
Results only include employees from a specific site. From the Specific Store dropdown, select the site.
From the Time Clock field, select Pending availability changes to set the following search criteria:
Results include employees with all employment statuses.
Results only include employees from sites that are associated with the user.
Results only include employees with one or more Time Off requests with a Pending status.
Select Search. Any records that match the Search Criteria will display in the utility to the right.
Add Employee
→
To add an employee record:
In the upper-right of the Employee Search screen, select Add Employee.
Define the settings on the following pages:
Page
Description
General information including name and address.
Phone numbers and email address.
Employment status.
Stores where the employee is available to work.
Availability for labor scheduling.
Add full and partial day off records.
Add a fixed labor schedule.
Add time card entries and define the pay rate.
Settings for the Xenial POS application.
Note
Depending on the integration of the application, the Xenial POS tab may not be available.
From the upper-right of the screen, select Save.
General Settings
Define the following settings to add general information about the employee. Fields marked with an asterisk on the editor are required.
Employee Information
Setting | Description |
|---|---|
Employee ID | Employee identification code/number. |
Ext.Ref | ID code/number for external reference. |
First Name | Employee's first name. |
Middle Name | Employee's middle name. |
Nickname | Employee's nickname. |
Last Name | Employee's last name. |
Street Address | Employee's street address - Line 1. |
Street Address 2 | Employee's street address - Line 2. |
City | City where the employee lives. |
State / Province | State / Province where the employee lives. |
County | County where the employee lives. |
ZIP / Postal Code | Postal Code for street address. |
Hire Date | Date when the employee was hired. |
Next Review | Date when the next employee performance review is scheduled. |
Change Time | This field is not editable. |
Birth Date | Employee's date of birth. |
Social Security # | Employee's Social Security Number. |
Verify Social Security # | Type the employee's Social Security Number again for verification. |
Ignore Labor Law | Toggle Yes to not enforce labor laws in regards to the employee. |
School District | School district where the employee is enrolled (if applicable). To the right of the School District field, select the ellipsis to specify the effective date when a school district update takes effect. |
Other
Setting | Description |
|---|---|
Minor | Toggle Yes if the employee is a minor. If Emancipated Minor is toggled to Yes, the Minor toggle is disabled. |
Cashier | Toggle Yes if the employee is scheduled as a Cashier. |
Emancipated Minor | Toggle Yes if the employee is an Emancipated Minor. "Emancipated Minor" is a legal term that identifies an individual who before attaining the age of majority is freed from control by their parents or guardians. If Minor is toggled to Yes, the Emancipated Minor toggle is disabled. |
Healthcare Qualified | Toggle Yes if the employee qualifies for health care. |
Encounter Log On w/o Clock In | Toggle Yes if the employee is not required to clock in when the employee logs on to Encounter POS. |
Schedule Goal Hours | Ideal number of hours to schedule the employee each week/period. |
Contact Information
Define the following settings to add contact information for the employee.
Setting | Description |
|---|---|
Home Number | Type the employee's home phone number. |
Mobile Number | Type the employee's mobile phone number. |
Other Number | Type an alternate phone number for the employee. |
Email Address | Type the employee's email address. |
Verify Email Address | Type the employee's email address again for confirmation. |
Status Settings
Define the following settings to indicate the employment status of the employee.
Setting | Description |
|---|---|
Active | Toggle to Yes if the employee is currently employed with the company. When toggled to Yes, the other fields on the Status page are disabled. Toggle to No if the employment status is currently inactive. |
Inactive Reason | From the dropdown, select the reason for the inactive employment status. |
Inactive Date | Type the date when the employment status was changed to inactive OR select the calendar icon to select the date from a popup calendar. |
Comment | Type any comments about the inactive employment status. |
Stores
Define the following settings to identify the stores where the employee is available to work.
Setting | Description |
|---|---|
Primary Store | From the dropdown, select the store where the employee works most frequently. |
Assign Employee | For each site listed in the Available Stores section, toggle Assign Employee to Yes if the employee is available to work at the site. |
Availability Settings
To specify the employee's availability for scheduling:
In the lower-left below the grid on the Availability page, select +Add Item.
At the bottom of the grid, locate the new item.
Define the following settings:
Setting
Description
Day
From the dropdown, select the day of the week.
Begin Time
From the dropdown, select the time when the availability period begins.
End Time
From the dropdown, select the time when the availability period ends.
Tip
To the right of an item, select X to remove the item from the grid.
Time Off
From the Time Off page, add the following items for the employee:
Full Days Off
To add a Time Off record for a full day:
From the Time Off page, select the Full Days Off tab.
In the lower-left of the tab, select +Add Item.
Define the following settings:
Setting
Description
Date
In the provided field, type the Time Off date OR select the calendar icon to select the date from a popup calendar.
Comment
Type any comments about the Time Off record.
Status
From the dropdown, select the status of the Time Off record.
Partial Days Off
To add a Time Off record for a partial day:
From the Time Off page, select the Partial Days Off tab.
In the lower-left of the tab, select +Add Item.
Define the following settings:
Setting
Description
Date
In the provided field, type the Time Off date OR select the calendar icon to select the date from a popup calendar.
Begin Time
From the dropdown, select the time when the Time Off record begins.
End Time
From the dropdown, select the time when the Time Off record ends.
Comment
Type any comments about the Time Off record.
Status
From the dropdown, select the status of the Time Off record.
Fixed Schedules
To create a fixed schedule for the employee, define the following settings:
Setting | Description |
|---|---|
Use Fixed Schedules | Toggle to Yes to create a fixed schedule. The other settings on this page are editable when Use Fixed Schedules is toggled to Yes. |
Allow Shift Extension | Toggle to Yes to automatically extend a shift by the duration of the break time when a break is added to the shift. |
Schedule Breaks | Toggle to Yes to add breaks to the employee schedule. |
Schedule Type | Select the type of fixed schedule to add for the employee: Weekly or Monthly/Periods. |
Edit Schedules | Define a fixed labor schedule for the employee: |
Add a Fixed Schedule (Weekly)
To add a fixed weekly schedule:
In the lower-left of the Employee Details - Fixed Schedules page, select Edit Schedules.
For each day of the week on the Fixed Schedule (Weekly) window, select a time of day for the following:
Field
Description
1st Shift Begin Time
Time when the first shift of the day starts.
Break Time
Time when the break starts.
End Time
Time when the first shift of the day ends.
2nd Shift Begin Time
Time when the second shift of the day starts.
Break Time
Time when the break starts.
End Time
Time when the second shift of the day ends.
Note
The Break Time fields are only available when Schedule Breaks is toggled Yes on the Fixed Schedules page.
Split shifts are not supported on a fixed schedule.
In the lower-right of the Fixed Schedule (Weekly) window, select OK.
To clear the values for a day of the week:
To the right of the day of the week row, select the 3-dot menu.
From the popup menu, select Clear.
Add Fixed Schedule (Monthly)
To add a fixed monthly schedule:
In the lower-left of the Employee Details - Fixed Schedules page, select Edit Schedules.
From the Month dropdown in the upper-right, select the month.
For each day of the week, select a time of day for the following:
Field
Description
1st Shift Begin Time
Time when the first shift of the day starts.
Break Time
Time when the break starts.
End Time
Time when the first shift of the day ends.
2nd Shift Begin Time
Time when the second shift of the day starts.
Break Time
Time when the break starts.
End Time
Time when the second shift of the day ends.
Note
The Break Time fields are only available when Schedule Breaks is toggled Yes on the Fixed Schedules page.
Split shifts are not supported on a fixed schedule.
From the lower-right, select OK.
To clear the values for a day of the week:
To the right of the day of the week row, select the 3-dot menu.
From the popup menu, select Clear.
Add Fixed Schedule (Periods)
To add a fixed schedule for a period:
In the lower-left of the Employee Details - Fixed Schedules page, select Edit Schedules.
From the Period dropdown in the upper-right, select the period.
For each listed date, select a time of day for the following:
Field
Description
1st Shift Begin Time
Time when the first shift of the day starts.
Break Time
Time when the break starts.
End Time
Time when the first shift of the day ends.
2nd Shift Begin Time
Time when the second shift of the day starts.
Break Time
Time when the break starts.
End Time
Time when the second shift of the day ends.
Note
The Break Time fields are only available when Schedule Breaks is toggled Yes on the Fixed Schedules page.
Split shifts are not supported on a fixed schedule.
From the lower-right, select OK.
To clear the values for a specific date:
From the right of the date row, select the 3-dot menu.
From the popup menu, select Clear.
Copy Schedule
To copy the current schedule from one period to another:
In the upper-right of the Fixed Schedule (Periods) screen, select Copy.
From the Copy To dropdown, select the period to update with the copied schedule.
From the lower-right of the Copy Schedule window, select Copy.
Time Cards/Pay Rates
Important
To add a time card entry, the employee must be assigned to at least one site. To assign an employee to a site, see Stores.
To add a time card entry for an employee:
From the lower-left of the Time Cards/Pay Rates page, select +Add Item.
Define the following settings:
Setting
Description
Store
From the dropdown, select the site where the employee worked the shift.
Department
From the dropdown, select the department where the employee worked (if applicable).
Time Card Number
Type the time card number.
Pay Rate
Type the pay rate the employee received for the shift.
Pay Rate Time Frame
From the dropdown, select the applicable time frame for the selected pay rate.
Effective Date
In the provided field, type the business date for the shift OR select the calendar icon to select the date from a popup calendar.
Default
Select the default time card entry. Only one entry can be selected. The first entry is selected by default.
History
To view/edit the employee's pay history:
From the History column, select the ellipsis to open the Historical Pay window.
From the Pay Rate Time Frame dropdown, select the applicable time frame for the pay rate.
In the Pay Rate field, type the pay rate the employee received for the shift.
In the lower-right, select OK.
Tip
To the right of an item, select X to remove the item from the grid.
Xenial POS
Note
Depending on the integration of the application, the Xenial POS tab may not be available.
Define the following Xenial POS application settings:
Field | Description |
|---|---|
POS Code | Specifies the Xenial POS code used to identify the employee. This value is generated automatically and cannot be edited. |
POS Role | From the dropdown, select a Xenial POS role to assign to the employee. |
POS Password | Type the password the employee uses to access the Xenial POS application. |
Change Employee
→
To adjust an employee's record:
Search for the desired employee using the techniques outlined in Search - Employee Maintenance.
From the employee list, locate the employee.
To the right of the employee row, select the 3-dot menu.
From the dropdown, select Change.
Make the necessary changes/adjustments.
From the upper-right of the screen, select Save.
Print Employee
→
To print an employee's record:
Search for the desired employee using the techniques outlined in Search - Employee Maintenance.
From the employee list, locate the employee.
To the right of the employee row, select the 3-dot menu.
From the dropdown, select Print.