Portal User Configuration
Portal User Configuration covers a variety of topics:
Invite a New User - Add a new user to the DMB Portal and invite them to register.
Manage User Restaurant Access - Manage user access to selected sites.
Manage Site Hierarchies - Organize site hierarchies to simplify user access management.
Manage User Application Access - Manage group and user access permissions to particular applications and menus.
Manage User Profiles - Manage individual user profiles including email communications.
Access Manager Overview
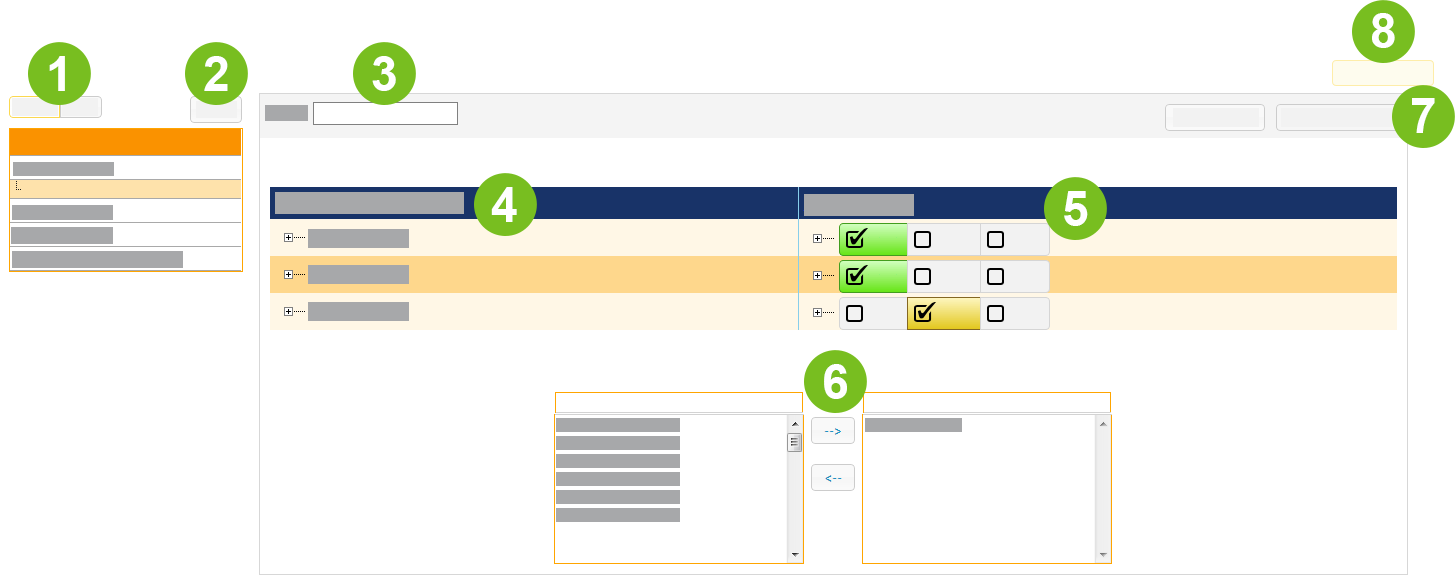
1 | Group or User | Select a group or user to define their access permissions. Default group names are italicized. Access permissions for default groups are predefined and cannot be changed. |
2 | New Group | Create a new group. The new group can optionally inherit the access permissions of a default group. |
3 | Group Name | Edit the name of a user-configured group. Default group names are not editable. |
4 | Menu, Application, Activity | Select a menu, application, or activity to define access permissions for the user/group. Use the + and - buttons to expand and collapse the lists. |
5 | Access Permission | Select the access permission for the corresponding menu, application, or activity. Access permissions defined for an individual user override the permissions defined for the groups to which the user is assigned.
|
6 | User Group Assignment | Manage user group assignments. |
7 | Fold/unfold all | Expand/collapse all the lists to view all the defined access permissions for the selected user/group. |
8 | Save Changes | Save the configuration changes. |
Manage User Access Permissions
→ → →
Access permissions defined for an individual user override the permissions defined for the groups to which the user is assigned.
To manage individual user access permissions:
From the upper-left of Access Manager, select User.
From the User List, select the user name.
From the upper-right of the Access Manager panel, select Fold/unfold all to view all the defined access permissions for the selected user.
From the Access field, customize the access permissions for the group as needed for each component listed in the Menu/Application/Activity field.
From the upper-right of the panel, select Save Changes.
Create a Group
→ → →
To create a user group:
From the upper-left of the Access Manager panel, select Group.
From the upper-right of the Group Name field, select New.
In the Create New Group window, locate the Groups to Follow dropdown, then select the default group to follow.
When a user-configured group follows a default group, it inherits the defined access permissions of the default group. The group also automatically inherits the access permissions for any new applications defined for the default group.
Groups that follow default groups are nested underneath those groups in the Group Name field. Stand alone groups are added to the bottom of the group list.
A user-configured group cannot be followed by another user-configured group.
In the Create New Group window, locate the Name field, then type a descriptive name for the group.
From the bottom of the Create New Group window, select Add Item.
Alternatively, select Cancel to exit out of the Create New Group window without submitting changes.
From the Group Name list on the left, select the newly created group.
From the upper-right of the Access Manager panel, select Fold/unfold all to view all the defined access permissions. The access permissions inherited by a user-configured group from a default group are customizable.
From the Access field, customize the access permissions for the group as needed for each component listed in the Menu/Application/Activity field.
From the upper-right of the panel, select Save Changes.
Tip
To delete a group: Select the group name, and then from the upper-right of the Access Manager panel, select Delete Group.
Add a User to a Group
→ → →
To add a user to a group:
From the upper-left of Access Manager, select Group.
From the Group Name table, select the group.
From the Available users field in the center of the panel, select the user.
To quickly locate a user, type the name in the Search field.
To select multiple users, hold down Crtl on the keyboard and then select the users.
To select the entire list of users, select the first user and then drag the cursor down with the mouse.
To the right of the Available Users field, select the right arrow to move the selected user(s) to the Selected Users field.
From the upper-right of the panel, select Save Changes.
Note
When a user is assigned to multiple groups where one group allows access to an application, but another group does not, the user is allowed to access the application.
Remove a User from a Group
→ → →
To remove a user from a group:
From the upper-left of Access Manager, select Group.
From the Group Name table, select the group.
From the Selected Users field in the center of the panel, select the user.
To quickly locate a user, type the name in the Search field.
To the left of the Selected Users field, select the left arrow to move the selected user(s) to the Available Users field.
From the upper-right of the panel, select Save Changes.
Invite a New User
→ → →
To invite a new user to access The Portal:
From the preferred browser, navigate to The Portal.
From the product tabs listed across the top of the page, select the appropriate product.
From the menu list on the left, select Admin Options.
From the options listed in the center of the page, select Manage User Restaurant Access.
From the Manage User Restaurant Access menu, select Invite a New User.
In the provided fields, type the information for the new user. All fields are required.
From the User Groups field, select the user group assignments for the user. The groups to which a user is assigned determine their access permissions.
When a user is assigned to multiple groups where one group allows access to an application, but another group does not, the user is allowed to access the application.
A user cannot assign another user to a group unless they are also a member of that group.
Select Add & Invite User. An email invitation is sent to the user with instructions to register their account.
Manage User Restaurant Access
→ → →
To allow a user access to one or more sites:
From the preferred browser, navigate to The Portal.
From the product tabs listed across the top of the page, select the appropriate product.
From the menu list on the left, select Admin Options.
From the options listed in the center of the page, select Manage User Restaurant Access.
From the list on the left, select the site or hierarchy group.
Use the + and - buttons to expand and collapse the site/hierarchy group lists.
From the All Users menu, select the user.
Select Allow Selected User(s) Access to: [Site/Hierarchy Name].
To remove a user, select Remove Selected User(s) from: [Site/Hierarchy Name].
Manage User Profiles
→ → →
Users designated as a Primary Contact can manage the profiles of other users in a franchise.
To manage a user profile:
From the preferred browser, navigate to The Portal.
From the product tabs listed across the top of the page, select the appropriate product.
From the menu list on the left, select Admin Options.
From the options listed in the center of the page, select Manage Users.
From the User List, select the user.
Edit the user profile as needed. Include the email address and login credentials.
Select the portal communications to send to the registered email address. These communications include information about new features, enhancements, or required actions for a particular product.
Select Save.
Deactivate a User
→ → →
When a user is deactivated, a red DEACTIVATED status appears on their profile.
To deactivate a user from The Portal:
From the preferred browser, navigate to The Portal.
From the product tabs listed across the top of the page, select the appropriate product.
From the menu list on the left, select Admin Options.
From the options listed in the center of the page, select Manage Users.
From the User List, select the user.
Select Deactivate.
From the top of the Manage Users panel, select Save Changes.
Additional information about deactivated users:
A deactivated user cannot login to The Portal. Their password and answer to their security question are also deactivated.
To reactivate a user, it is necessary to define a new password. The user may then change the assigned password and reenter the security question answer(s) in the Settings menu.