Menu Waste/Promo
Use Menu Waste/Promo to add the amount of prepared menu items thrown or given away. Examples are a cheeseburger thrown out because it was made in error, or baked cookies donated to a charity group.
Menu Waste Promo Form Overview
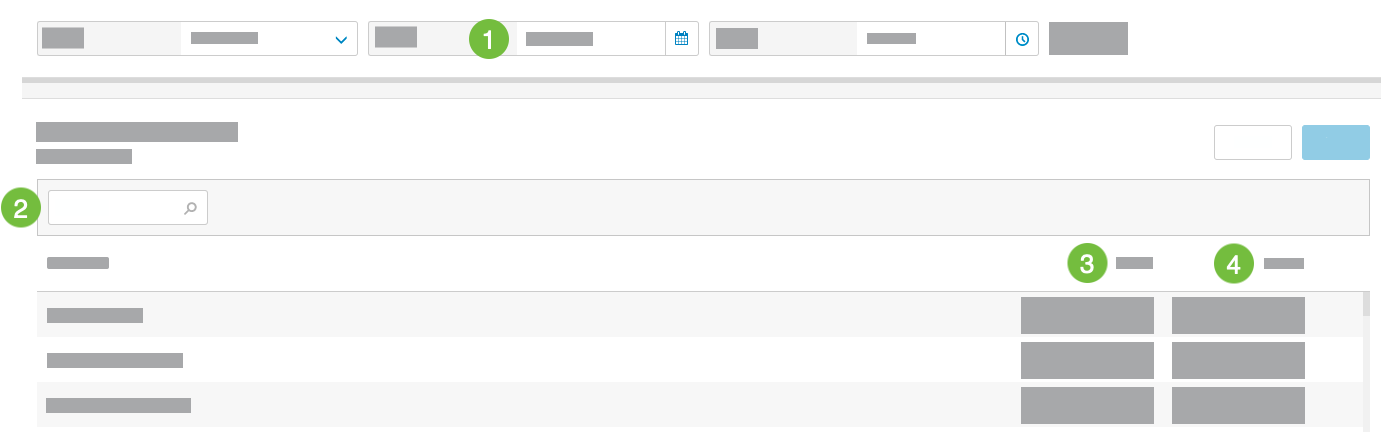 |
1 | Date | This should be the business date of the waste or promo count. The business date is not always the same as the calendar date. Make sure to select the correct business date for the count, especially if performing a waste or promo count after 12 a.m. In this case, the business date will typically be one day before the calendar date. |
2 | Search | Look for items by Menu Item name. |
3 | Waste | The number of menu items wasted. |
4 | Promo | The number of items given out as promotional items. |
Things to Know
- Why are menu items not automatically populated on the Add Menu Waste/Promo form?
- Can a menu item be manually added to the Add Menu Waste/Promo form?
- What if the date that needs to be adjusted is not listed on the Menu Waste/Promo form?
- What if the exact date is unknown when it is necessary to adjust menu waste/promo data?
Why are menu items not automatically populated on the Add Menu Waste/Promo form? | |
The Xenial Back Office administrator determines which items are automatically populated on the form. Contact them to request any changes. | |
Can a menu item be manually added to the Add Menu Waste/Promo form? | |
From the lower-left of the form, select +Add Item, and then select the item from the dropdown. If the item is not available from the +Add Item list, contact the Xenial Back Office Administrator. | |
What if the date that needs to be adjusted is not listed on the Menu Waste/Promo form? | |
The system lists product mix totals for selected site and date(s). If the waste/promo information entry needed is not listed, proceed to the Begin Date and End Date fields at the bottom left of the window and add the needed date. | |
What if the exact date is unknown when it is necessary to adjust menu waste/promo data? | |
if the exact date is unknown, define a custom date range from the Search Criteria form that includes the date that needs to be adjusted. |
Menu Waste/Promo - Instructions
Step by step instructions for Menu Waste/Promo can be found here:
Search Menu Waste/Promo
→ →
To search for a specific site, type the Store # or Store Name into the Search field.
Select the box next to the target site(s) in the Store List. To select all sites in the Store List, select the box to the left of Store # at the top of the list.
With the target site(s) selected, select the calendar icon in the date selector to choose a date range for the search.
From the calendar popup, define the date range, and then select Apply.
It is also possible to select Period / Week, Today, or Yesterday as the search date or date range.
Select Search. Any records that match the Search Criteria will display in the utility to the right.
Add Menu Waste/Promo
→
Select Add Menu Waste/Promo. Select the site. date, and time of the transaction. Proceed to step 2.
Make desired changes to either of these settings:
Setting
Description
Waste (UOMs)
Type the number of units of a menu item discarded as waste.
Promo (UOMs)
Type the number of units of promo given away.
Select Save to save changes and exit or Cancel to exit without saving any changes.
Change Menu Waste/Promo
→
The system lists product mix totals for selected site and date(s). If the waste/promo information entry needed is not listed, proceed to the Begin Date and End Date fields at the bottom left of the window and add the needed date.
If unsure of the exact date, add a date range. Select Search. A new list displays.
Select the 3-dot menu next to the date to change and select Change.
Make desired changes to either of these settings:
Setting
Description
Waste (UOMs)
Type the number of units of menu item discarded as waste.
Promo (UOMs)
Type the number of units of promo given away.
Select Save to save changes and exit or Cancel to exit without saving any changes.
Delete Menu Waste/Promo
→
The system lists product mix totals for selected site and date(s). If the sales information entry needed is not listed, proceed to the Begin Date and End Date fields at the bottom left of the window and add the needed date.
If unsure of the exact date, add a date range.
Select Search. A new list displays.
Select the 3-dot menu next to the date to delete and select Delete.
The screen displays a confirmation popup asking if this is the Menu Waste/Promo to delete.
Select Yes.