Order-Level Procedures
This section describes how to perform actions on orders.
Cancel Order
Cancel an order before it is tendered or saved. This option is helpful in the event of an order entry mistake, customer walkout, or any other situation that requires the dismissal of an order.
Once the order is canceled, a new order is opened with a new order number.
To cancel an order:
From the lower-left, select Options.
From the Options menu, select Cancel Order.
When prompted to confirm the operation, select OK.
Note
Manager approval may be required.
Capture Customer Information
Capture customer information such as name, address, or vehicle description to ensure accurate order delivery.
To capture customer information:
From the lower-left, select Options.
From the Options menu, select Order Information.
From the Order Information form, locate the information to capture.
If necessary, tap and drag the form up and down to access additional sections.
Type the information in the provided fields.
The following describes the sections on the Order Information form:
Note
Some sections may not be available.
Section
Description
Vehicle
Select the color and type of the customer's vehicle and add any optional comments.
Vehicle information helps the drive thru team to quickly recall/locate drive thru orders and deliver the correct order.
General Information
Type the table tent ID for the order in the provided field.
Customer Information
Type the customer's name, email address and phone number in the provided fields.
Address
Type the customer's home address in the provided field.
Pickup/Delivery Information
Type the pickup/delivery date and time requested.
Select Save Order Information.
Note
If the POS is setup to automatically capture customer information, the Order Information form opens when you select Total or Save.
Change Order Destination
To change the order destination for an order:
From the upper-left, select the down arrow next to the order destination list.
From the dropdown, select the order destination. A green circle appears in the upper-left of the selected order destination.
Loyalty Transactions
From the Loyalty section, define loyalty program settings:
To add a loyalty transaction:
On the Order Entry screen, above the order item listbox, select the customer icon
 .
.From the Identify Customer window, scan the loyalty card with the barcode scanner -OR- use the numeric keypad to type the customer's phone number or loyalty account number.
Once the loyalty account is identified, the customer's name is displayed above the order item listbox.
The following actions are available from a dropdown menu next to the customer's name:
Remove Customer - Remove the current customer from the order.
Change Customer - Open the Identify Customer window to lookup a different customer loyalty account to add to the order.
Enter the order.
Scan Loyalty Card
Note
Depending on configuration, this feature may not be available.
To scan a loyalty card with an integrated camera:
From the upper-right of the Identify Customer window, select the camera icon.
Use the integrated camera to scan the QR code on the loyalty card.
Search for Loyalty Account
From the upper-right of the Identify Customer window, select the search icon  to locate an account using any of the following criteria:
Customer name
Email address
Phone number
Loyalty card code
Redeem Loyalty Discount
To redeem a loyalty discount or coupon:
Above the order item listbox, select the customer loyalty with barcode icon.
This icon is not available until an item is added to the order.
From the Customer Code popup, enter the barcode using one of the following methods:
Scan the barcode with the barcode scanner.
Use the keypad to type the barcode -OR- select the keypad icon to open a numeric keypad.
Select the camera icon to scan the barcode (if available).
Select Submit to apply the discount.
Online Orders
An online order is an order that a customer places via the store’s website or the Online Ordering application. An "Information" toast notification is displayed on all terminals when an online order is received.
View Online Orders
The Open & Suspended Orders screen includes an Online Orders lane that lists all online orders that have been sent to the kitchen.
The orders listed in the Online Orders lane are sorted by Pickup Date/Time in ascending order.
The Online Orders lane includes orders in the following status:
Order Status | Description |
|---|---|
Open |
|
Partially Paid |
|
Paid |
|
Note
Paid and Partially Paid online orders cannot be adjusted or voided.
Order-Level Comments
Add a comment or special instruction to an order for the kitchen staff.
Add Order-Level Comment
To add a comment (or special instruction) to an order for the kitchen staff:
From the lower-left of the screen, select Options.
From the Options menu, select Add Comment.
In the Comment field, type the comment.
Select Done. The comment appears below the order item listbox.
Edit Order-Level Comment
To edit an order-level comment:
From the lower-left of the screen, select Options.
From the Options menu, select Edit Comment.
In the Comment field, type the comment.
Select Done. The comment appears below the order item listbox.
Delete Order-Level Comment
To delete an order-level comment:
From the lower-left of the screen, select Options.
From the Options menu, select Delete Comment.
Park Order
Identify a Drive Thru order as "Parked" when the guest is asked to park and wait for their order.
Access Parked orders from Order History or the Open Orders screen.
A Parked order is identified as follows:
Parked Order label with a "P" indicator.
Elapsed time since the order was parked.
To park an order:
From the lower-left, select Options.
From the Options menu, select Park Order.
When prompted to confirm the operation, select Yes.
From the Parked Order Information screen, type the vehicle information, and then select Park Order.
To unpark an order:
From the lower-left, select Options.
From the Options menu, select Unpark Order.
When prompted to confirm the operation, select Yes.
Refund Order
To refund selected order items:
From the upper-left, select the hamburger icon
 .
.From the System Navigation menu, select Functions.
From the Orders column of the Functions screen, select Create Refund Order.
From the Select Items to Refund screen, select the items to refund.
From the lower-left, select Refund.
From the Refund Order screen, select the applicable pay type.
Refund Specific Amount
To perform a Refund Specified Amount transaction:
From the upper-left, select the hamburger icon
.From the System Navigation menu, select Functions.
From the Orders column of the Functions screen, select Refund Specified Amount.
From the Start Refund Order popup, type the refund amount.
Select Apply.
From the Refund Order screen, select the applicable pay type.
Reprint Last Order Receipt
To reprint a receipt for the last order entered on a terminal:
From the lower-left, select Options.
From the Options menu, select Re-Print Last Order.
When prompted to confirm the operation, select OK.
Resend Order to Kitchen
To resend an order to the kitchen and reprint the ticket:
From the upper-left, select the hamburger icon
.From the System Navigation menu, select Order History.
From the Order History screen, select the order to resend.
From the lower-right, select Options.
From the Options menu, select Re-Send to Kitchen.
Resume Saved or Suspended Order
To resume a Saved or Suspended order:
From the upper-left, select the hamburger icon
.From the System Navigation menu, select Open Orders.
Orders are sorted by order destination.
Locate the order, and then select Resume.
The order opens and is ready for additional actions.
Tip
Select New Order in an order destination header to start a new order.
Save Order
Save an order to access at a later time. Edit and tender the saved order from any terminal.
Depending on configuration, you can save an order before adding an item (i.e. an "empty order"). This feature allows a guest to retain their place in line if they are not ready to place their order initially.
Access saved orders from the Open and Suspended Orders screen.
To save an order:
From the lower-left, select Options.
From the Options menu, select Save Order.
Tip
Select Save & Print to save the order and print a receipt.
Split Order
Split an order and move items and order segments to new orders, or share items with new orders, and split costs among multiple individuals.
Note
To split an order may require manager approval.
Move Items to New Orders
To move items from the current order to new orders:
From the lower-left, select Options.
From the Options menu, select Split Order.
The current order is displayed in the left panel of the Split Order screen.
Orders assigned to the same table number are displayed in the right panel.
From the footer of the Split Order screen, select Move Items.
From the left panel, select the items to move.
To deselect an item, tap it again.
To move an entire order segment, select the segment header.
From the right panel, locate the new order, and then select Move Here.
A new order is added to the right panel with the Move Here icon. This enables you to move items to another new order (if necessary).
After you move the applicable items/order segments to new orders, perform one of the following steps:
To save all orders, select Save in the screen footer.
To save all orders and print a receipt, select Save & Print in the screen footer.
To tender an order, select PAY in the order footer.
Select Print Receipt on the tendered order to print a receipt.
Once all orders are tendered, the initial Split Order screen appears.
Tip
To move an item/order segment to the original order, select the item/segment header, and then select Move Here on the original order.
Split Order: Move Quantity of Items
To move a quantity of order items to new orders:
From the lower-left, select Options.
From the Options menu, select Split Order.
The current order is displayed in the left panel of the Split Order screen.
Orders assigned to the same table number are displayed in the right panel.
From the footer of the Split Order screen, select Move Items.
From the left panel, locate the order item(s) to move.
To the left of the items, select the quantity area.
Use plus + and minus - to specify the quantity to move, and then select Done.
From the right panel, locate the new order, and then select Move Here.
A new order is added to the right panel with the Move Here icon. This enables you to move items to another new order (if necessary).
Once the items are moved to new orders, perform one of the following steps:
To save all orders, select Save in the screen footer.
To save all orders and print a receipt, select Save & Print in the screen footer.
To tender an order, select PAY in the order footer.
Select Print Receipt on the tendered order to print a receipt.
Tip
To move an item/order segment to the original order, select the item/segment header, and then select Move Here on the original order.
Share Items
To share order items with other orders:
From the lower-left, select Options.
From the Options menu, select Split Order.
The current order is displayed in the left panel of the Split Order screen.
Orders assigned to the same table number are displayed in the right panel.
From the footer of the Split Order screen, select Share Items.
From the left panel, select the items to share.
To deselect an item, tap it again.
To move a quantity of an item:
To the left of the item, select the quantity area.
Use plus + and minus - to specify the quantity to move, and then select Done.
From the right panel, select Share Here on each order that will share the items.
A check icon is displayed on each selected order.
When Share Here is selected for a new order:
A check icon is displayed on the order.
A new order is added to the right panel with the Share Here icon allowing you to share items with another order (if necessary).
From the screen footer, select Done.
From the Split Order screen, perform one of the following steps:
To save all orders, select Save in the screen footer.
To save all orders and print a receipt, select Save & Print in the screen footer.
To tender an order, select PAY in the order footer.
Select Print Receipt on the tendered order to print a receipt.
Important
Applied item-level discounts are removed from shared items.
Split Order Segments in Share Items Mode
To split all order segments from an order, select Split All Seats from the message panel in Share Items mode.
The first order segment remains on the original order in the left panel of the Split Orders screen.
New orders are created for all other segments. New orders appear in the right panel of the Split Orders screen.
Suspend Order
Suspend an order to access, edit, and/or tender an order at a later time.
Access suspended orders from the Open & Suspended Orders screen.
To suspend an order:
From the lower-left, select Options.
From the Options menu, select Suspend Order.
Variant Builds
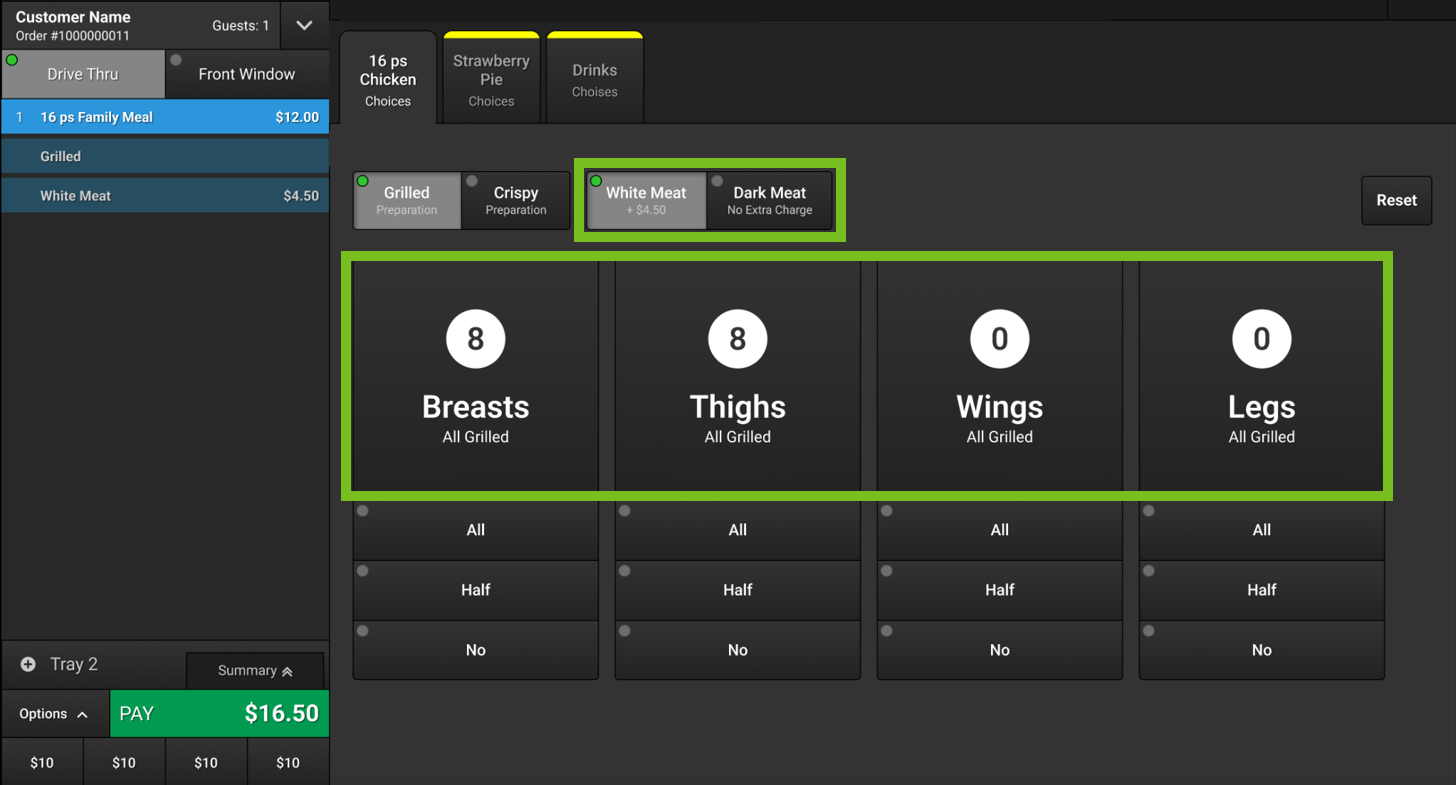
The Variant Builds feature enables the guest to order a meal and choose between different product mixes within that meal.
For example, a site might offer a Chicken Dinner that enables the guest to choose between different mixes of chicken parts, such as Breasts, Thighs, Wings, and/or Legs.
Select a predefined mix, such as White Meat or Half Breasts / Half Legs, or select a customized mix requested by the guest. Select optional product modifications, such as Grilled or Crispy.
Variant Build User Interface
When a bundle (meal) includes a component with a variant build, a unique UI is displayed that enables the Order Taker to select the specific product mixes and modifications requested by the guest.
The following introduces the UI that is used for variant builds:
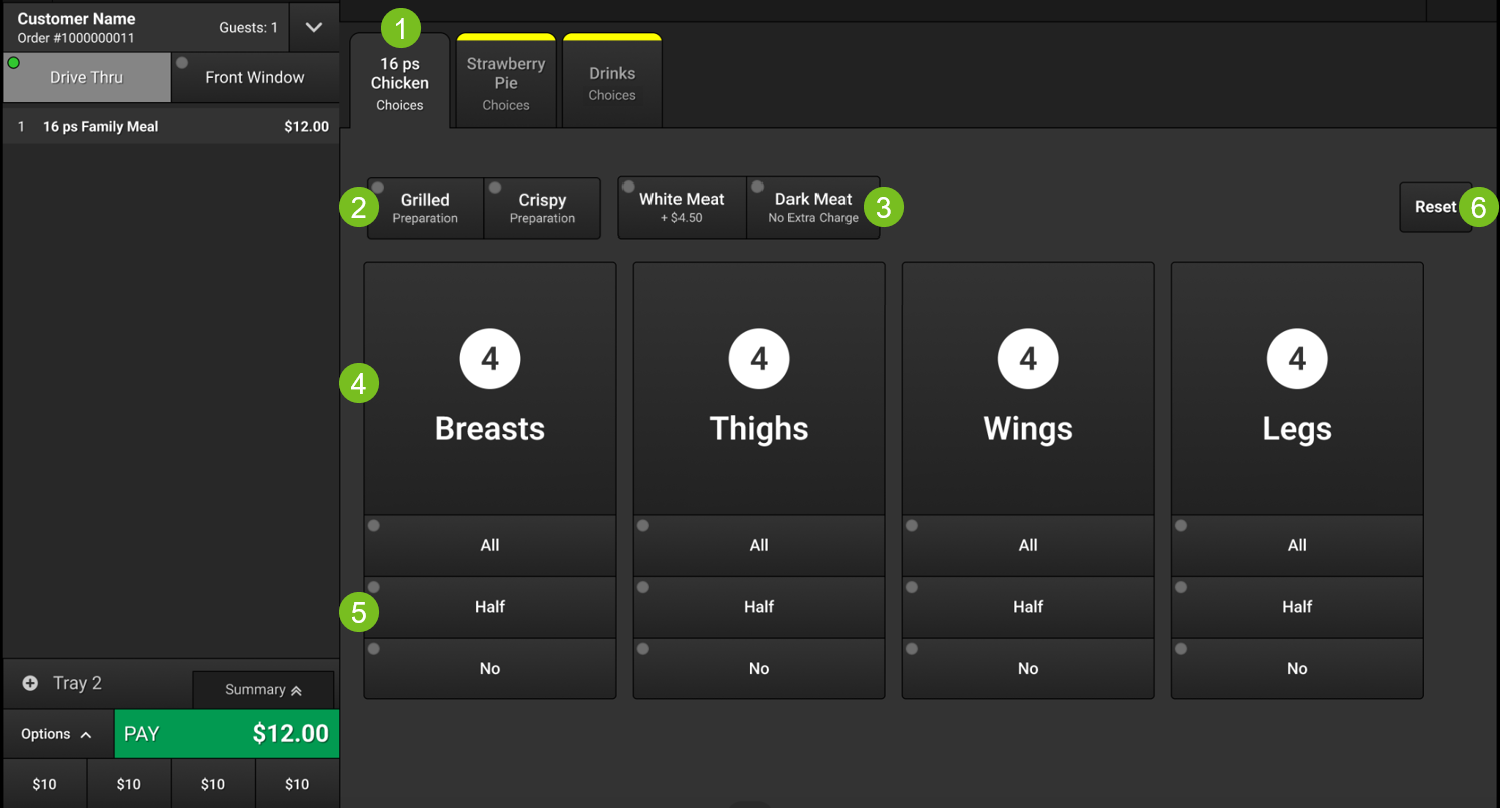 |
1 | Variant Build | Identifies the variant build. Select this tab to access the interactive UI. |
2 | Associated product variant types are listed here. Select a type to apply it to the product selections. The selected type is added to the order as a child item of the Bundle Component. | |
3 | Predefined mixes of product variants are listed here. The extra charge for the mix is displayed on the button (if applicable). Select a mix to add it to the order. The selected mix is added to the order as a child item of the Bundle Component. | |
4 | Main product variants are identified here. The quantity currently added to the order is displayed above the Main Variant name. When a Main Variant Mix or Individual Mix is selected, the Main Variant quantities are updated accordingly. | |
5 | Select the provided buttons to quickly change the quantity of the respective Main Variant. When an Individual Mix is selected, the Main Variant quantities are updated accordingly. | |
6 | Reset | Remove all component modifications and reset the variant build to its default values. |
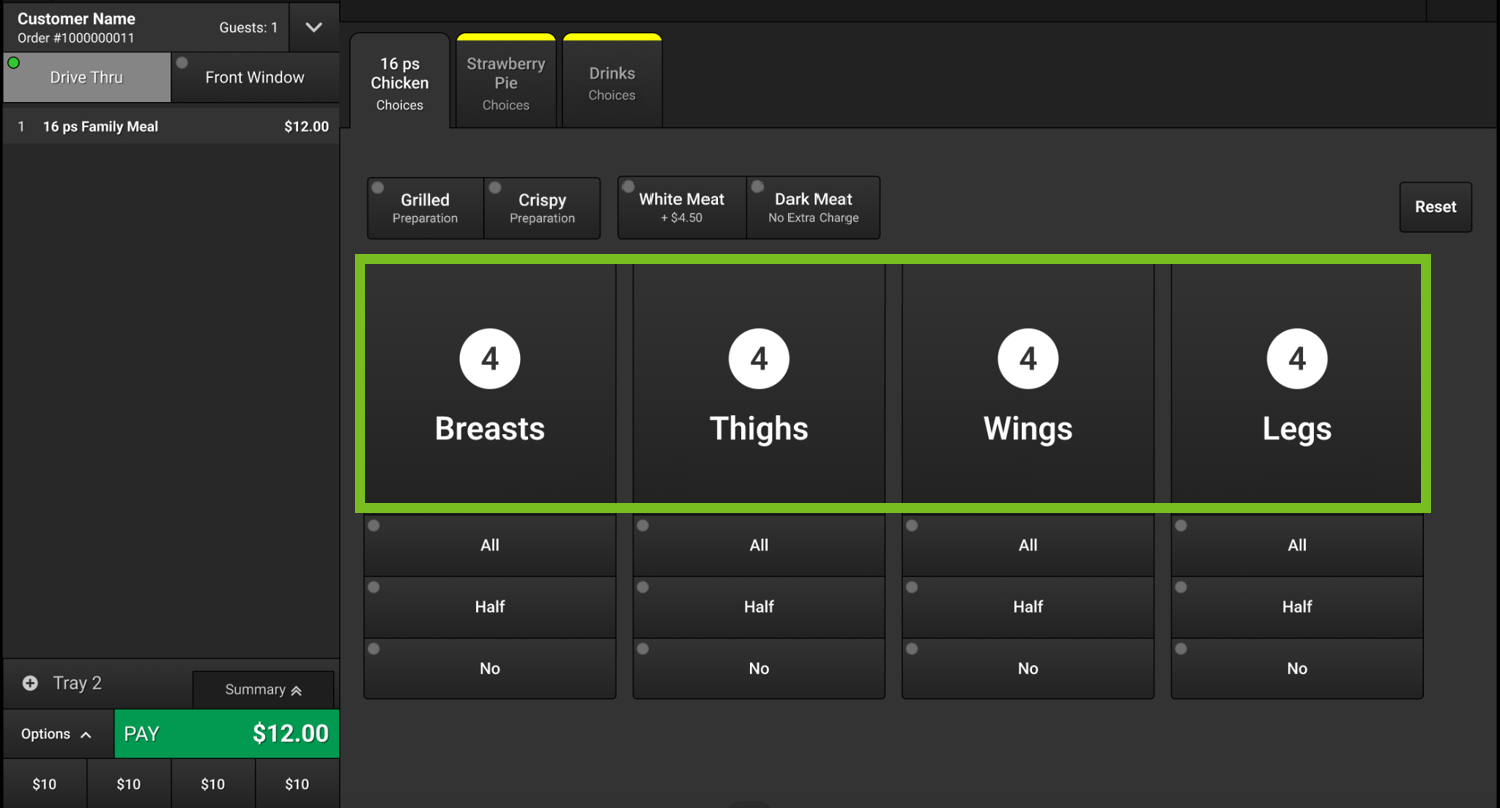
Main Variants
Main Variants are displayed in the center of the screen. The Main Variant quantity that is currently added to the order is displayed above the Main Variant name.
The total product quantity that is defined for the variant build is distributed evenly among the Main Variants by default.
Associated Variant Types
A Variant Build may include Associated Variant Types, which are located to the left of the Main Variant Mixes.
Depending on the amount of available space, the Associated Variant Types may be listed horizontally or selected from a dropdown.
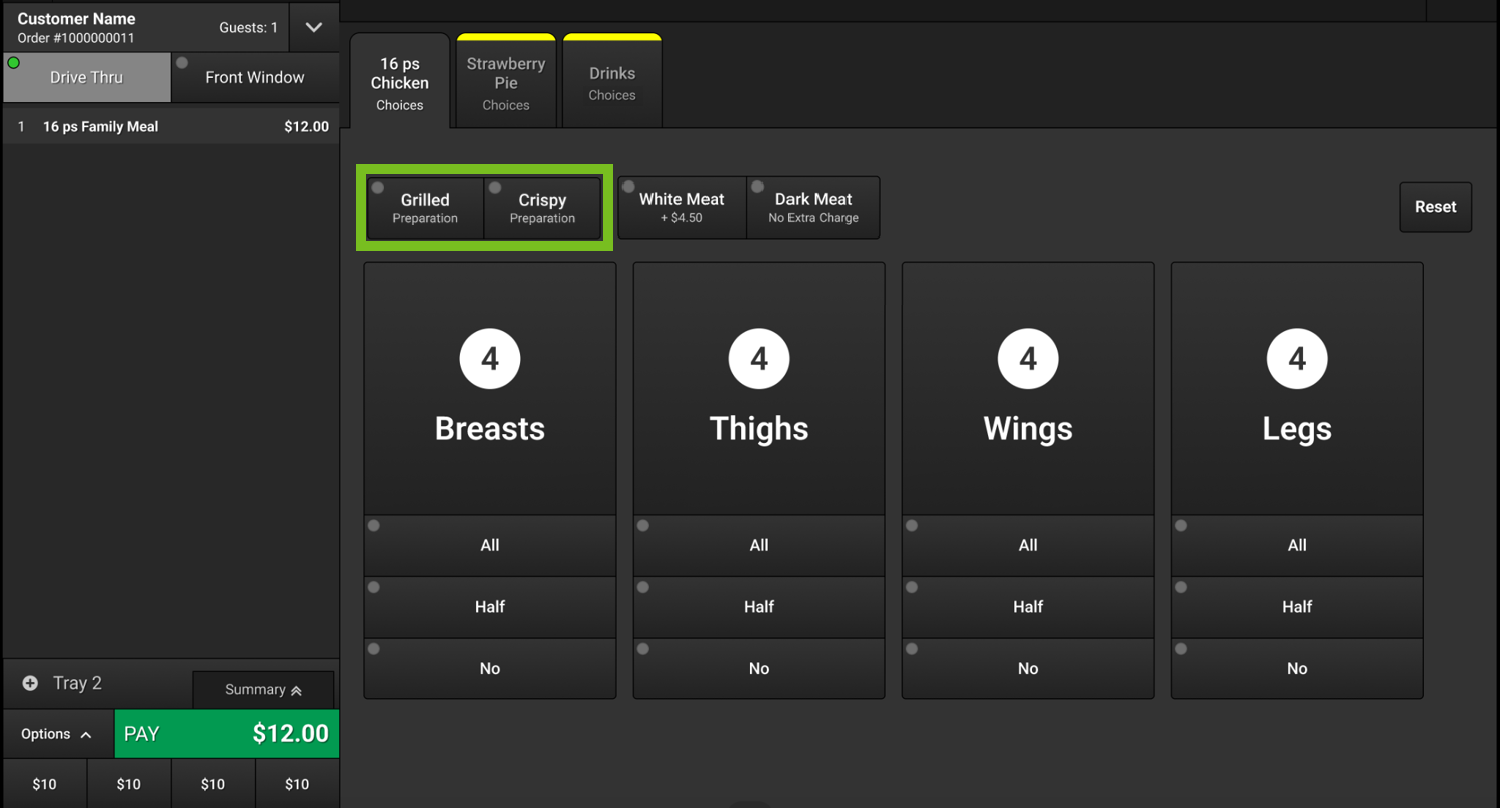 |
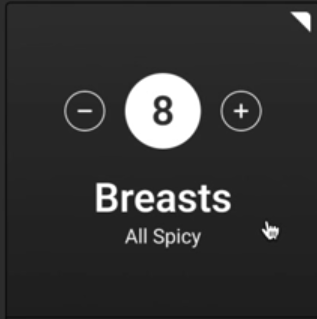
In the following example, Grilled is selected. The button is highlighted and a green dot appears in the upper-left.
 |
"Grilled" is displayed beneath the Main Variant names.
The selected mix is added to the order as a child item of the Bundle Component.
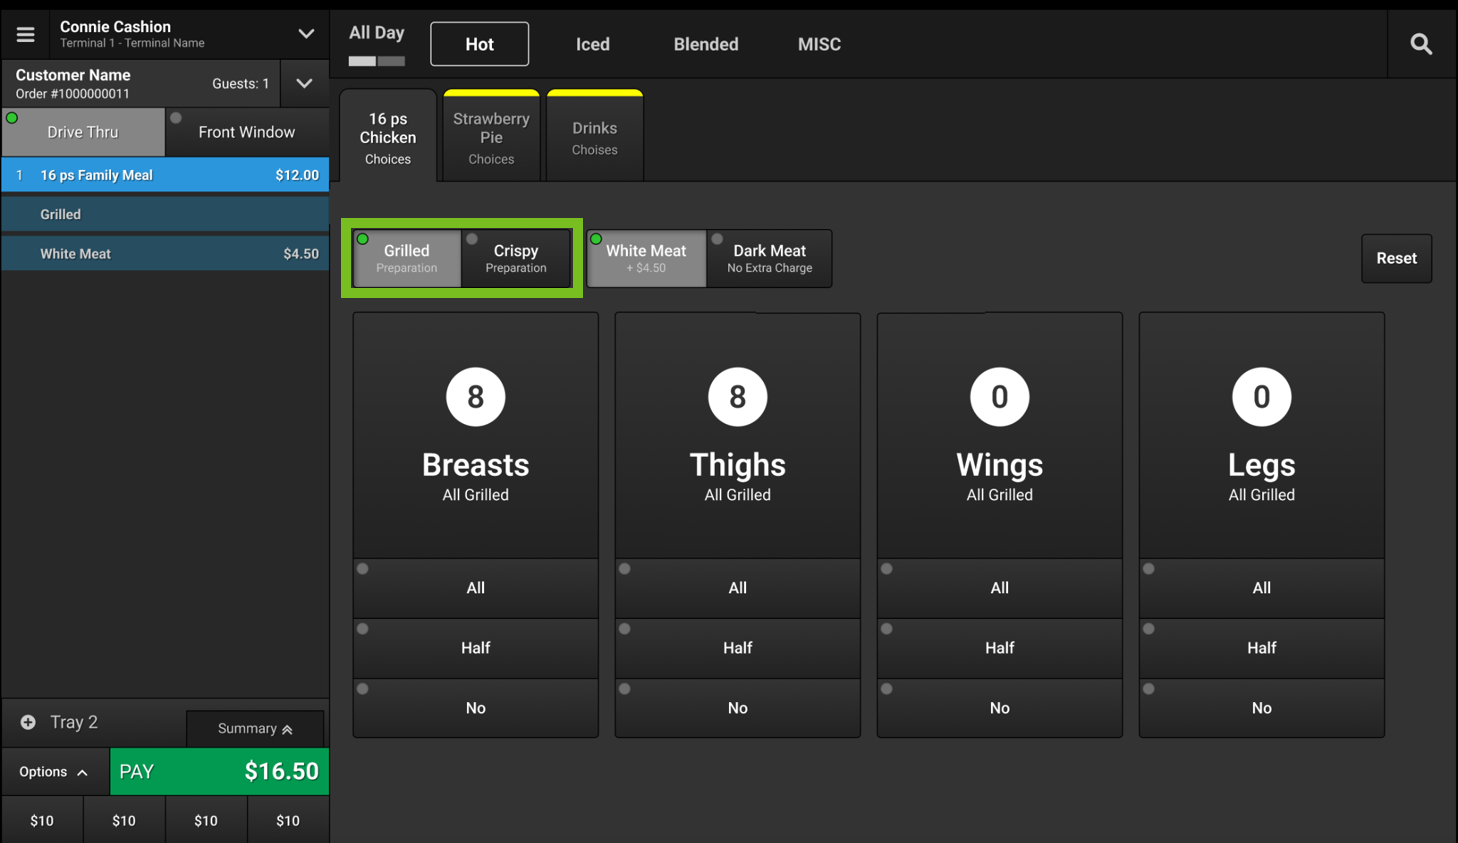
Main Variant Mixes
Main Variant Mixes are predefined mixes of product variants. The extra charge for the mix is displayed on the button (if applicable).
 |
Select a Main Variant Mix to add it to the order. The mix is added as a child item of the Bundle Component.
In the following example, White Meat is selected from the Main Variant Mixes. As a result, the total component quantity is distributed between Breasts and Thighs.
When a mix is selected, the Main Variant quantities are updated accordingly.
 |
Individual Mixes
Use the Individual Mixes located below the Main Variants to quickly adjust the quantity of a Main Variant. When an Individual Mix is selected, the displayed quantity of each Main Variant is updated accordingly.
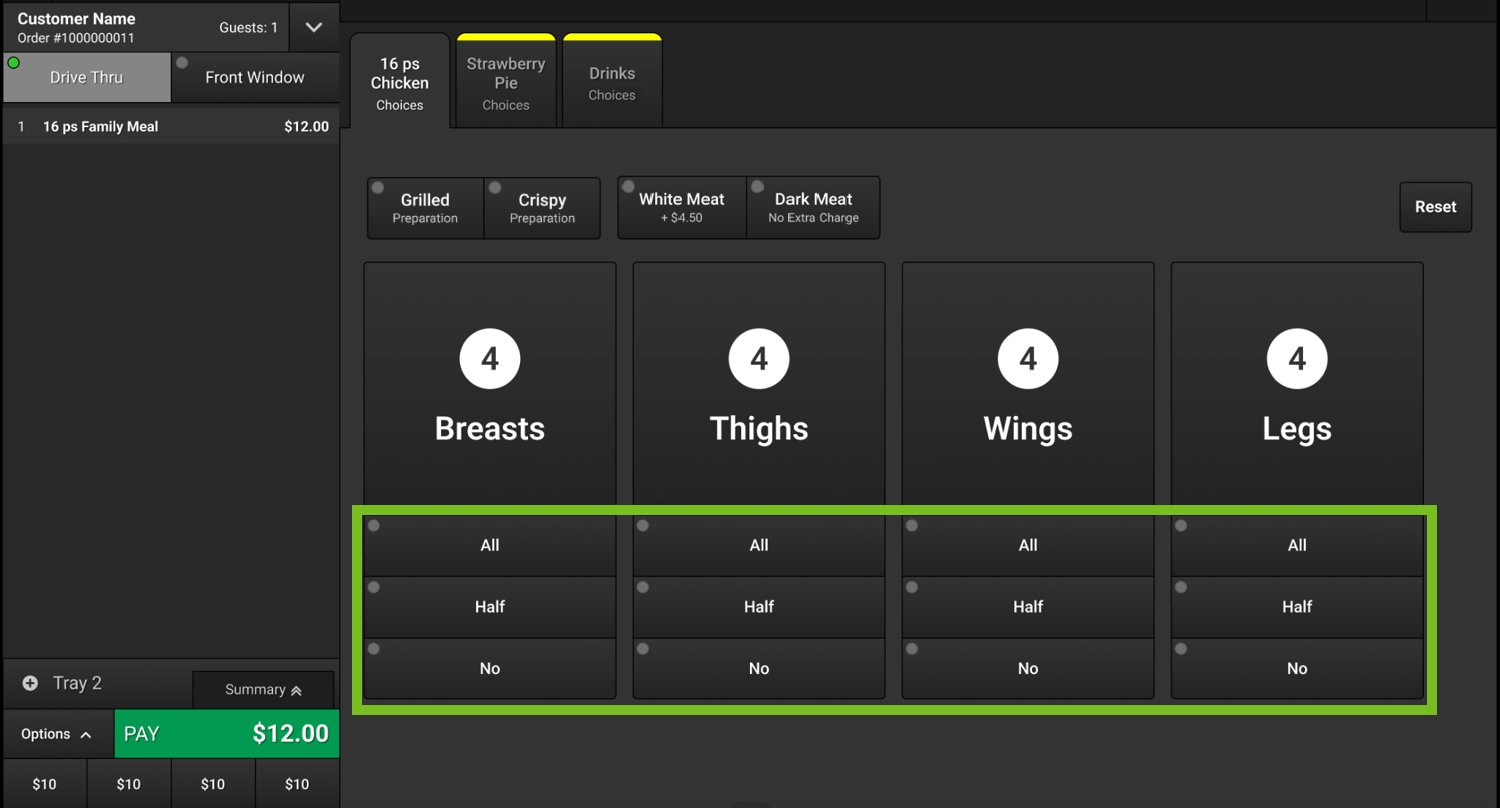 |
In the following example, the user selected:
Half Breasts
Half Thighs
The Main Variants Breasts and Thighs and their respective quantities are added to the order as child items of the "16 Piece Chicken Family Meal".
The Main Variants Wings and Legs are automatically set to 0 (No).
 |
Custom Mixes
When a variant build is configured to Allow Custom Mixes, the user may select a unique mix of products to add to the order. This includes adjusting the quantities of the Main Variants and the Associated Variant Types.
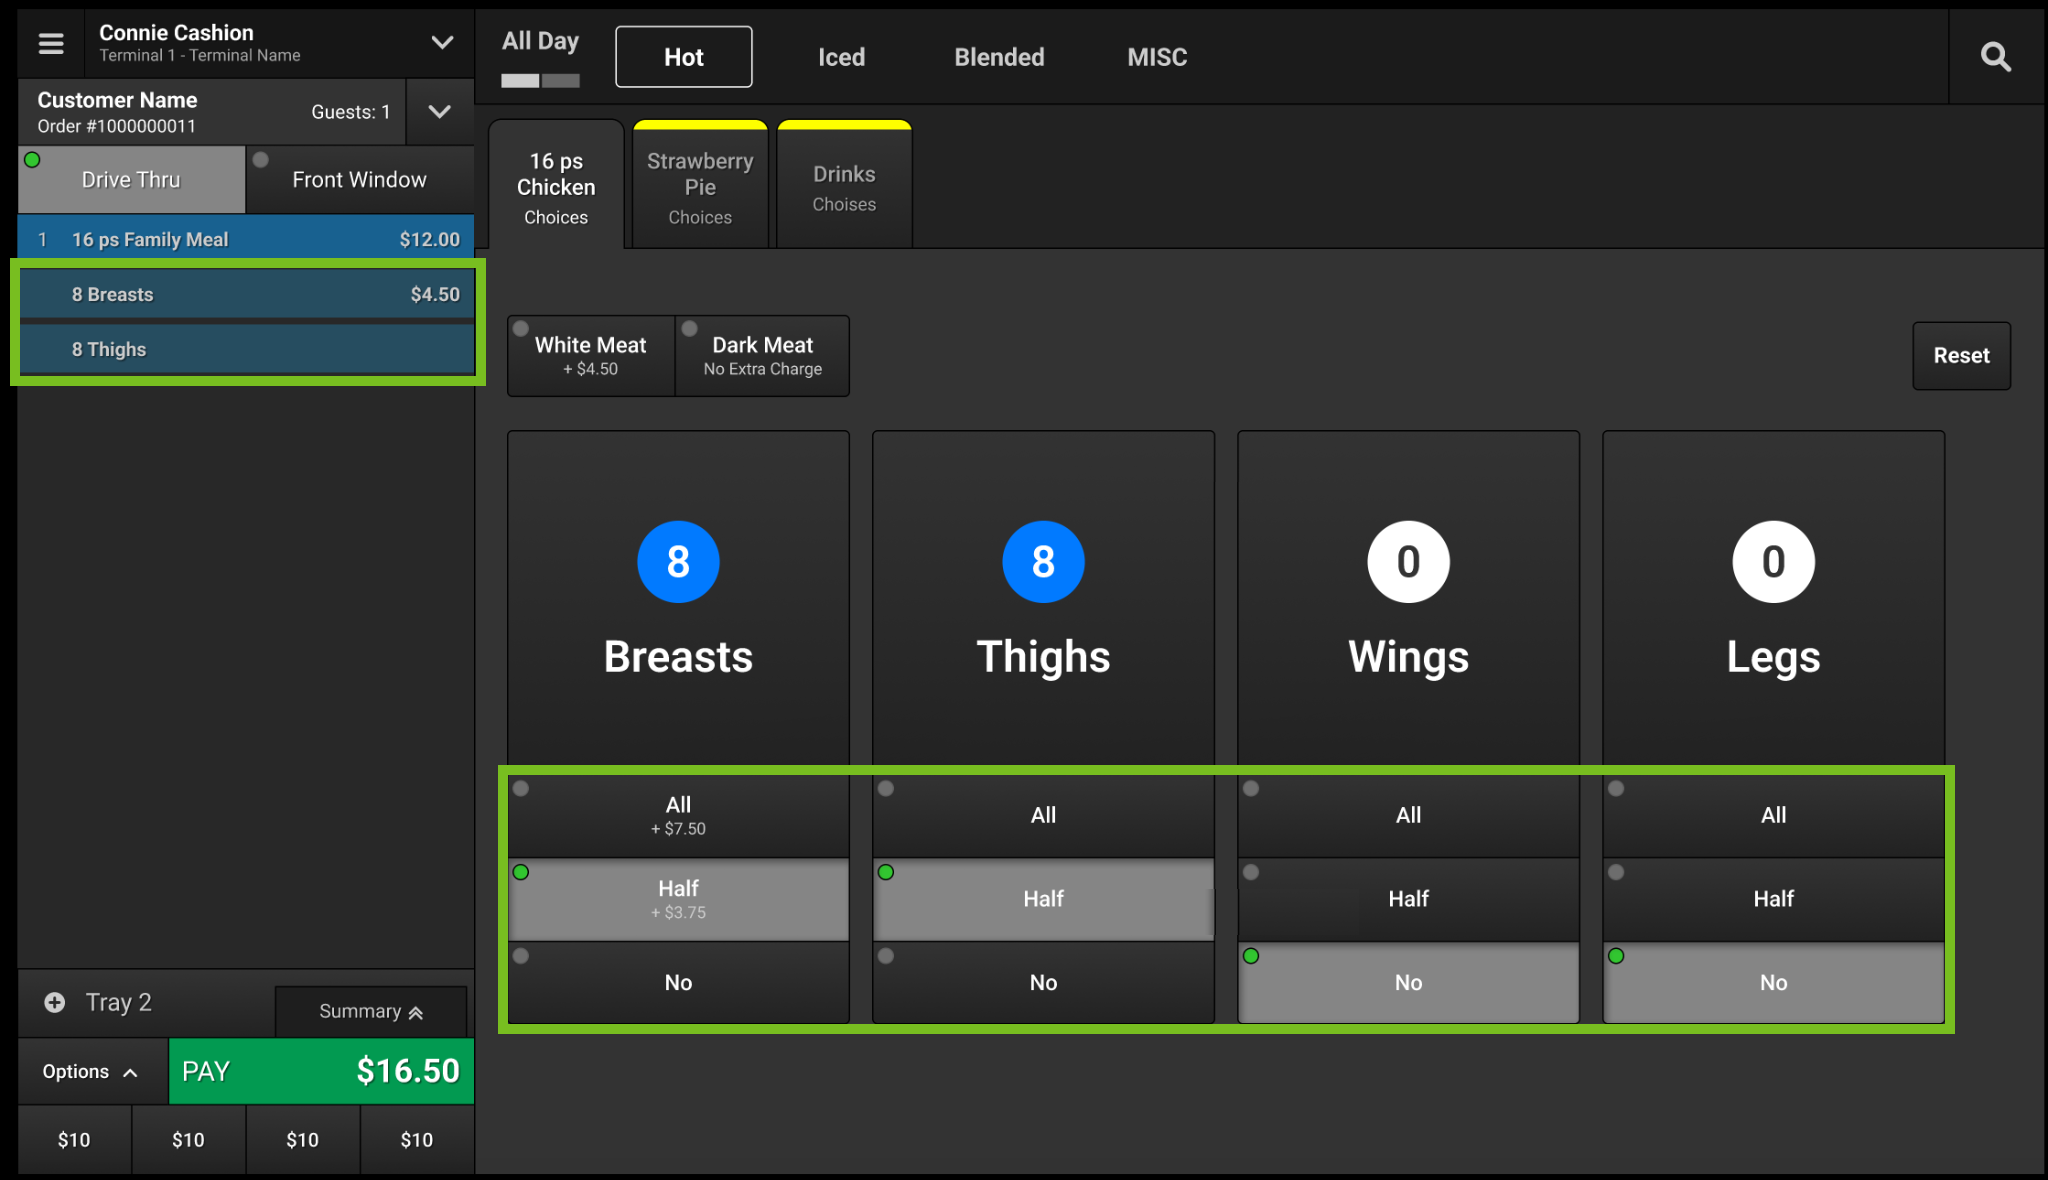
Adjust Quantity of Main Variants
To adjust the quantity of a Main Variant by increments of one (1), use the plus (+) and minus (-) rocker buttons that appear on either side of the displayed quantity.
If the rocker buttons are not available, the variant build does not allow custom mixes.
 |
When a Main Variant quantity is adjusted, the difference between the Main Variant quantity and the total component quantity is evenly distributed among the other Main Variants.
The plus (+) button is disabled when necessary to prevent the user from exceeding the total component quantity.
The minus (-) button is disabled when necessary if decreasing the Main Variant quantity would result in a quantity that is less than the total quantity defined for the component quantity.
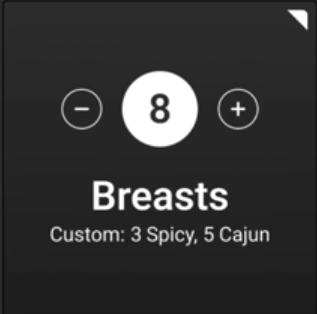
Adjust Quantity of Associated Variant Types
To adjust the quantity of an Associated Variant Type:
Select any area of the Main Variant button other than the plus (+) and minus (-) rocker buttons.
From the Associated Variant Type window, use the numeric keypad to enter the requested quantity of an Associated Variant Type.
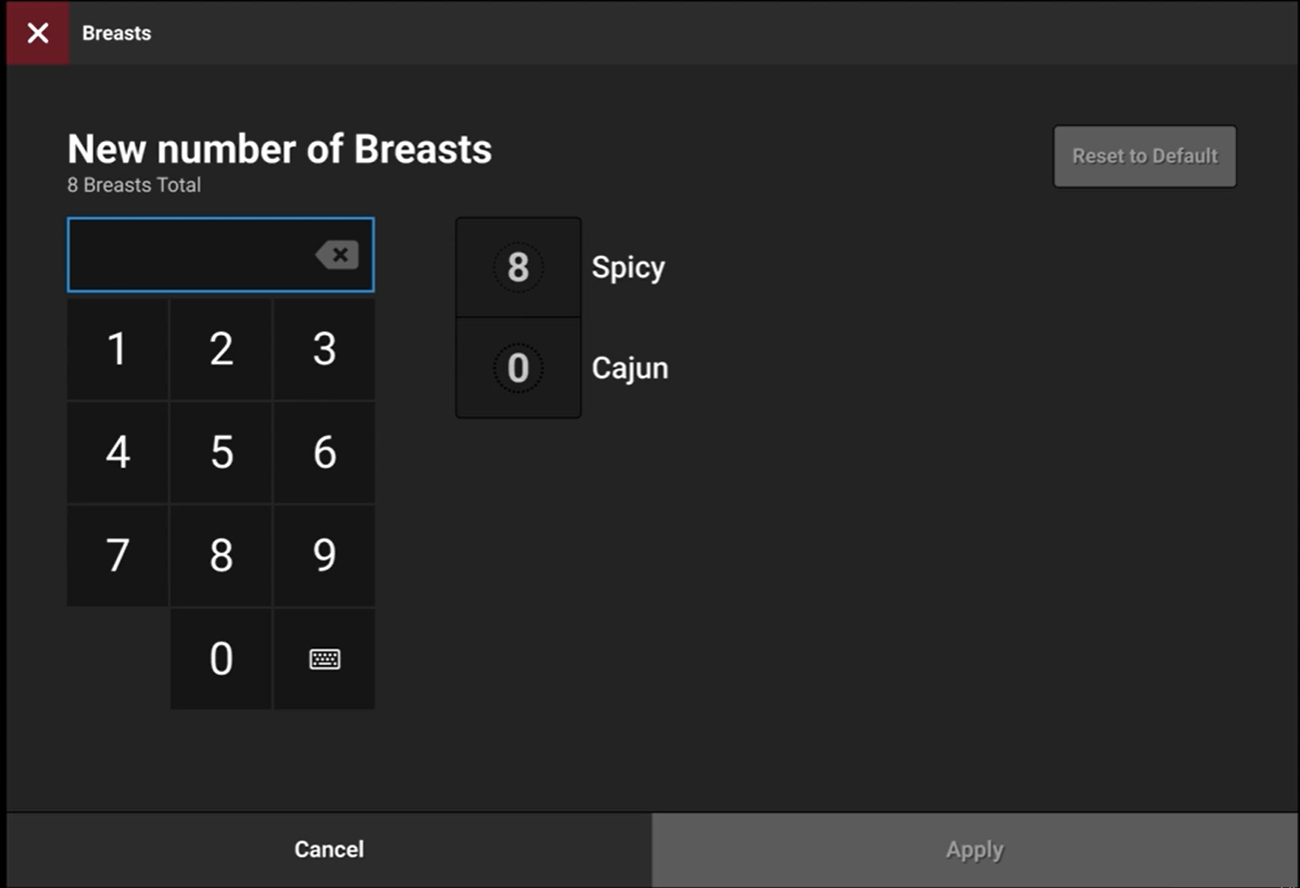
Select the Associated Variant Type to update.
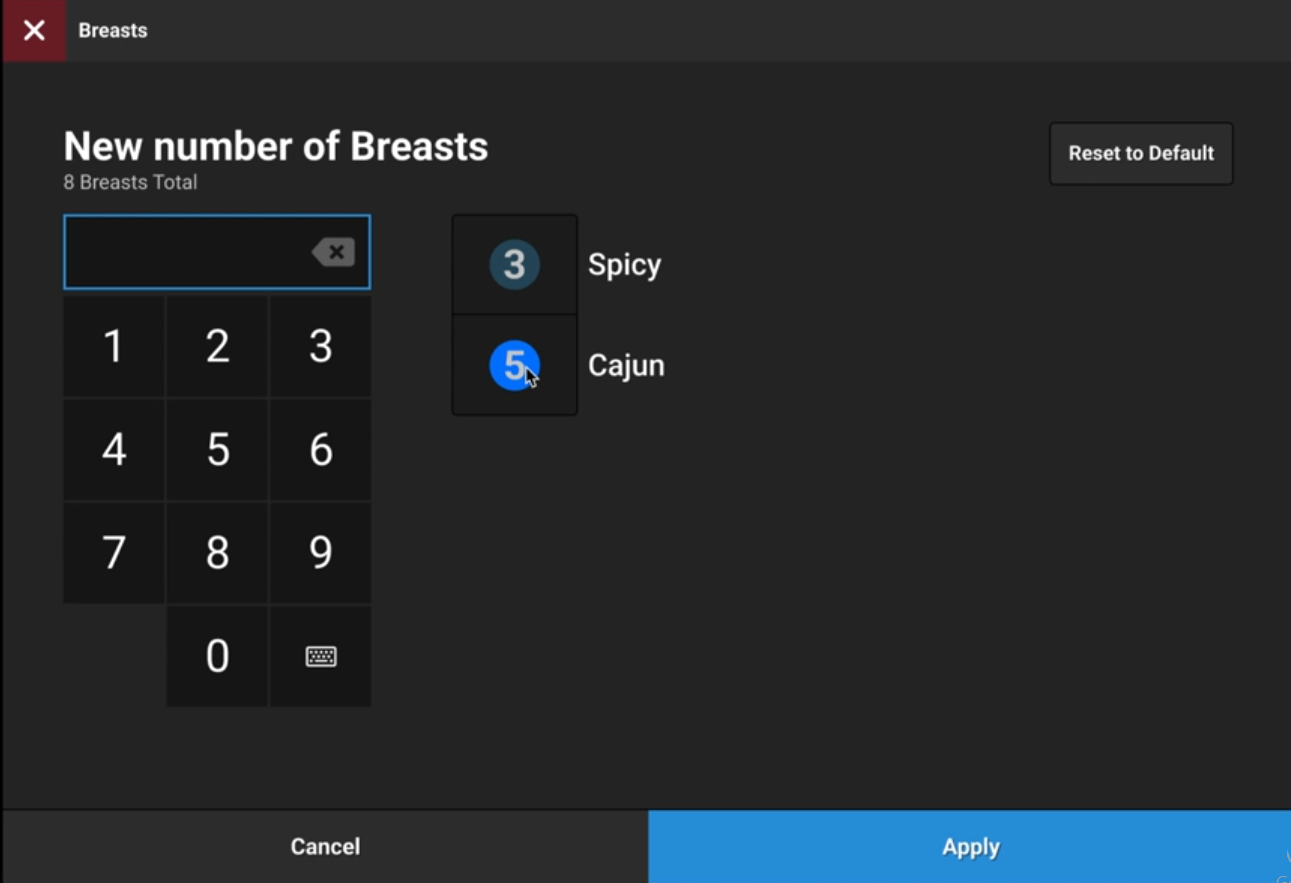
From the lower-right of the window, select Apply. The displayed quantity is updated and allocated to the applicable products.
Tip
From the upper-right of the Associated Variant Type window, select Reset to Default to undo the changes and reset the default values.
Things to Know
Send Builds to Kitchen - Variant Builds are sent to the XKM application following the defined child item rules.
Auto-Advance - Auto-Advance rules are applied to Variant Build components when added to an order.
Convert Components - Convert Variant Build Bundle Components to other products.
Unavailable Products - Any unavailable products included in a bundle component are neither added to the order nor included in the item count.
Inactive Products - If no Active products are configured for a variant, the associated variant is hidden on the POS menu.
Quantity Distribution - When a variant build is configured to Allow Custom Mixes, the user may select a unique mix of products to add to the order..
As the user modifies the quantity of each variant, the quantity of the remaining variants is dynamically updated.
Variant Builds Configuration
To configure a variant build, see Variant Builds.
To configure a bundle component, see Bundle Configuration.
Void Saved or Suspended Order
To void a Saved or Suspended order:
From the upper-left, select the hamburger icon
.From the System Navigation menu, select Open Orders.
Orders are sorted by order destination.
Select the order to void.
From the lower-right, select Options.
From the Options menu, select Void Order.
When prompted, select the reason for voiding the order (if applicable).
When prompted, type a comment about the voided order (if applicable).
When prompted to confirm the operation, select OK.
Note
Manager approval may be required.
Waste Order
A Waste Order transaction enables you to identify selected order items as "waste". The ingredients are removed from inventory.
To create a waste order:
From the upper-left, select the hamburger icon
.From the System Navigation menu, select Functions.
From the Orders column of the Functions screen, select Create Waste Order.
From the Waste screen, select the items to waste.
From the lower-left, select Waste.
When prompted, select the reason code for the transaction (if applicable).
When prompted to confirm the operation, select OK.
From the Waste Order Finalized popup window, select OK.