2024 October: Feature Highlights
Business Rule Builder
PRMA-3410
Use the Business Rule Builder to create and manage rules that define content within a single layout at a site. Site Configurations define Business Rules containing different variables within the content layout depending on equipment at the site.
Affected Components:
Xenial Digital Menu Board (XDMB)
Xenial Portal (XOP)
Xenial Digital Menu Board (XDMB)
Added Business Rules to the Settings and Tools the Settings and Tools area of the left navigation menu. Use this feature to create, manage, and delete Business Rule Sets.
 |
 |
To add a new Business Rule Set:
From the upper-left of the Business Rule Sets screen, select Create Set.
In the General section, define the following:
Set Name - Type the name of the set.
Description - Type a description for the set.
From the left navigation menu of the Business Rule Sets Editing page, select Business Rules.
From the main section of Business Rules, select + Create New Section.
In the Name field of the Create New Section window, enter the name for the section.
From the lower-right of the Create New Section window, select Create Section.
From the Section box, select Add New Field.

To edit the section: from the upper-right of the Section box, select the Edit Icon.
From the Configuration section, define the following:
Selection Type: Toggle to turn the options on/off, only allow the selection of one item, or allow the selection of multiple items.
Label Text: Enter the name of the label text.
Info Text: Enter a description for the configuration.
Daily Rotation: Toggle to enable/disable daily rotation.
From the Preview & Default Values section, toggle enable/disable.
Note: To change the field, select the Global Icon and select an option from the list.

From the left navigation panel, select Availability.
To add a Availability Filter: from the upper-right of the Availability Filters section, select Create Filter.
From the Availability Condition dropdown, select the desired condition:
All - All fields are available for the site(s).
Only the Following - Fields are only available for the selected sites.
Excluding the Following - Fields are available for all sites except the selected site(s).
From the lower-right of the Sites/Hierarchies window, select Next.
From the right of the Availability Condition field, select Add Sites.
In the Add Sites/Hierarchies window, select the Hierarchies and Sites to add.
To locate a hierarchy of site: type the hierarchy/site name in the Search field.
From the lower-right of the Add Sites/Hierarchies window, select Add.
From the lower-right of the Add Sites/Hierarchies window, select Done.
From the lower-right of the Create New Field screen, select Create.
Xenial Portal (XOP)
Added the Business Rules to the left navigation menu of Xenial Data Management (XDM) within Xenial Portal (XOP) under the Custom fields section. Use this function to create, manage, and delete Business Rules.
Entitlements
PRMA-3588
Entitlements denote an item that when purchased, entitle the recipient to future benefits such as a free item or a redeemable coupon.
Affected Components:
Xenial Data Management (XDM)
Xenial Gift and Loyalty (XGL)
Xenial Portal (XOP)
Xenial Point of Sale (XPOS)
Xenial Data Management (XDM)
Added Item Type option Entitlement for the following:.
Create New Product - Add a new Entitlement Product.

→ → → →
To add an entitlement:
From the upper-right of the Product List, select New Product.
In the Naming section, define the following:
Formal Name - Type the name of the product.
ID - Type the identifier of the product.
Item Type - From the dropdown, select Entitlement.
[Optional] Activation Required - Toggle On to require activation to use the entitlement product. Toggle Off to not require activation to use the entitlement product.
In the Reporting Categories section, define the following:
Major Category - From the dropdown, select the type of major category.
Minor Category - From the dropdown, select the type of major category.
From the upper-right of the Create New Product page, select Save.
Named Calculations - Add Entitlements as a condition to a Named Calculation.

→ → → → →
To add an Entitlement to a Named Calculation:
From the upper-right of Named Calculations, select Add Calculation.
From the Named Calculation Type field, select Sales.
From the lower-right of the Choose Named Calculation Type window, select Continue.
In the General Options section, define the following:
Calculation Name - Type the name of the calculation.
Named Code - This field is auto populated to match the Calculation Name, to change the name code, type the desired entry.
[Optional] Data Type: Select Numeric or Amount
[Optional] Description: Type a description for the calculation.
From the upper-right of the Conditions section, select Add Condition.
In the Add Conditions window, define the following:
Key - From the dropdown, select Item Type.
[Optional] Condition: Select IN or NOT IN.
From the upper-right of the Values section, select Add Item Type.
From the Add Item Type window, check Entitlement.
To quickly find a value: from the Search field, type Entitlement.
From the lower left of the Add Item Type window, select Add Item Type.
From the upper-right of Create New Calculations, select Save.
Xenial Gift and Loyalty (XGL)
Added the following endpoints to the list of Loyalty Endpoints:
activateEntitlements- Activate Entitlements.deactivateEntitlements- Deactivate Entitlements.
Xenial Portal (XOP)
Added option to enable and disable entitlements from the following sections:
Roles - Added new subcategory under Xenial Point of Sale (POS) group, Ordering.
→ → → → → →

Admin Roles - Available for the following Roles:
Admin
PS-Admin
XPRT-Admin Global Roles
Company Administrator

Xenial Point of Sale (XPOS)
Added Entitlements as a product option to associate them with loyalty to use in an order for redemption.
Added the ability to deactivate Entitlement products sold, deleted, or when an order is void, suspended, or refunded.
Xenial Portal | Email Updates
PRMA-4042
Implemented updates to Xenial Portal emails, which are sent to users for registration and password reset functions.
When the default email server is used to send emails:
A "noreply" email is now sent to the user to prevent user replies. The sender address is noreply@xenial.com for all email types sent from the portal for external and internal users.
When the user selects the link from an expired registration email, a page now opens with instructions on how to receive a new registration link.

Xenial Data Management (XDM)
From the Email Server Settings section of Company/Site Preferences, define server settings for the emails that are sent to users for the Xenial Portal.
The DEFAULT_EMAIL_FROM_ADDRESS variable is used to control the default email address at both the company and site-level.
Dismiss Close Drawer Popup
PRMA-4558
This update adds the ability to dismiss the Close Drawer popup during the Drawer Closing session on Xenial Point of Sale (XPOS) in order to access POS Functions while the physical drawer remains open.
Affected Components:
Xenial Data Management (XDM)
Xenial Cloud Portal (XOP)
Xenial Point of Sale (XPOS)
Xenial Data Management (XDM)
Added configuration to dismiss Drawer Closing popup.
→ → → → → → → →
 |
Toggle Yes to allow bypass of the Close Drawer popup.
Toggle No to NOT allow bypass of the Close Drawer popup.
Xenial Cloud Portal (XOP)
Added permission to dismiss the Close Drawer popup during the Drawer Closing session.
 |
Xenial Point of Sale (XPOS)
This update allows dismissal of the Close Drawer popup during the Drawer Closing session.
XDMB | Customizable Tip Screen
PRMA-4670
Xenial Digital Menu Boards 3.1 introduces a customizable, customer-facing Tip Screen component, which enables a Valued Brand to configure the tip screen that is displayed to the customer on the XDMB.
The Tip Screen component includes a screen from which the customer can select a predefined tip, and a screen from which the customer can enter a custom tip.
For configuration instructions, see Add Tip Screen.
 |
 |
Customizable elements include the logo image, background color, font, and button design. Choose between a Light or Dark Theme.
Affected Components:
Portal (POR) (Sicom Portal sources content packages and design configurations)
Xenial Digital Menu Boards (XDMB)
Adding Allergens
PRMA-4834
This update adds the option to add and set an icon for an item.
Affected Components:
Xenial Data Management (XDM)
Xenial Cloud Portal (XOP)
Xenial Online Ordering (XOO)
Xenial Suite Catering (XCAT)
Xenial Data Management (XDM)
Added Allergens tab to Product List editor. Allergens Information is used to set the possible allergens for products/modifiers at a site. The options include: Contains, May Contain, and Does Not Contain.
For more details, see Product List - Allergens.

Added ability to add and change a icon when creating and editing an allergen.

→ → → → → →
To configure an allergen icon:
From the Allergen Icon section, select Edit.
From the Edit Allergen icon window, define the following:
Description: Type a short description for the Allergen.
Image Source:
URL - type the URL address of the image source.
Upload - from the file selector, import an image form a local file drive.

From the lower-right of the Edit Allergen Icon window, select Save.
To set a allergen icon:
From the Allergen Icon list, select one or more of the allergens to specify on the product.
From the upper-right of the Allergen Configuration page, select Save.
Xenial Cloud Portal (XOP)
Added the allergen.View role permission to allow users to create and edit product modifications.
 |
When one or more of the following permissions are turned On, allergen.View is also turned On:
product.Viewproducts.Viewstandard-product.Viewretail-item.Viewmodifier.View
Xenial Online Ordering (XOO)
This update adds allergen information and icons to orders and products that have potential allergens.
Xenial Suite Catering (XCAT)
Allergen icons show on the main page and Par Stock template pages for products and orders with allergen tags.
Xenial Suite Catering (XCAT) | User Experience Improvements
PRMA-4842
This update provides various improvements in order to enhance user experience with Xenial Suite Catering (XCAT).
Affected Components:
Xenial Suite Catering (XCAT)
Xenial Reports (XRPT)
Xenial Suite Catering (XCAT)
Improved the logic when duplicating an order to update the duplicated order when the menu has also been updated.
Order List columns can now be fixed.
Increased the maximum order item quantity limit 99 to 999.
Questions are NOT fetched for the orders that can not be edited.
Improved logic to subtract change from the payment total for orders that have change.
Improved SS change cart API to reduce the query and return of information and provide a more stable return response data structure.
Improved the MenuEngine logic to include requests with the parameter
include_itemto reduce duplicated requests.Improved the reporting data logic.
Enhanced SCP configuration to replicate the SS configuration in order to enhance user experience.
Improved the logic for Xenial Cloud Portal notifications when receiving event orders.
The Audit Trail now tracks Xenial Suite Catering (XCAT).
Rolled back card on file deletion in order to investigate and product a better solution.
Xenial Reports (XRPT)
Enhanced the Suite Order Summary Report with the following:
Added toggle option Show All Payments: Toggle On to show all payment records for the order — OR toggle Off to only show payment records with the Paid status. This option is Off by default.
Added State column in the payment list which shows the current payment status of the order.
Migrated historical data to accommodate ETL process improvements.
Performance Improvements for Mobile Ordering
PRMA-4966
Performance improvements surrounding mobile ordering.
Affected Components:
Xenial Data Management (XDM)
Xenial Online Ordering (XOO)
Xenial Data Management (XDM)
→ → → → →
Changes to Xenial Data Management Create/Edit Order Source form include:
A new Injected Order Options section—located below the General area
Moved the Combine Like Items for Injected Order option to the Injected Order Options section
Added a new option to Enforce Order Check-in on Commit—when enabled injected orders are automatically checked-in upon the commit of the order

Xenial Online Ordering (XOO)
Internal performance improvements to utilize the new XDM Injected Order Option to Enforce Order Check-in on Commit.
Xenial Suite Catering (XCAT) | Mobile Optimization
PRMA-5081
This update optimizes SuiteSpot (SS) for mobile devices.
Affected Components:
Xenial Suite Catering (XCAT)
Xenial Suite Catering (XCAT)
Implemented the following changes to optimize SuiteSpot (SS) on mobile devices:
Added the filters to Orders and Archived tabs on the Order History page:


Added Welcome splash screen when opening the app.

Selecting Manage My Account navigates to My Account instead of Contact Details.
Selecting Review on the Review Order page shows the Product popup.

Expanded Order Details in order and invoice lists are always in view.
Importing and Exporting Roles
PRMA-5107
This update adds the ability to import and export roll configurations from the Xenial Cloud Portal (XOP).
Affected Components:
Xenial Cloud Portal (XOP)
Xenial Cloud Portal (XOP)
Added the ability to import and export role configurations from Xenial Cloud Portal (XOP) as well as view the recent imports and exports.
→ →
To import a role:
From the upper-right of the Roles page, select the dropdown arrow.
From the dropdown menu, select Import Role.

In the Import Company Role CSV popup, drag and drop the CSV file — OR — select within the dotted box.
Note: Selecting within the dotted box opens the file explorer window. Use this to search for and add the desired CSV file.

Form the lower-right of the the Import Company Role CSV popup, select Next.

From the lower-right of the Are you sure you want to import the following Roles? prompt, select Yes.

To export a role:
From the 3-dot menu of a role, select Export.
To view Recent Imports:
From the upper-right of the Roles page, select the dropdown arrow.
From the dropdown menu, select View Recent Imports.


(Optional) To view information on a import: From the 3-dot menu of a import, select Info.
(Optional) To remove a import from the list: From the 3-dot menu of a import, select Remove.
To view Recent Exports:
From the upper-right of the Roles page, select the dropdown arrow.
From the dropdown menu, select View Recent Exports.


(Optional) To view information on a export, from the 3-dot menu of a export, select Info.
(Optional) To remove a export from the list: From the 3-dot menu of a export, select Remove.
To facilitate importing and exporting from the Xenial Cloud Portal the following changes have been made:
Added the following permissions:

Export.Roles.View - Allows the user to view and download the list of .csv files that contain roles and permissions.
Export.Roles.Manage - Allows the user to view, download, and edit the list of .csv files that contain roles and permissions.
Users can set any permissions to a newly created role and successfully save a role.
Configure Visibility of Quantity of Ordered
PRMA-5236
This update provides the ability to configure the visibility of the indicator for the Order Quantity of individual items within the Xenial Order Menu screen.
Affected Components:
Xenial Data Management (XDM)
Xenial Point of Sale (XPOS)
Xenial Data Management (XDM)
Added setting Display Ordered Quantity on Menu Buttons to the Company and Site preferences.
→ → → → → → → →

Added override setting Display Ordered Quantity on Menu Buttons to the Terminal Scheme preferences.
→ → → → → → →

Xenial Point of Sale (XPOS)
Added quantity indicators for the number of products ordered in the top left corner of the Menu Item.
 |
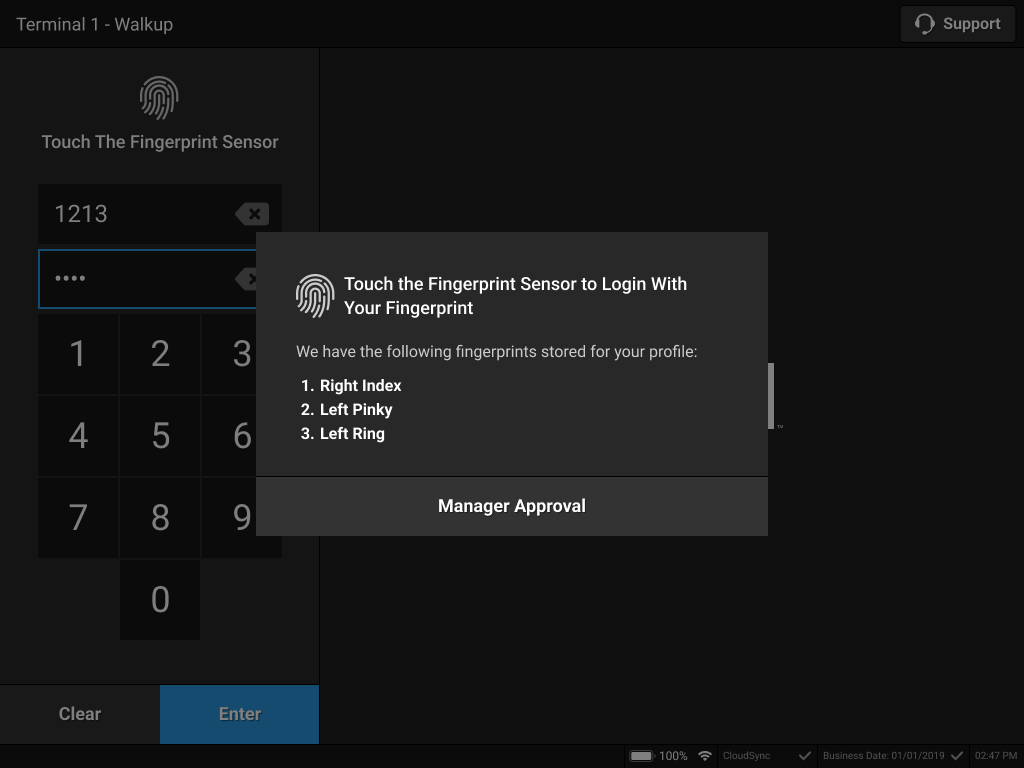
Biometric Authentication on Windows Devices
PRMA-5356
Biometric Authentication allows users to log into Xenial Point of Sale (XPOS) using stored fingerprint data. Managers can enable of Biometric Authentication for the company/site through Xenial Data Management (XDM) in the Xenial Portal (XOP). Xenial Back Office (XBO) displays employees who have opted out of Biometric Authentication.
Affected Components:
Xenial Back Office (XBO)
Xenial Data Management (XDM)
Xenial Point of Sale (XPOS)
Xenial Portal (XOP)
Xenial Back Office (XBO)
Added a new property to the Employee Profile to show if the user has opted out of Biometric authentication.
Xenial Data Management (XDM)
Added a new Peripheral configuration Use Biometrics to the Ordering Application section of Xenial Data Management (XDM). Toggling Use Biometrics enables the following:
Enables Biometric Authentication for Xenial Point of Sale (XPOS)
Edit the Consent Prompt
Set the number of stored fingers
For more information, see Site Ordering - Access.
 |
Xenial Point of Sale (XPOS)
Added Biometric setup and login options to the Xenial Point of Sale (XPOS) ordering applications. Manage saved fingerprints from the Timeclock module within the My Settings menu.
XPOS Login Screen with Biometric option
 |
XPOS Biometric Enrollment Message
 |
XPOS Biometric Stored Fingerprints Message
 |
XPOS Biometric Authentication Successful Message
 |
Xenial Portal (XOP)
Added a new permission to allow users to opt out of biometric authentication and instead use User PIN to login.
Security Enhancements
PRMA-5455
Ran security and infrastructure penetration test in order to ensure the security of the Cardholder Data Environment (CDE) and the data contained within in accordance with the recommendations outlined in the NIST Special Publication 800-115.
Affected Components:
Xenial Back Office (XBO)
Xenial Cloud Portal (XOP)
Xenial Data Management (XDM)
Xenial Digital Menu Boards (XDMB)
Xenial Gift and Loyalty (XGL)
Xenial Online Ordering (XOO)
Xenial Back Office (XBO)
Improved permission logic to prevent an employee’s rate information from being available in site token requests.
Xenial Cloud Portal (XOP)
Enhanced and updated Access Control List.
Improved API logic to prevent logs of incoming access_tokens and passwords.
Xenial Data Management (XDM)
Enhanced and updated Access Control List.
Xenial Digital Menu Boards (XDMB)
Enhanced and updated Access Control List.
Xenial Gift and Loyalty (XGL)
Enhanced and updated Access Control List.
Xenial Online Ordering (XOO)
Enhanced and updated Access Control List.
Streamline XVI Workflow
PRMA-5461
Streamlined the Xenial Venues Inventory workflow.
Affected Components:
Xenial Venues Inventory (XVI)
Xenial Venues Inventory (XVI)
XVI workflow updates include:
XVI Module | Setting | Description |
|---|---|---|
Transfers | Tab Key | Use tab to navigate the fields and directly type quantities without the need to click into the field. |
Transfer Group Template | Create and use Transfer Group Templates that automatically populate with the pre-selected sites for the new transfer group. | |
Transfer list | DIfferentiate between the transfer list and the transfer group option. Use the dropdown to select a single site in the upper section and then the item list populates. | |
Orders/Deliveries | Tab Key | Use tab to navigate the fields and directly type quantities without the need to click into the field. |
New Feature- Add items to pending order | Ability to add items to a PO even with a status of Pending. | |
Inventory Counts | Tab Key | Use tab to navigate the fields and directly type quantities without the need to click into the field. |
New Feature- Count options | Blank entries now contain zeros and Quantity on Hand values are visible. | |
Stand sheets | Sales Order | The Sales Order form is closed by default |
Sales Order name | Appears in the Sales Order Detail |
Quick Build Modifier Variant Pricing
PRMA-5506
This update adds configuration settings to:
Subtract the price of a modifier from the modifier build price when the modifier is replaced with a variant.
Regardless if Subtract Price on Modifier Removal is toggled ON or OFF for a modifier build, if the user replaces a modifier from the build with a variant, the price of the original modifier is subtracted from the build price.
When a modifier build is applied to a product, automatically add the tag that is assigned to the modifier build to the parent product (modifier) for child-item pricing rule evaluation.
Affected Components:
Xenial Data Management (XDM)
Xenial Online Ordering (XOO)
Xenial Ordering (POS)
Xenial Data Management (XDM)
The following Data Management editors were updated:
Modifier Builds
The following setting is available from the Pricing page of the Modifier Builds editor (when Pricing Method = Sum Modifier Prices):
 |
This setting determines if the price of a modifier build is affected when a modifier included in the build is replaced with a variant.
Subtract Price on Modifier Replacement - When this setting is enabled, the price of the modifier is subtracted from the modifier build price when it is replaced with a variant.
Tags
This update adds a configuration setting to the Tags editor for product tags.
 |
The following setting is available from the General section of the Tags editor when Products is selected from the Usage field:
Add to Parent When Assigned to a Modifier Build - When this setting is enabled for a tag, and the tag is added to a modifier build, then the tag is automatically added to the parent item (modifier) for child-item pricing rule evaluation when the modifier build is applied to a product.
Xenial Online Ordering (XOO)
The Price Engine is updated to:
Calculate the price of an item based on the applied product tags from the Order Object. This allows for tag-based, child-item pricing rules that are defined for modifiers and their variants to be applied to the parent item.
Optionally update the modifier build price when a build modifier is replaced with one of its variants.
Xenial Ordering (POS)
To improve the flexibility of child-item pricing rules, this update adds the ability to apply modifier build tags and their pricing rules to the respective parent item (modifier).
New Feature: Validation Format
PRMA-5550
As part of upcoming barcode scanning validation and parsing updates, the Validation Format utility now allows Xenial Point of Sale (XPOS) to accept Loyalty and Stored Value barcode scans from the Order Entry and Tender screens without requiring the user to open a separate modal (e.g. Loyalty Identification modal).
Use the Validation Format utility with Xenial Point of Sale (XPOS) to scan Loyalty and Stored Value barcodes from the Order Entry and Tender screens without requiring the user at the POS to open a separate modal (e.g. Loyalty Identification modal).
Use the Validation Formats editor in Xenial Data Manager (XDM) to:
Define the validation format of the scanned barcodes for Loyalty ID and Stored Value entities.
Assign specific POS actions and the eligible screens to the validation format.
Affected Components:
Xenial Data Management (XDM)
Xenial Point of Sale (XPOS)
Xenial Data Management (XDM)
Added Validation Format to Xenial Data Management. Use this feature to view, add, edit, and delete formats.
Added Validation Format to Xenial Data Management. Use this feature to view, add, edit, and delete formats.
To add a Validation Format:

From the upper-right of the Validation Formats homepage, select New Validation Format to add a validation format.

From the Description page of the Validation Formats editor, define the following:
Setting
Description
Format Name
Type a name for the validation format.
Entity
From the dropdown, select the entity to assign to the validation format.
Priority
Type the numeric priority to assign to the validation format in relation to other validation formats.
Active
Toggle the Active status of the validation format for each site.
From the Scan Format page of the Validation Formats editor:
Define the format of the scanned entity, including the character type, and character count.
Define the conditions that the entity string must meet.

From the Scan Format section, define the format of the scanned entity:
Setting
Description
Character Types
From the dropdown, select the type of characters to include in the string.
Minimum Character Count
Type the minimum number of characters that are required.
Maximum Character Count
Type the minimum number of characters that are allowed.
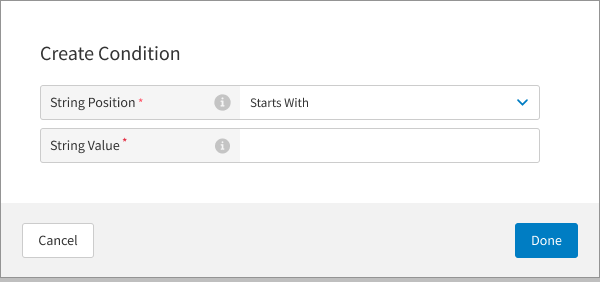
From the Contains section, define the conditions that the entity string must meet:
From the upper-right of the Contains section, select Add Condition.
From the Create Condition window, define the following:
Setting
Description
String Position
From the dropdown, select the position where the string is located in the scanned entity.
For example, select Starts With if the string is located at the beginning of the scanned entity.
String Value
Type the string value. The eligible characters are dependent on the Character Type selected in the section above.
From the Parsing Rules page of the Validation Formats editor, add rules that determine how the scanned entity is parsed. A parsing rule instructs the application how to read and interpret the values in the scanned entity.

To add a parsing rule:
From the upper-right of the Parsing Rules page, select Add Parsing Rule.
In the Rule Name field, type the name of the parsing rule.
From the Parameters section, select Add Parameter.

From the Add Parameter window, use the provided fields to define the function, position, value, and/or length of the string included in the scanned entity.
The provided fields are determined by the selected string position. Some fields described below may not be available.
Field
Description
Use As
From the dropdown, select the function of the string.
String Position
From the dropdown, select the location in the scanned entity where the string is located.
Value
Type the specific string value.
Length
Type the number of characters that make up the string.
Start Character
Type the first character in the string.
Start Character Position
Type the position value of the first character in the string.
For example, if the first character in the string occupies the third position in the scanned entity, then type 3.
End Character
Type the last character in the string.
End Character Position
Type the position value of the last character in the string.
For example, if the last character in the string occupies the ninth position in the scanned entity, then type 9.
From the lower-right of the Add Parameter window, select Save.
From the Actions page of the Validation Formats editor:
Identify the screen(s) where the user at the POS is allowed to scan the barcode.
Identify the action to execute at the POS when the barcode is scanned.

To add a POS action and associated screen:
From the upper-right of the Actions page, select Add Action.
From the Add Action window, define the following:
Setting
Description
Action Name
Type a name for the action.
Screen
From the dropdown, select the screen where the user at the POS is allowed to scan the barcode.
Action
From the dropdown, select the action to execute at the POS when the barcode is scanned.

From the lower-right of the Add Action window, select Save.
From the upper-right of the New Validation Format form.
To delete a Validation Format:
From the 3-dot menu of a validation format, select Remove.
From the lower-left of the confirmation popup, select Yes.
To edit a Validation Format:
From the 3-dot menu of a validation format, select Edit.
Added the following permissions to allow a user to view, add, edit, and delete validation formats:
validation-format.Add
validation-format.Delete
validation-format.Manage
validation-format.View
Xenial Point of Sale (XPOS)
Xenial Point of Sale (XPOS) can now scan Loyalty and Stored Value barcodes from the Order Entry and Tender screens without requiring the user at the POS to open a separate modal (e.g. Loyalty Identification modal).
Ability to Disable Claim and Complete Indicators
PRMA-5560
To streamline the use of Xenial Kitchen Management (XKM), users may now configure the visibility of the claim indicators to meet the requirements of the screen in use.
Affected Components:
Xenial Kitchen Management (XKM)
Xenial Kitchen Management (XKM)
Added the ability to disable claim and complete indicators.
Note: In order to disable the the claim and complete indicators, the indicators must NOT be added to Item Lifecycle Events for Advance Lifecycle of screens. Previously bumped items show the completed state regardless of the Item Tap Event setting when the Auto Recall Bumped Items option is enabled. For more information see Item Events.
 |
 |