Takeovers
→ → → →
Use the Takeovers utility to display content, like a promotion, over primary content, such as a menu. A takeover can be set to appear at intervals or at specified events including an order start, an order payment, or a canceled order.
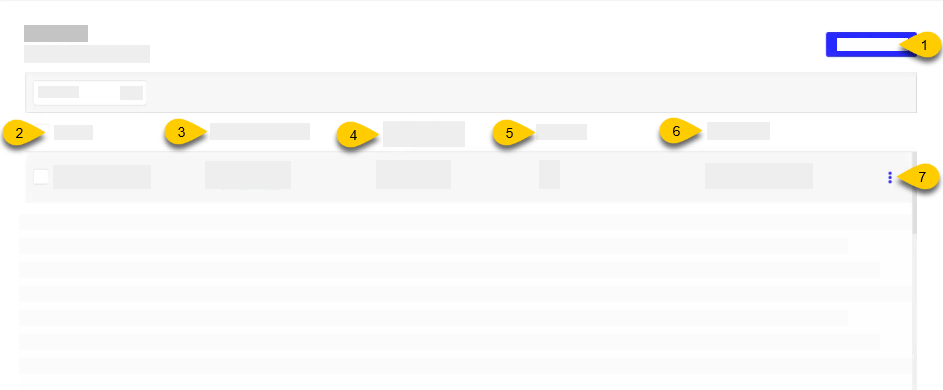 |
1 | Create Takeover | Create a new takeover |
2 | Name | Name of the takeover |
3 | Content Thumbnails | Image of the takeover |
4 | Display Schema | Identifies the Display Schema and its maximum number of displays (horizontal and vertical) |
5 | In Use | Number of devices displaying the takeover |
6 | Last Update | Date/time of last update |
7 | 3-Dot Menu | Edit the takeover |
Create an Interval Based Takeover
→ → → →
To create an interval based takeover:
From the Takeovers homepage, select Create Takeover.
From the Select Display Schema popup, select the correct schema from the list and select Continue.
From Create New Takeover - General, enter the Takeover Name in the text field. The Takeover name must be unique.
From Create New Takeover - General, select the Interval Based radio button. under Takeover Trigger.
From the Create New Takeover left pane, select Content.
From Create New Takeover - Content, select Add Content Design.
From the Add Content Design popup, select the correct content from the list. Alternatively, use the + icon on the display row to add content, or use the Search box to search for content and select to add.
From the lower-right of the Add Content Design popup, select Add Content Design.
From Create New Takeover - Content, edit the following settings as needed:
Setting
Description
Repeat Play Interval
Set the time interval to repeat the takeover display.
Delay Start
Set the amount of time to delay the takeover display. For example, delay the start of a second device's takeover display to start at the end of the first device's takeover display.
Duration
Set the amount of time the takeover displays. Use the reset icon
 to return to the original setting.
From the upper-right of Create New Takeover, select Save.
Nota
The Repeat Play Interval setting must be configured to select Save for the new takeover.
From the upper-right of Create New Takeover, select Preview to view the new takeover:
From the Preview page, select Play under Takeover in the left pane.
From the Preview page, select Stop to stop the takeover preview.
From the left navigation pane, select Layouts.
From the Content Layouts list, select the correct layout.
From the Content Layout layout page, select Content.
From the Content list, select the 3-dot menu for the content and select Edit.
From the Content popup, select +Add Takeover.
From the Add Takeover popup, select the new takeover from the list.
From the lower-right of the Add Takeover popup, select Add Takeover. The new takeover displays as a tab on the Content popup.
From the lower-right of the Content popup, select Done.
From the upper-right of Content Layout layout page, select Save.
From the Content Layout layout page, select Preview to view the changes.
From the Content Layout layout page, select Ready to Deploy.
From Content Deployment, select the 3-dot menu for the layout and select Schedule.
From the Site Selector popup, select the site(s) for deployment and select Select Site.
Nota
All devices at the selected site(s) must be connected to the same network and belong to the same Display Schema for the takeover to display properly across all selected devices.
From the Schedule Deployment popup, select one of the following options:
Toggle Deploy Now.
Select a deployment date from the calendar in the Date field and the time in the Time field to schedule the deployment at a later date and time.
From the Schedule Deployment popup, select Confirm and Deploy.
Create an Events Based Takeover
→ → → →
To create an events based takeover:
From the Takeovers homepage, select Create Takeover.
From the Select Display Schema popup, select the correct schema from the list and select Continue.
From Create New Takeover - General, enter the Takeover Name in the text field. The Takeover name must be unique.
From Create New Takeover - General, select the Events Based radio button under Takeover Trigger.
From the Create New Takeover left pane, select Content.
From Create New Takeover - Content, select Add Content Design.
From the Add Content Design popup, select the correct content from the list. Alternatively, use the + icon on the display row to add content, or use the Search box to search for content and select to add.
From the lower-right of the Add Content Design popup, select Next.
From Create New Takeover - Configure, select Add a Start Trigger.
From Add a Start Trigger popup, select the trigger from the list. Multiple triggers can be added, and can be different between devices.
Nota
At least one Start Trigger selection is required to save the takeover.
From the lower-right of the Add a Start Trigger popup, select Add Start Trigger.
From the Add Content Design - Configure popup, select the End Takeover Content option from the End Method dropdown.
From the lower-right of the Add Content Design - Configure popup, select Add Content Design.
From the upper-right of Create New Takeover, select Save.
From the upper-right of Create New Takeover, select Preview to view the new takeover:
From the Preview page, select the takeover option from the Test Event Trigger dropdown in the left pane.
From the Preview page, select Stop to stop the takeover preview.
From the left navigation pane, select Layouts.
From the Content Layouts list, select the correct layout.
From the Content Layout layout page, select Content.
From the Content list, select the 3-dot menu for the content and select Edit.
From the Content popup, select +Add Takeover.
From the Add Takeover popup, select the new takeover from the list.
From the lower-right of the Add Takeover popup, select Add Takeover. The new takeover displays as a tab on the Content popup.
From the lower-right of the Content popup, select Done.
From the Content Layout layout page, select Priority Ranking.
From Content Layout - Priority Ranking, drop and drag the rows to determine the priority of the content.
Nota
A takeover placed at the top of the priority list is displayed in front of lower-priority takeover layers.
From the lower-right of Content Layout - Priority Ranking, select Done.
From the upper-right of Content Layout layout page, select Save.
From the Content Layout layout page, select Preview to view the changes.
From the Preview page, select the dropdown under Takeover in the left pane to play the preview.
From the Preview page, select Stop to stop the takeover preview.
From the Content Layout layout page, select Ready to Deploy.
From Content Deployment, select the 3-dot menu for the layout and select Schedule.
From the Site Selector popup, select the site(s) for deployment and select Select Site.
Nota
All devices at the selected site(s) must be connected to the same network and belong to the same Display Schema for the takeover to display properly across all selected devices.
From the Schedule Deployment popup, select one of the following options:
Toggle Deploy Now.
Select a deployment date from the calendar in the Date field and the time in the Time field to schedule the deployment at a later date and time.
From the Schedule Deployment popup, select Confirm and Deploy.