Foodservice Management | POS User Guide
The Foodservice Management (FSM) POS User Guide includes:
Topic | Description |
|---|---|
Steps to use the FSM POS for a typical shift. | |
Clock in or out in the FSM POS system using this additional add-on feature. | |
Log in or out from the FSM point of sale (POS) system using this feature. | |
View the order summary, modify order items, manage the order and the drawer, look up a customer, and clock in and out from this screen. | |
Steps to use drawer features. | |
Steps for taking customer orders on the FSM POS system. | |
Steps to modify order items. | |
Steps to modify order items that have more than one modifier. | |
Steps to check out the order using different tender types. | |
Steps to check out the order when the FSM POS system is offline. | |
Steps to manage orders in different statuses. | |
Steps to void an order. | |
Steps to refund an order. |
Order of Operations for a Typical Shift
The following is a chronological order of tasks of a typical shift. It is useful to understand and apply these steps in order to ensure minimal issues occur during daily activities within the FSM POS system.
The manager clocks in.
The employee clocks in.
The manager logs in.
The manager assigns the cash drawer to the employee, enter a dollar amount in the till.
The employee counts the drawer in front of the manager to ensure its accuracy.
The employee logs in.
The daily transactions are entered and cashed out by the employee.
A cash drop may be performed, if needed.
A pay out may be performed, if needed.
The manager removes the employee from the drawer.
The manager or employee counts the drawer. This is dependent on the individual location standards.
The manager balances the drawer, and enters the cash value when prompted. The total amount in the drawer with the starting till included should be entered here.
A receipt prints with a Cashier Report.
The employee clocks out.
After completing any additional required duties, the manager clocks out.
Clock In / Clock Out
The Clock In/Clock Out feature is an optional add-on feature which is a time-in-system within myEmployees through https://www.mynextep.net. This feature can also be set up to print. Please disregard this information if this feature is not available in your organization.
There are a few options available on how an employee can log in and clock in to the POS device:
Employees may be assigned a PIN by management to clock in for their shifts and to log in to the POS device for order entry.
Genius supports Biometrics fingerprint recognition within the POS system. Employees allow the system to scan their fingerprint eliminating the use of barcodes and/or PINs.
Employees, typically managers that have override permissions, may use the option of an ADMIN card to replace the need to enter a PIN.
PIN numbers are created by approved management through https://www.mynextep.net.
All employees should clock in as soon as they are ready to begin working their assigned shift and clock out before leaving. Employees can clock in or out on the POS device from the Log In / Clock In screen or from the Main Order screen with a manager's approval. Clocking out is crucial for reconciling employee labor. If an employee forgets to clock in at the start of their shift or clock out at the end of their shift, only management has access to override their time.
Nota
The Clocking In function does not grant access to the POS device. This feature is strictly for time management purposes. To clock in and clock out, select the corresponding button on the main Clock In screen and enter the user PIN.
Screen Capture
Log In / Clock In / Clock Out |
|

Log In / Log Out
The Log In/Log Out feature allows employees to log in and log out of the FSM POS system. Employees use this to process orders and functions available with their POS device.
Employees who are assigned access to the POS must log in to access the FSM POS Main Order screen.
Nota
Employees can use a card swipe to access the device instead of using a PIN.
To log in with a PIN and log out:
From the Main Order screen, select Log In and enter the user PIN.
To log out, from the bottom-right corner Main Order screen, select Log Out.
Nota
The Log Out button may appear on a different area of the screen depending on the device.
When cash drawers are being used, a manager must assign employees to a drawer before they can begin processing orders. For specific instructions, see Drawer Management.
Importante
Logging out of the POS device does not close out the employee's drawer. It is imperative that the employee removes and balances before they close out the drawer at the end of their shift. These are two separate functions.
Main Order Screen
After employees log in to the POS device, they see the Main Order screen. The Main Order screen is laid out with the Order Summary on the left, and the menu buttons and items modifiers on the right. The Status Bar, which is located at the top of the screen, and buttons, such as Drawer Mgmt located at the bottom, provide additional FSM POS functions.
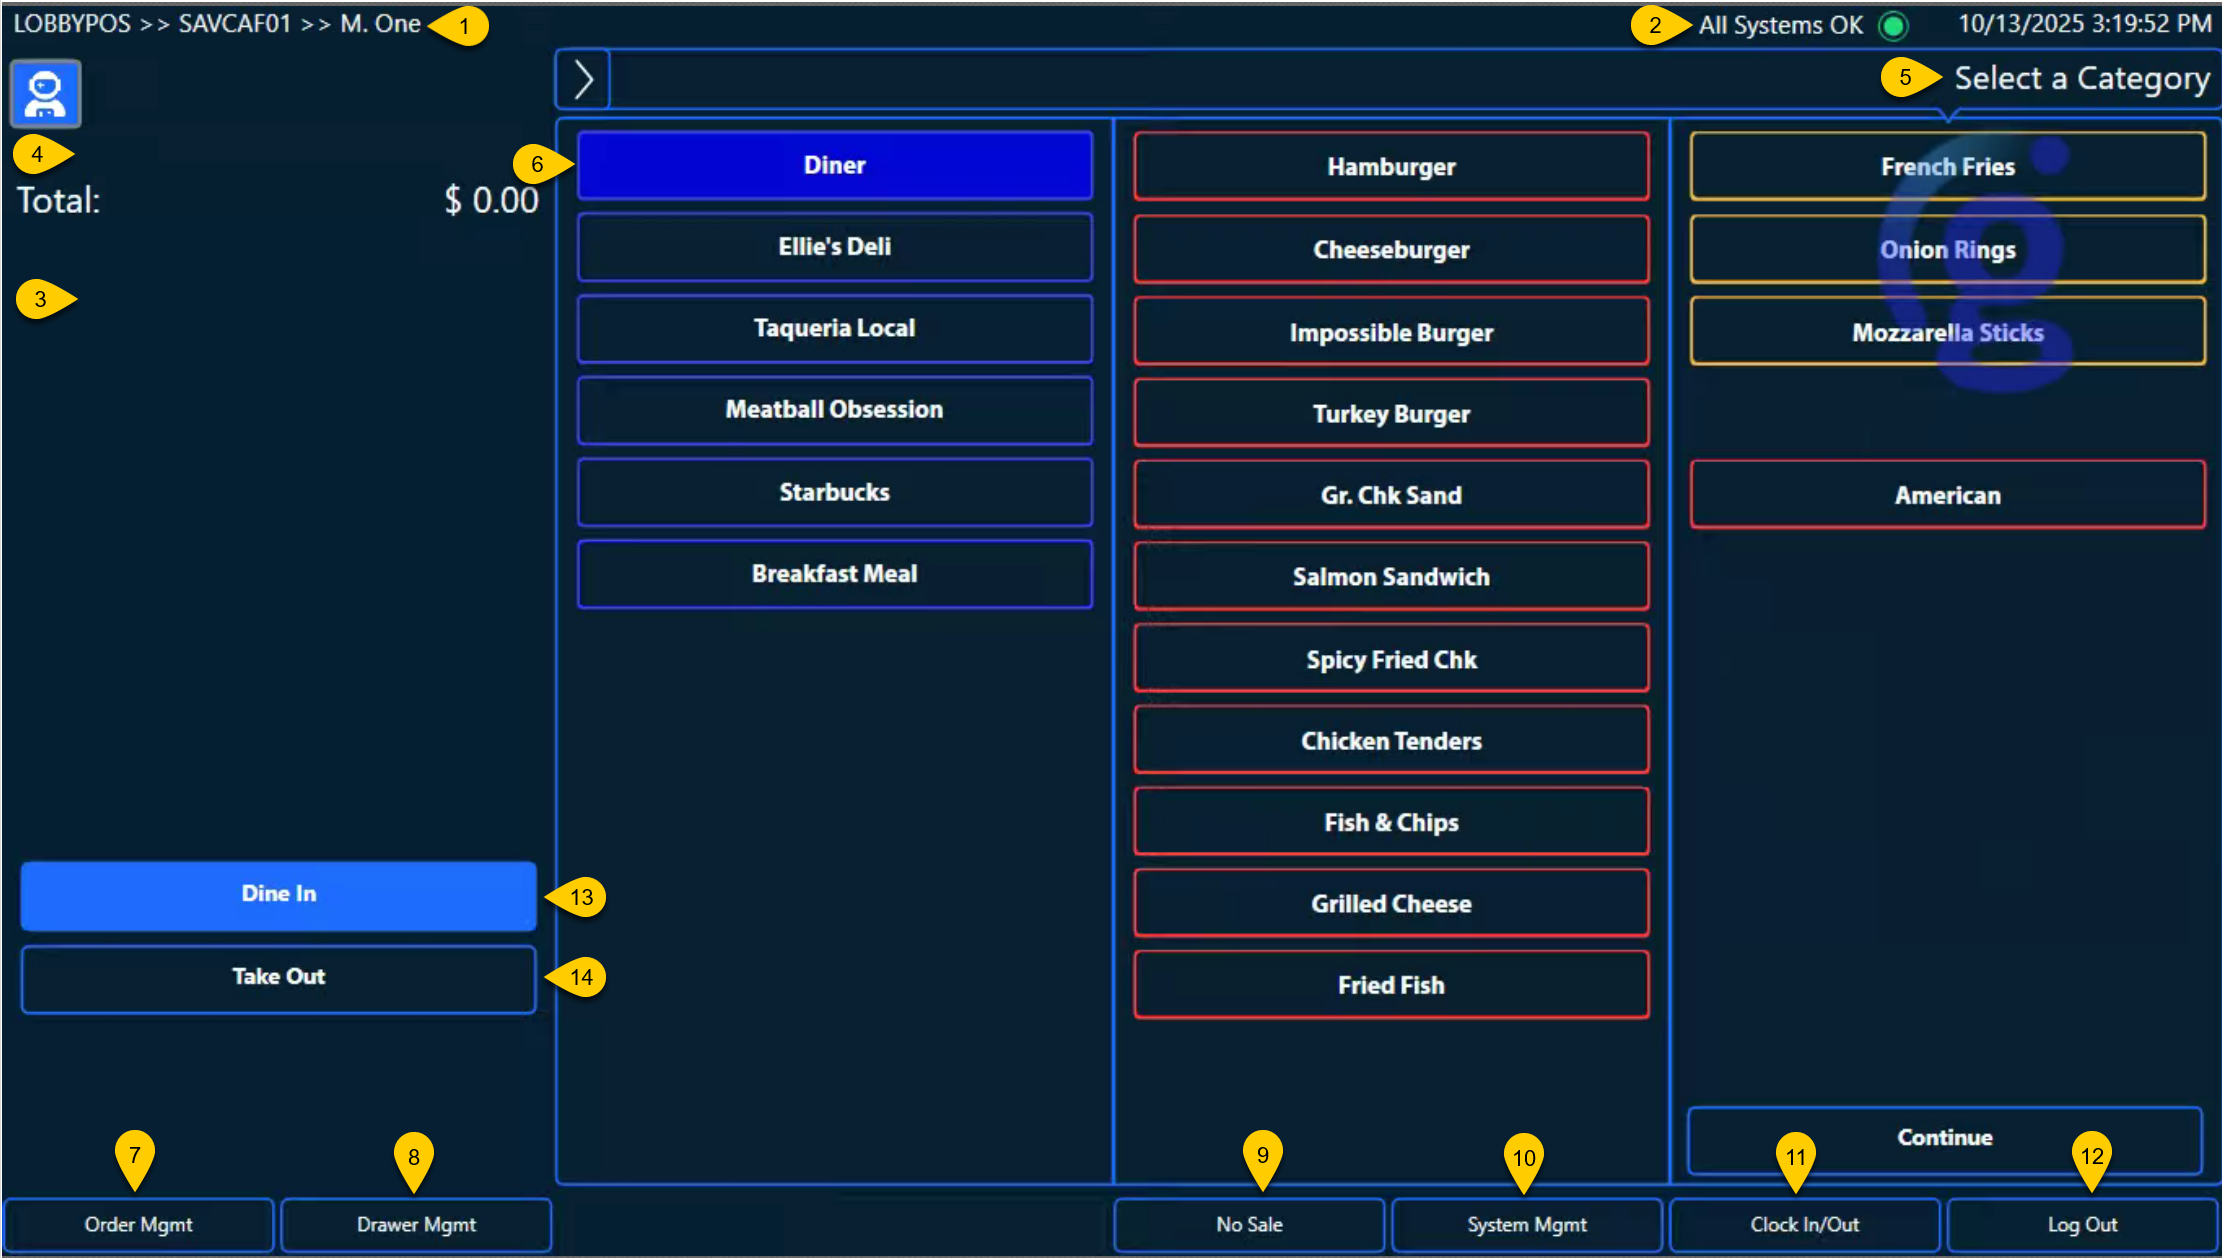 |
1 | Status Bar - Displays the store number, machine name, and the name of the employee that is logged in on the upper left portion of the screen. | ||||||||||||
2 | Status Icon - This icon indicates if there is a problem with any equipment on the network. Green indicates a healthy status, yellow indicates that the POS device cannot talk to https://www.mynextep.net, and red indicates a critical error. The details of a red, or critical, status are displayed in the status bar. | ||||||||||||
3 | Order Summary - This area displays items and their modifiers as they are being entered, as well as items and their modifiers added to the order previously. A running total is displayed at the top of the field. | ||||||||||||
4 | Items - Items ordered display in the Order Summary. Employees can touch the item to modify, remove, change the quantity, or add special instructions. For detailed instructions, see Item Modification. | ||||||||||||
5 | Menu Display - Displays prompts for the employee, as well as indicating the modifiers displayed in the right column. | ||||||||||||
6 | Order Entry - The three columns of Menu Buttons are used to order and modify items. For detailed instructions, see Menu Flow. | ||||||||||||
7 | Order Mgmt - Takes the employee to the Order Management screen to check current, previous, and held orders. For a detailed description of functions, see Order Management. | ||||||||||||
8 | Drawer Mgmt - Allows the employee to access drawer features:
For a detailed description of functions, see Drawer Management. | ||||||||||||
9 | No Sale - Opens the cash drawer without a PIN number or any other passcodes and can be configured for manager approval. | ||||||||||||
10 | System Mgmt - Access to system tools:
| ||||||||||||
11 | Clock In/Out - Allows employees to clock in and out while an employee is logged on. For detailed instructions, see Clock In / Clock Out. | ||||||||||||
12 | Log Out - Allows the current employee to log out. For detailed instructions, see Log In / Log Out. | ||||||||||||
13 | Dine In - Indicates that the current order is for a guest dining in. This option is selected by default. | ||||||||||||
14 | Take Out - Indicates that the current order is for carry out/to go. |
Additional Functions
Hold Order - Places the order on hold and does not send the order to the kitchen. For example, if a guest forgets their wallet in the car, the employee can hold the order without losing it. Held orders can be accessed through Order Mgmt. For a detailed description of functions, see Order Management. | ||||||||
Cancel Order - Immediately cancels the current order. | ||||||||
Check Out - Immediately takes the employee to the payment screen. | ||||||||
Customer Lookup - Selecting the profile silhouette in the upper left-hand corner provides the following features for looking up a customer’s account:
|
Drawer Management
The Drawer Mgmt tab, located on the bottom section of the screen, allows employees with the proper security authorization access to certain drawer features. These features include:
Feature | Description |
|---|---|
Pay Out | This feature allows the restaurant to expense items that require cash. The Pay Out screen allows a dollar amount to be entered, as well as the reason for the pay out. For example, if an employee is sent to purchase paper towels, a pay out may be made in cash for the employee to purchase the supplies. ImportanteThe amount and reason must be entered to complete the Pay Out function. If not, the employee will receive an error message and will be unable to proceed. |
Cash Drop | This feature is used when a drawer has a large number of cash transactions and cash needs to be deposited, typically into a safety deposit box. The dollar amount is entered on the screen, and the total is calculated at the end of the shift reporting for that drawer. NotaThe cash limit amount allowed in a drawer set by an organization. Check with the store management or corporate to determine cash limit amounts. |
Remove | This feature is used to remove a cash drawer assignment from an employee. This is done at a shift change or at the end of the day so that the drawer can be counted and reconciled with the sales receipts. |
Balance | This feature is used to balance the drawer at the end of a shift or the end of a day and is entered here. The total is checked against the day's sales and is printed on the Cashier Report. |
Assign | This feature assigns a cash drawer to an employee at that POS device. A drawer cannot be assigned to more than one employee at the same time. The employee is selected from a menu of all employees, and the starting amount for each drawer must be entered. Employees should count their drawers upon receiving them to ensure accuracy. ImportanteAn employee must be clocked in to have a drawer assigned to them and the drawer must be assigned before they can enter orders. |
Driver Drop | This feature is used when a delivery service is used, and the money collected by the employee needs to be entered into the FSM POS system. For example, the employee returned from delivering a pizza order and needs to submit the money collected from the guest. |
Menu Flow
The FSM POS menu flow is designed to follow how a guest typically requests an order, also known as conversational ordering. Employees taking a guest’s order may be prompted to give key phrases to the guest during the order process, specifically for item modifications, combos, and item upsell. Example phrases may include and are not limited to:
“Does everything look alright?”
“Would you like to make that a combo?”
“What can I get for you?”
The menu buttons are laid out in three columns after the Order Summary, with each additional column displaying the modifiers for the item selected in the previous column. This allows a large quantity of information to be displayed on the screen, but only information that pertains to what is selected currently. This eliminates having buttons on the screen that do not apply to the specific order.
The first column in the Order Entry is typically populated with menu buttons that represent categories of items. Sometimes, this column also contains frequently used quick items or items that do not belong in a specific category, such as gift cards, that may otherwise be hard to find. Ultimately, all columns are configured to suit the needs of the concept. The menu button that is selected currently will be outlined in green.
The second column populates modifiers for the item highlighted in the first column. The third column populates modifiers for the item highlighted in the second column. Columns drop off the screen as the employee progresses further into the menu flow. After the item is selected, it can be viewed in the Order Summary. Occasionally, items may have so many modifiers that they populate all columns.
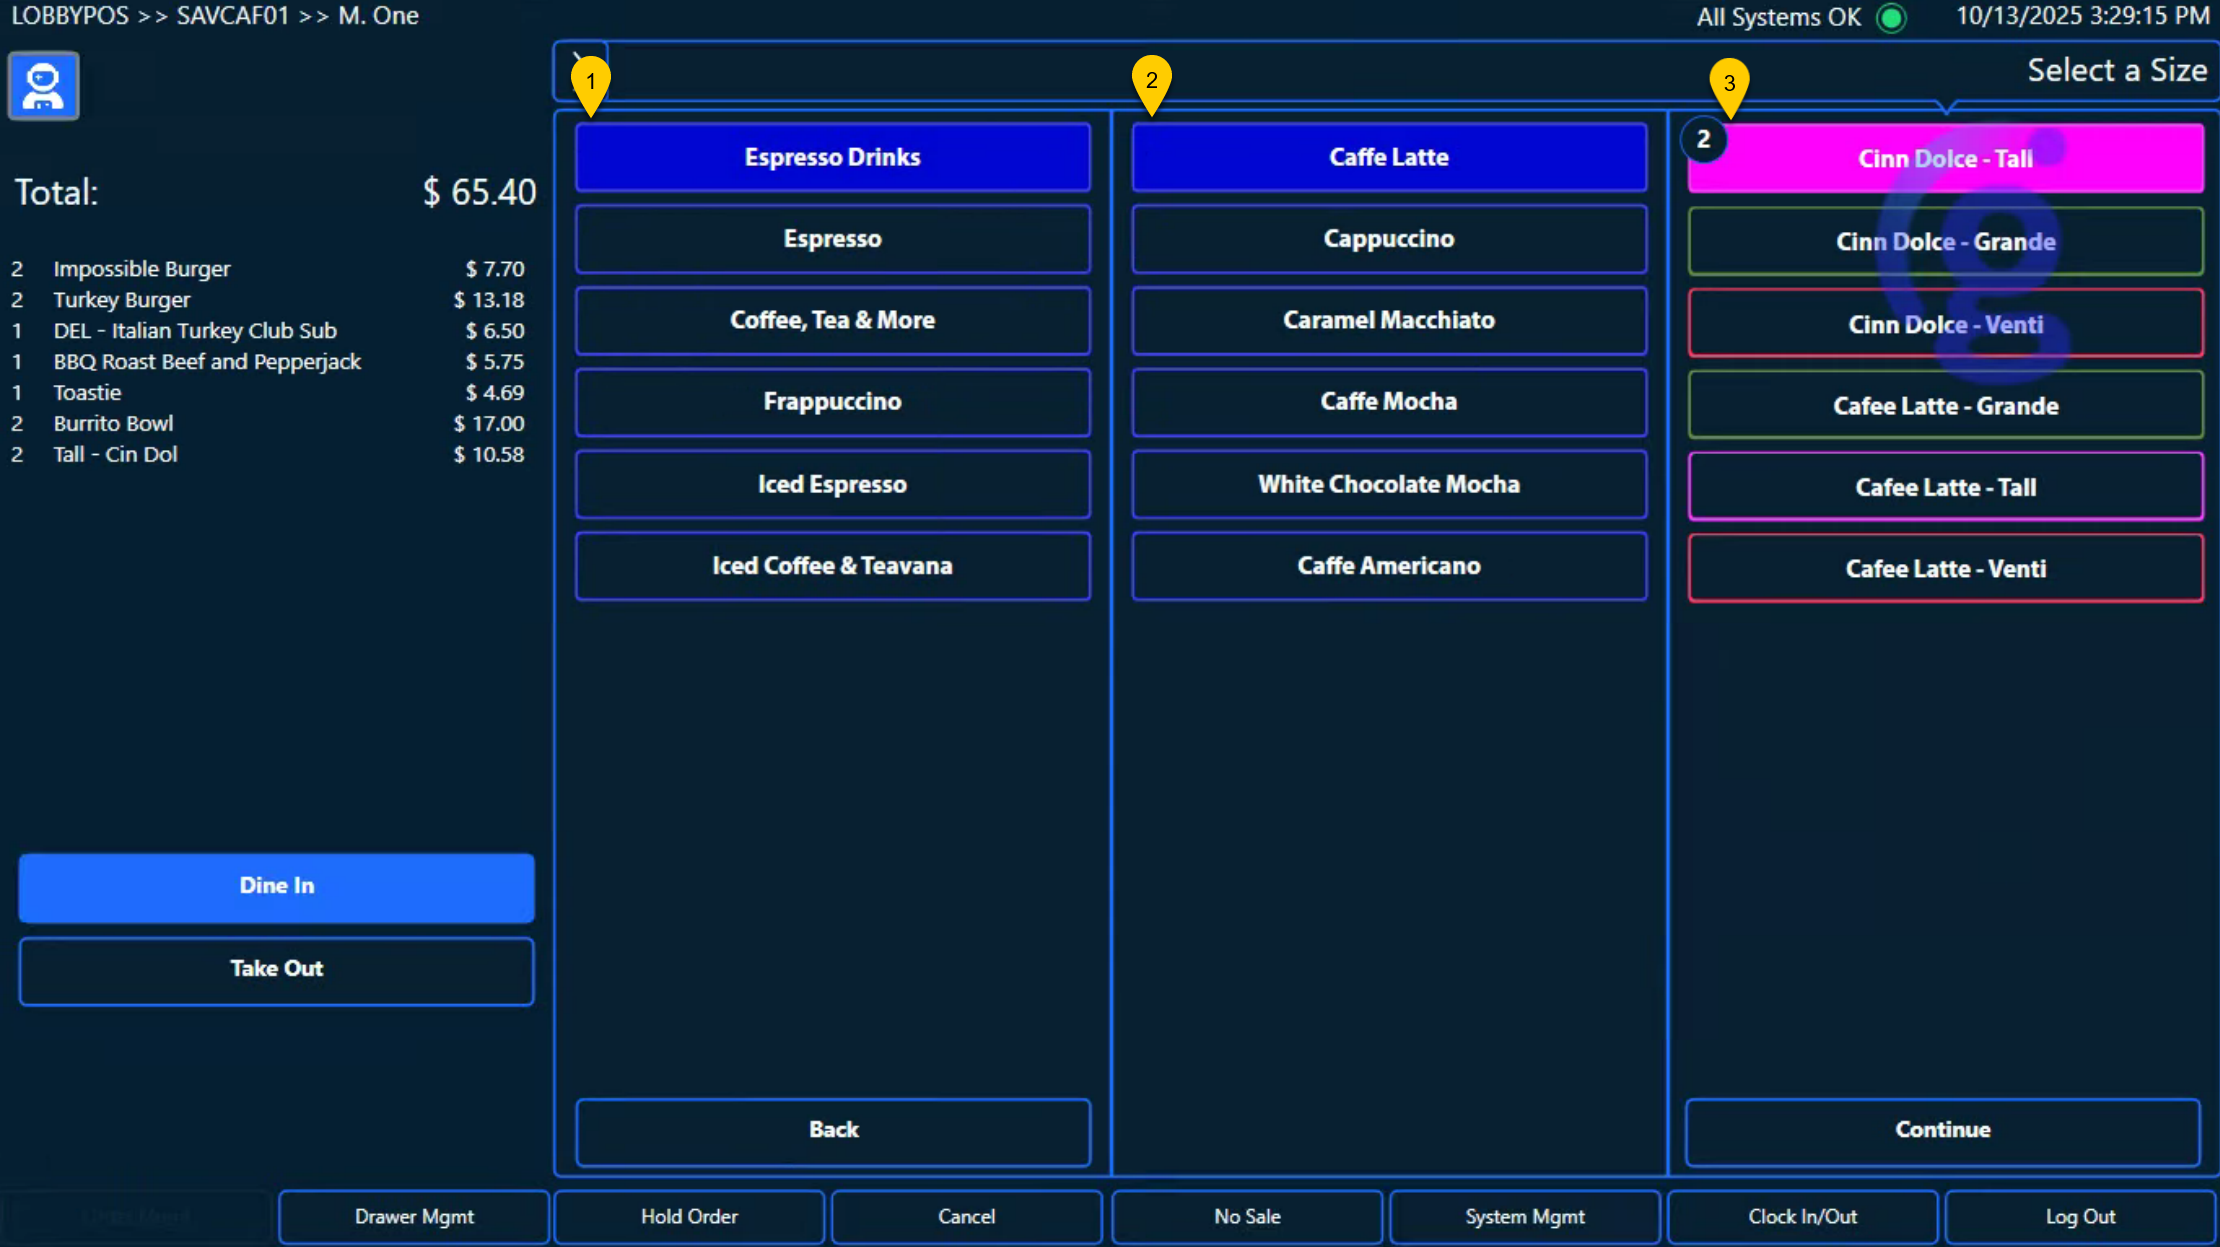 |
1 | The first column usually contains menu categories but may also contain individual items. The selected item is highlighted in blue. |
2 | The second column shows options for the item selected in the first column. |
3 | The third column contains options for the item or options selected in the second column. |
At the end of the menu flow, the employee is presented with a few options:
Main Menu - Adds the current item to the order back to the beginning menu.
End Order - Sends the order to the kitchen and proceeds to the payment screen.
Send to Kitchen - This option sends the current order to the kitchen for fulfillment but does not proceed to payment. The POS device returns to the beginning menu screen, and the order can be accessed through Order Mgmt.
Back - Goes back through the menu flow and eventually deletes the item.
Nota
Users must continue all the way through the menu flow to add an item.
Item Modification
There are many different ways an Item can be modified. Depending on how the menu flow is configured and the nature of specific items on the menu, the employee may be prompted to modify items during the normal menu flow or the employee may have to manually select an item to modify it.
To manually modify an item before an order is placed, select the item in the Order Summary. After selecting the item, the Modify Item popup appears. To modify the item, select from the following options:
Option | Description |
|---|---|
Remove | Removes the item from the order. |
Quantity | Allows the user to modify the quantity of the item with the number pad. |
Special Instructions | Allows the employee to send special instructions to the kitchen staff. Instructions also appear in the Order Summary on the guest’s receipt. |
Modify | Opens the menu flow for that item. |
Special Button Modifiers
Some menu columns move automatically to the next menu column with one selection, such as when selecting a main item like a salad or a cup of coffee. However, many items have more than one modifier. The following two examples take a closer look at how modifiers function within the FSM POS system:
Example 1
In the following example, the guest would like to order two (2) cups of coffee. The amount can be modified two different ways:
Select the item Coffee located in the Order Summary list.
Select the number 1 located next to the Coffee in Order Entry.
Either choice modifies the requested amount of coffee. Select Quantity to display the screen where the quantity can be entered. Select the number amount on the keypad and select OK.
Additionally, the guest would like to add extra cream and no sugar to one coffee and cream and sugar to the second coffee. This can be accomplished by selecting Special Instructions on the Modify Item screen. Use the alphanumeric pad to enter the specific requests of the guest.
Example 2
Modifiers that have specific instructions built in are referred to as special menu buttons. In the following example, the menu item, Antipasto Salad, has special modifier buttons available.
The guest orders an Antipasto Salad.
There is an option to have the dressing on the side or tossed in.
The guest has requested No Onion on their Antipasto Salad.
To complete the guest's request:
Select the item from the Order Summary and the Modify Item page appears. When the Modify button is selected, the special modify buttons display.
From the Modify Item page, select No Onion. The No Onion option highlights and appears in the Order Summary.
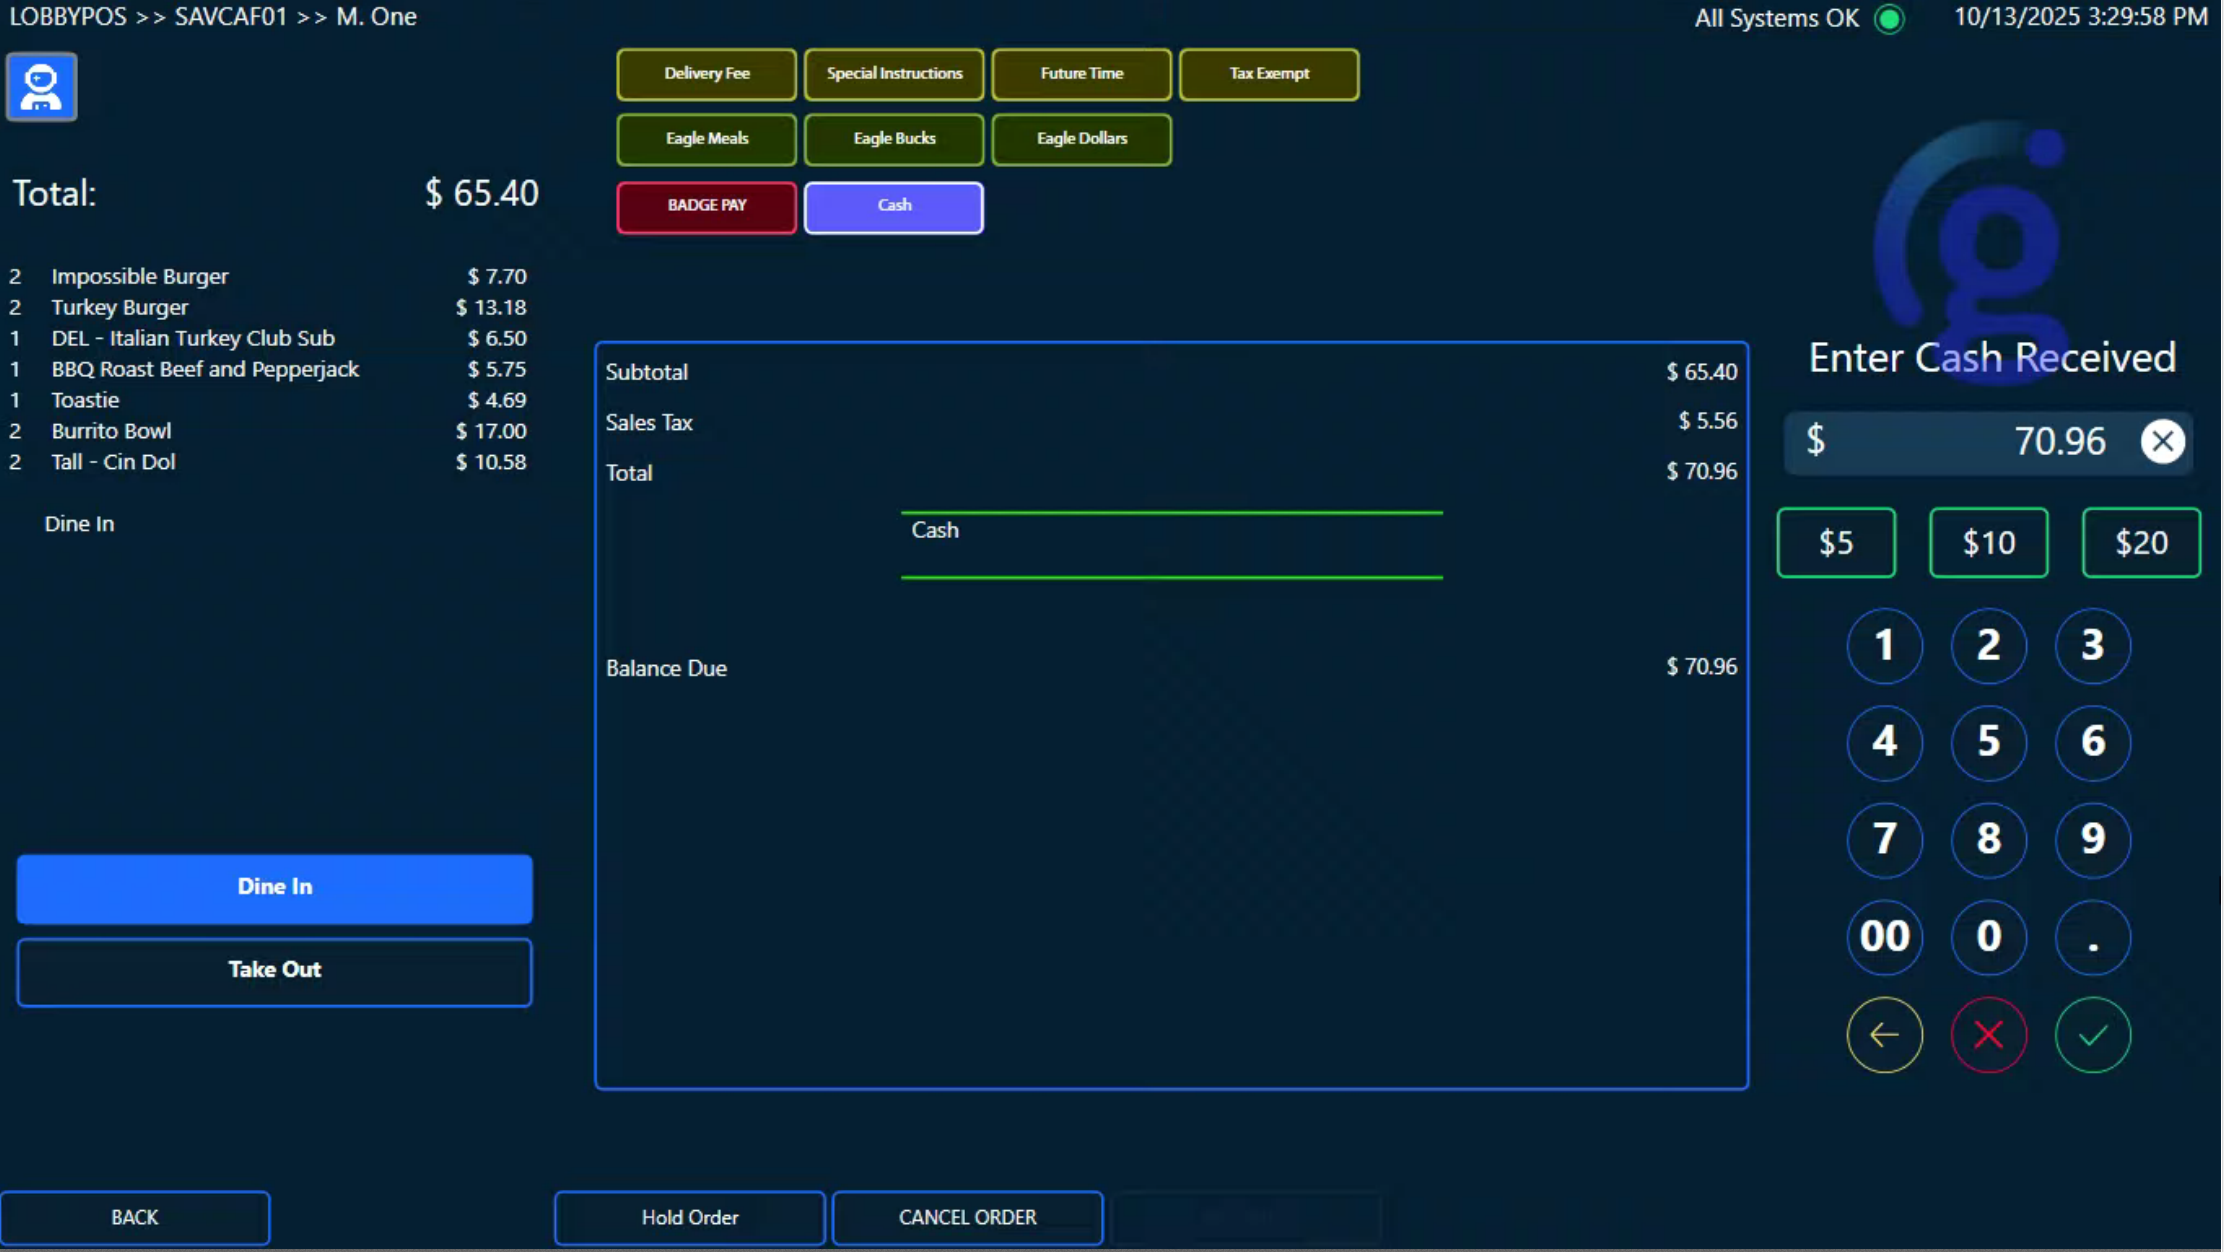
Ending the Order and Tender Types
Select End Order or Check Out at the end of the menu flow to go directly to the payment screen. The different options for payment display on the payment screen. Most locations use Cash, Credit, Gift Card, and Discount as tender types. However, this may vary depending on individual locations.
Nota
The tender default can be changed by request. If the revenue center processes more orders using Credit Cards, a request can be submitted to set this payment option as the default.
Payment Type | Description |
|---|---|
Cash | To process the transaction with a cash payment, enter the total amount received from the guest and select OK. The amount of change due displays on the screen. There are also quick keys for bills in $10, $20, $50 and $100 denominations. |
Credit | Select Credit, and select OK. A popup displays requesting the credit card information. Swipe the card through the mag stripe reader on the POS device. If the device reader fails to capture the card information, employees can manually enter the card information.
|
Gift Card | Genius supports multiple Gift Card interfaces, allowing employees to load, reload, and activate Gift Cards. NotaContact Genius for a list of supported Gift Card interfaces. |
Discount | Select Discount to open a discount screen. This enables an employee to give a predetermined discount or an open discount amount and may or may not be subject to manager approval. Discount percentages and approvals are all subject to the specific store's configuration. ImportanteDiscounts must be applied before any tender can be applied. |
Split Tenders | FSM POS is enabled to receive multiple tender types in the same transaction. For example, a guest may wish to pay partially in Cash and partially by Credit Card. The employee enters the Credit Card information as usual and the payment screen automatically displays the remaining balance. ImportanteWhen the quantity is entered without a decimal point, it will be treated as a whole dollar amount. The POS device does not require, and will not automatically enter, a decimal point. For example, if 5000 is typed in without a decimal point, it will be treated as $5000.00.
The guest’s Credit Card may be entered manually if the card reader does not receive the card information when swiped. Manually entering Credit Card information can be disabled. |
Screen Capture
Cash payment |
|
Offline Credit Card Transactions
If there is no connection to Transaction Manager (TM), the employee can still take orders and process Credit Card transactions. When the employee logs in to the POS device, they see a notification that This Ordering Station is Currently Offline, and are given a prompt to ask if they would like to Run in Offline Mode.
Importante
In order to continue in Offline Mode, the manager must enter their PIN for an override.
In Offline Mode, the Main Order screen displays that it is OFFLINE. Some of the buttons at the bottom of the screen are inactive in Offline Mode.
To proceed with offline Credit Card transactions:
From the Run in Offline Mode popup screen, select OK.
After finishing the guest’s order, select Continue, and select End Order, which opens the payment screen with the usual payment options. Select the payment type the guest presents.
For a Credit Card payment, a popup displays to confirm that they would like to accept the payment offline. Select OK to proceed. The Credit Card will be processed after TM reestablishes its connection.
When the device has reconnected to TM, a prompt displays This device has reconnected to Transaction Manager and is ready to go online. Go back online?. Select OK to go back online.
Order Management
Order Mgmt leads to the Order Management screen that is used for Closed, Hold, Open and Future orders.
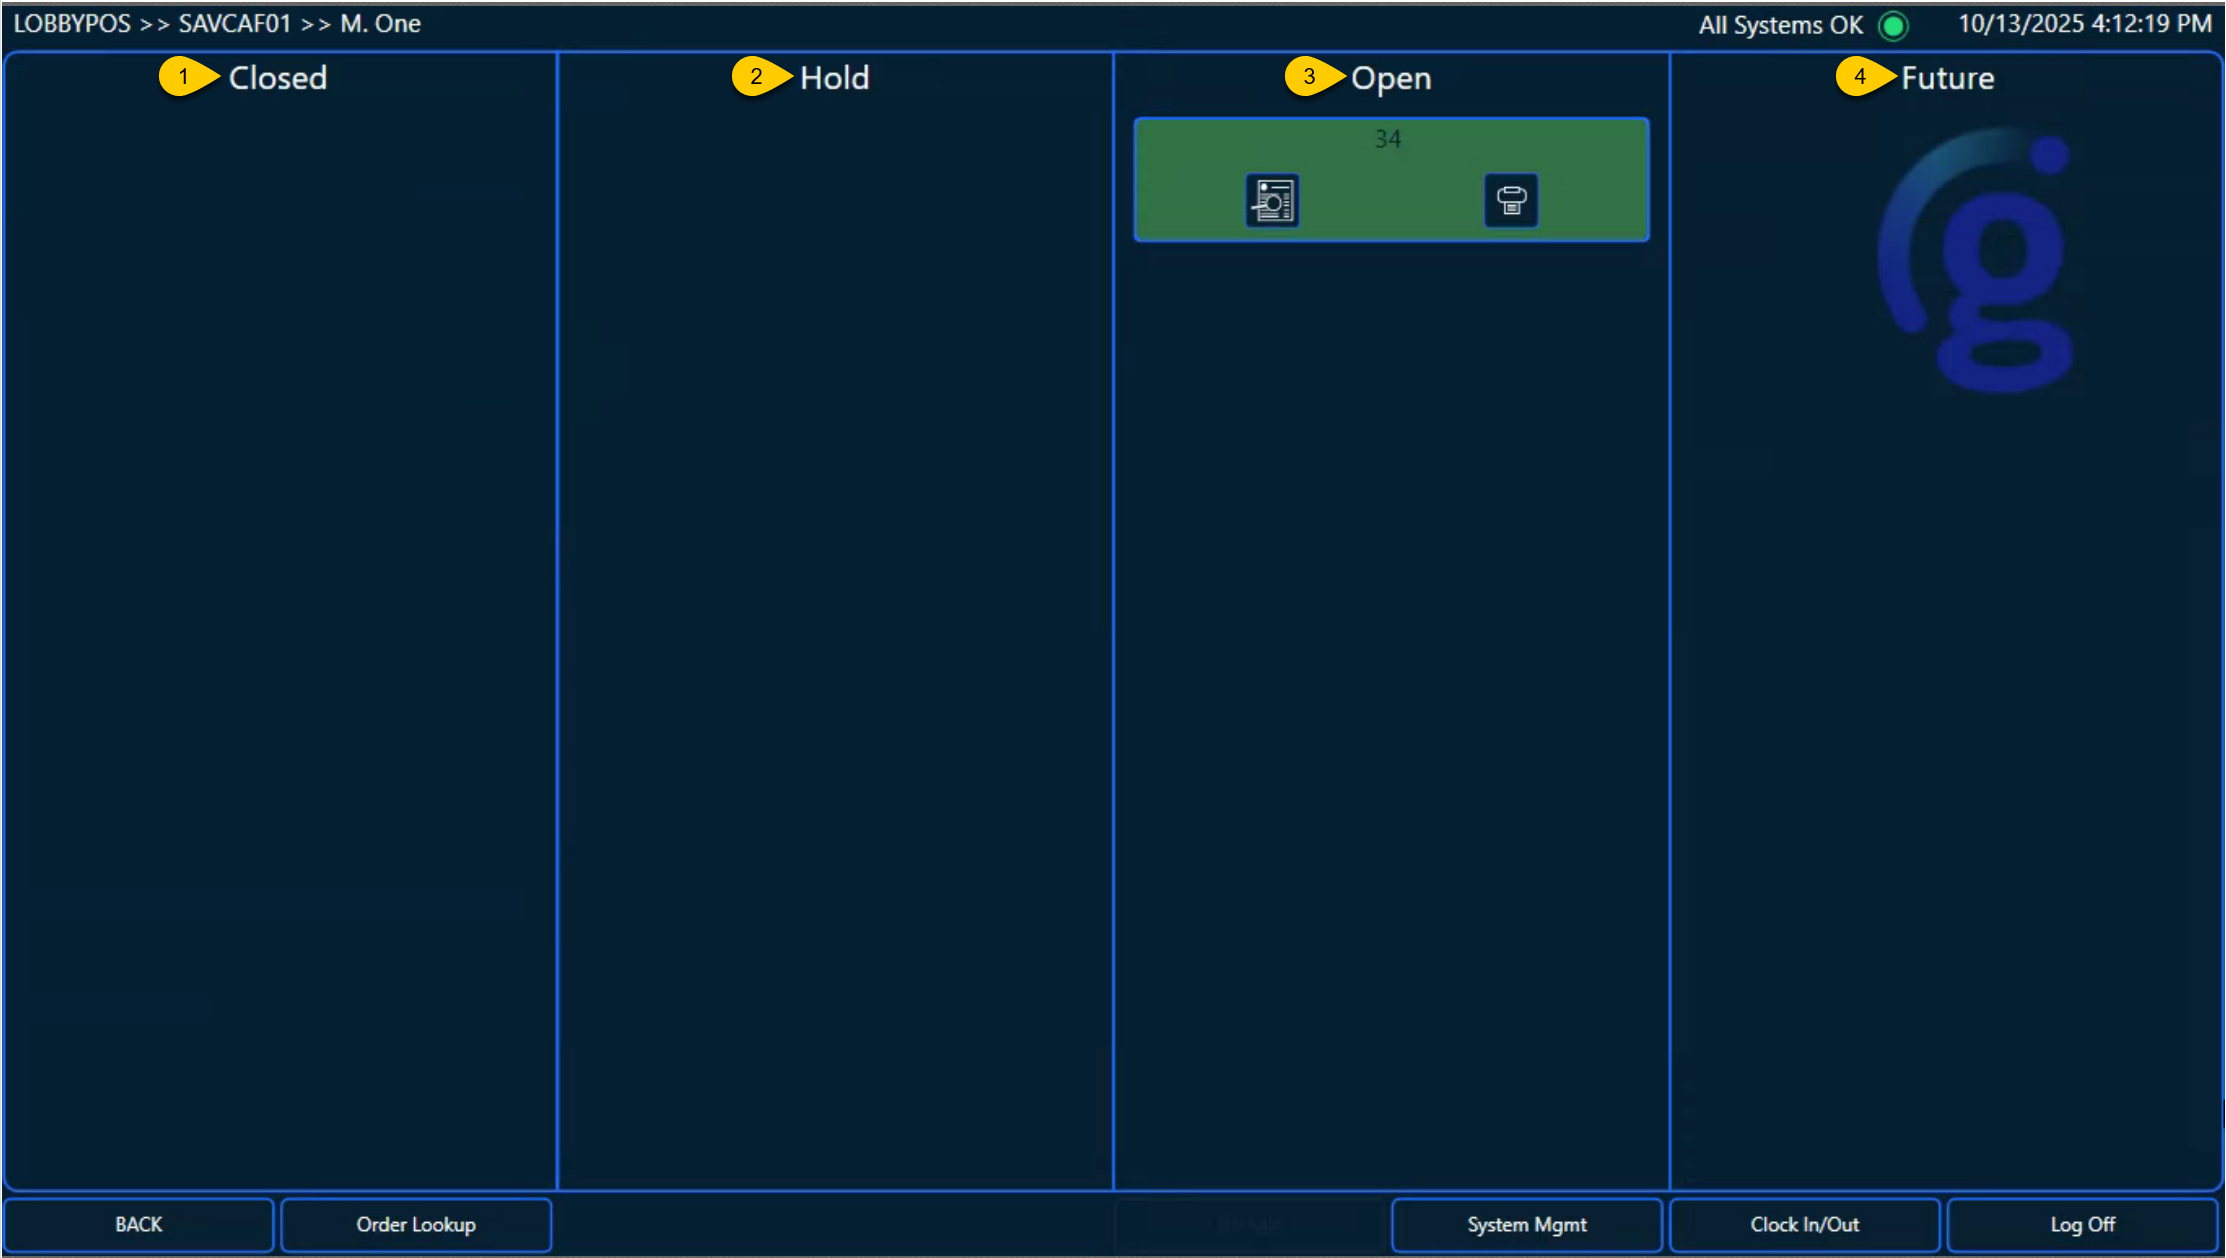 |
1 | Closed - Orders that have been paid and fulfilled in the OMS:
| ||||||||||||
2 | Hold - Orders that have been entered on the POS device and the employee selected either Hold Order or Send to Kitchen.
| ||||||||||||
3 | Open - Orders that have been entered and payment has been processed by the POS device. However, the kitchen has not completed the order:
| ||||||||||||
4 | Future - Orders that have been placed but are scheduled to be picked up at a later time. For example, a large birthday party order is placed on a Tuesday but is not being picked up until Saturday. Future orders can either be paid at the time of pickup or at the time the order is processed, depending on how they are set up in the FSM POS system. To create a future order:
|
Void an Order
To void an order:
From the Main Order screen, select Order Mgmt.
From Order Mgmt, select the order.
From the order summary screen, select Void.
From the Void Order? modal, select OK to void the order, or X to return to the order summary screen.
After selecting OK and returning to the Main Order screen, select Order Mgmt and the order displays as Closed.
From the order summary screen, the order displays as a void.
Screen Capture
Reopen, Refund, and Void buttons |
|

Refund an Order
To refund an order:
From the Main Order screen, select Order Mgmt.
From Order Mgmt, select the order.
From the order summary screen, select Refund.
From the Refund modal, select the items to refund, enter the Refund Reason, and select OK.
After selecting OK and returning to the Main Order screen, select Order Mgmt and the order displays as Closed.
From the order summary screen, the order displays as a refund.