Initialize Communication with WEB-SRM
To allow Genius companies and sites to communicate with WEB-SRM in Quebec, WEB-SRM service shall be configured on the Genius Portal on the global level All Services page. The configuration must be only by a Global Payments team member, based on the valid certification provided by Revenu Québec.
The initialize communication steps include the following:
Step | Topic | Description |
|---|---|---|
1 | Steps to enable the WEB-SRM service at the company level. | |
2 | Configuration settings for WEB-SRM service at the company level. | |
3 | Steps to enable WEB-SRM service and configure the settings at the site level. | |
4 | Steps to refresh the POS terminals. | |
5 | Obtain Digital Certificates for Genius POS Terminals to Communicate with WEB-SRM Service | Steps to obtain digital certificates to enable communication between POS terminals and WEB-SRM service. |
6 | Steps to request employee access to WEB-SRM service. | |
7 | Steps to use Genius POS with WEB-SRM service. |
See Reinitialize Communication with WEB-SRM Service for steps related to changing the site owner.
Enable WEB-SRM Service for a Company
Genius Portal → User Name Dropdown → Admin → All Services
To enable the WEB-SRM Service for a company:
From All Services, select Revenu Québec Web-SRM from the list.
From Revenu Québec Web-SRM, add the company to Included Companies.
See All Services for additional general information for this configuration.
Configure WEB-SRM Service for a Company
Genius Portal → Settings and Tools → Company Settings
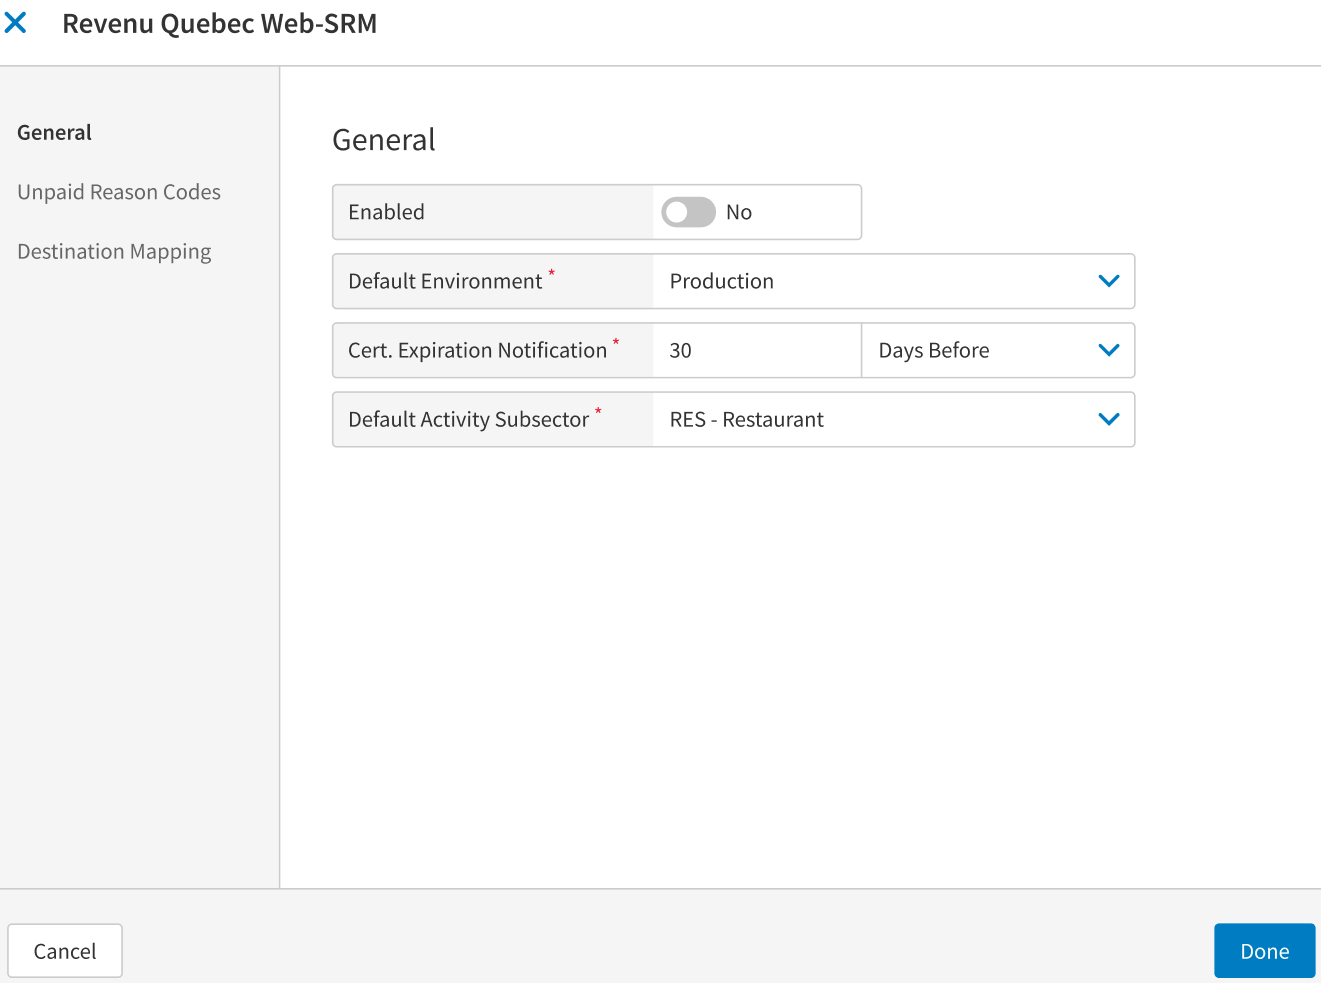
From Company Settings → Revenu Québec Web-SRM, define the following:
From the General section, define the following:
Field Name
Value
Description
Enabled
Toggle Yes to enable the Revenu Québec Web-SRM service for the company.
Default Environment
From the dropdown, select the default environment where the service runs:
Production - For production usage only
Development - For testing purposes only with testing mandatory identifiers
Testing - For certification only. Do not use this environment for real or testing companies outside the certification process in Revenu Québec.
This is a default environment for sites created for this company. It can be changed for a given site in Sites configuration.
The selected environment defines what APIs are used to send requests to the WEB-SRM service.
Cert. Expiration Notification
Use the provided fields to notify the owner or manager that the certification is close to the expiration date and to initiate the certificate update.
In the provided field, enter the number of days.
From the dropdown, select the preferred option.
The default value is 30 Months Before.
The notifications about certificates that expire soon appear on:
Genius Portal → Sites → Select Site → Services → Revenu Québec Web-SRM service
POS System Notification and Terminal State function
Default Activity Subsector
From the dropdown, select the default activity subsector (e.g. Restaurant) for the company.
Bars are not supported or certified.
Each order and item in the order is sent to the WEB-SRM service with the subsector attribute. If a site operates in different subsectors, such as Restaurant or Food Truck, a different order destination is used for each of the subsectors.
The subsector sent to the WEB-SRM service is defined by the default subsector of the site or the subsector of the order destination, which are configured in the WEB-SRM service. See WEB-SRM Service: Site Configuration for additional information.
From the Unpaid Reason Codes section, define the following:
Section
Value
Description
Add Reason Codes
Define which reason codes for the Void Order event are considered a Failure To Pay situation.
When a customer leaves without paying the bill or if a customer refuses to pay the bill, the order is sent to the WEB-SRM service with the specific attribute that claims the transaction is the Failure to Pay PSP type.
This type of transaction must not have a payment. No bill is produced for the customer.
To mark an order as Failure to Pay on Genius POS:
The reason code for voiding the order is enabled for the company.
The order is voided with a specific reason code, which is defined as Unpaid Reason Code.
See WEB-SRM: Unpaid Reason Codes for the configuration steps.
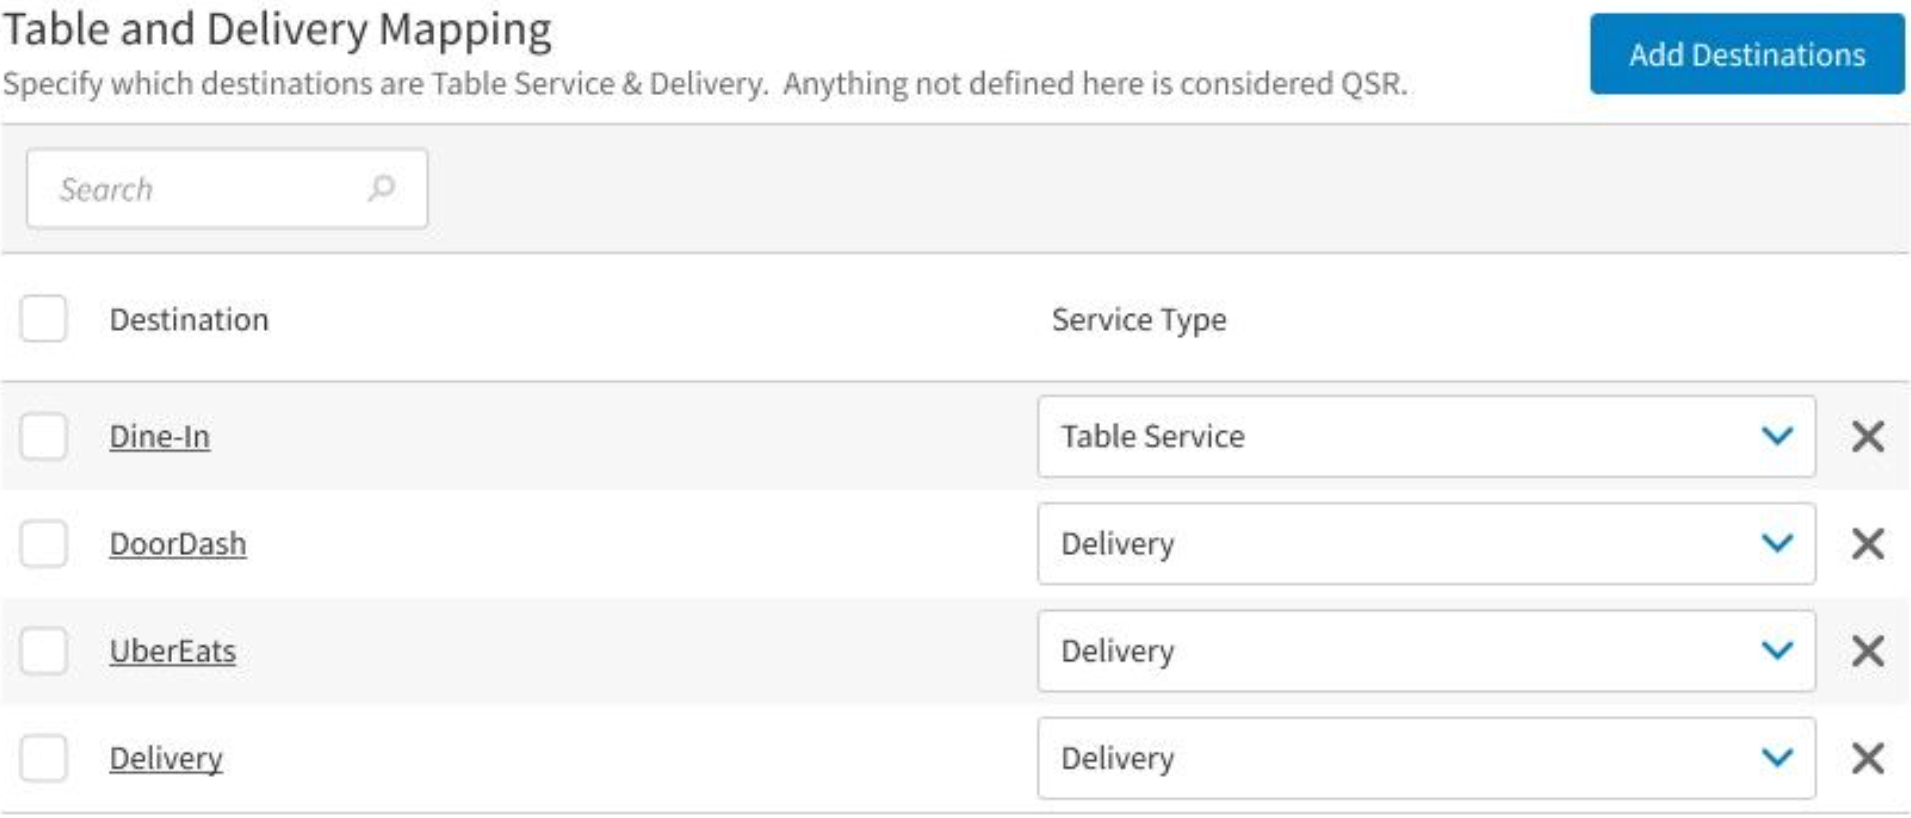
From the Service Type Mapping section, define the following:
Section
Value
Description
Table and Delivery Mapping
Define which order destinations are used for Table Service or Delivery (Delivery by the Mandatory).
All other destinations are to be considered as Counter Service.
Nota
It is critical to define the Service Type correctly, so that transactions are sent with the correct attributes.
Check the order source which is assigned to orders created through the Delivery Platforms.
Nota
Table Service is certified starting from 4.1 version.
Usage:
If an order has an Order Source with the attribute is-marketplace set to TRUE, then typServ="LVT", Service through Delivery Platform.
If the destination is configured as Delivery, then typServ="LVR" , Delivery by the Mandatory.
If the destination is not configured as Delivery or Table Service, then it is configured as Counter Service, typServ="CMP" automatically.
See WEB-SRM: Service Type Mapping for configuration steps.
Screen Captures

Enable and Configure WEB-SRM Service for a Site
Mandatory Information
Genius Portal → Sites
From Sites → Create Site, define the following:
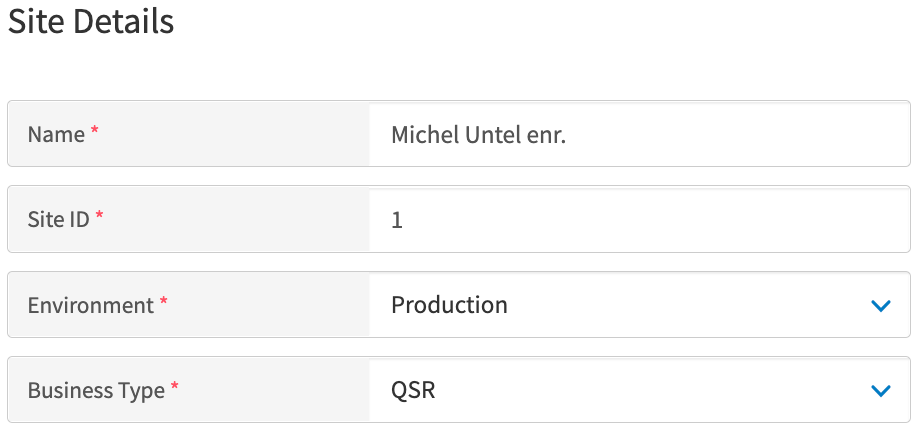
From General → Site Details, define the following:
Field Name
Value
Description
Site Name
Length: 1 to 64 characters. It must contain ASCII characters only.
The Site Name is sent in transactions to the WEB-SRM service. The name of the mandatary who operates the business (field nomMandt and printed on the User Report).
Site ID
Configure the site identifier (ID) taking into account its usage in the certificate nickname generation.
The Site ID is used for the WEB-SRM service certificate nickname generation. The six (6) digits are taken from site_id value. If the value is longer, it is truncated at the beginning of the number.
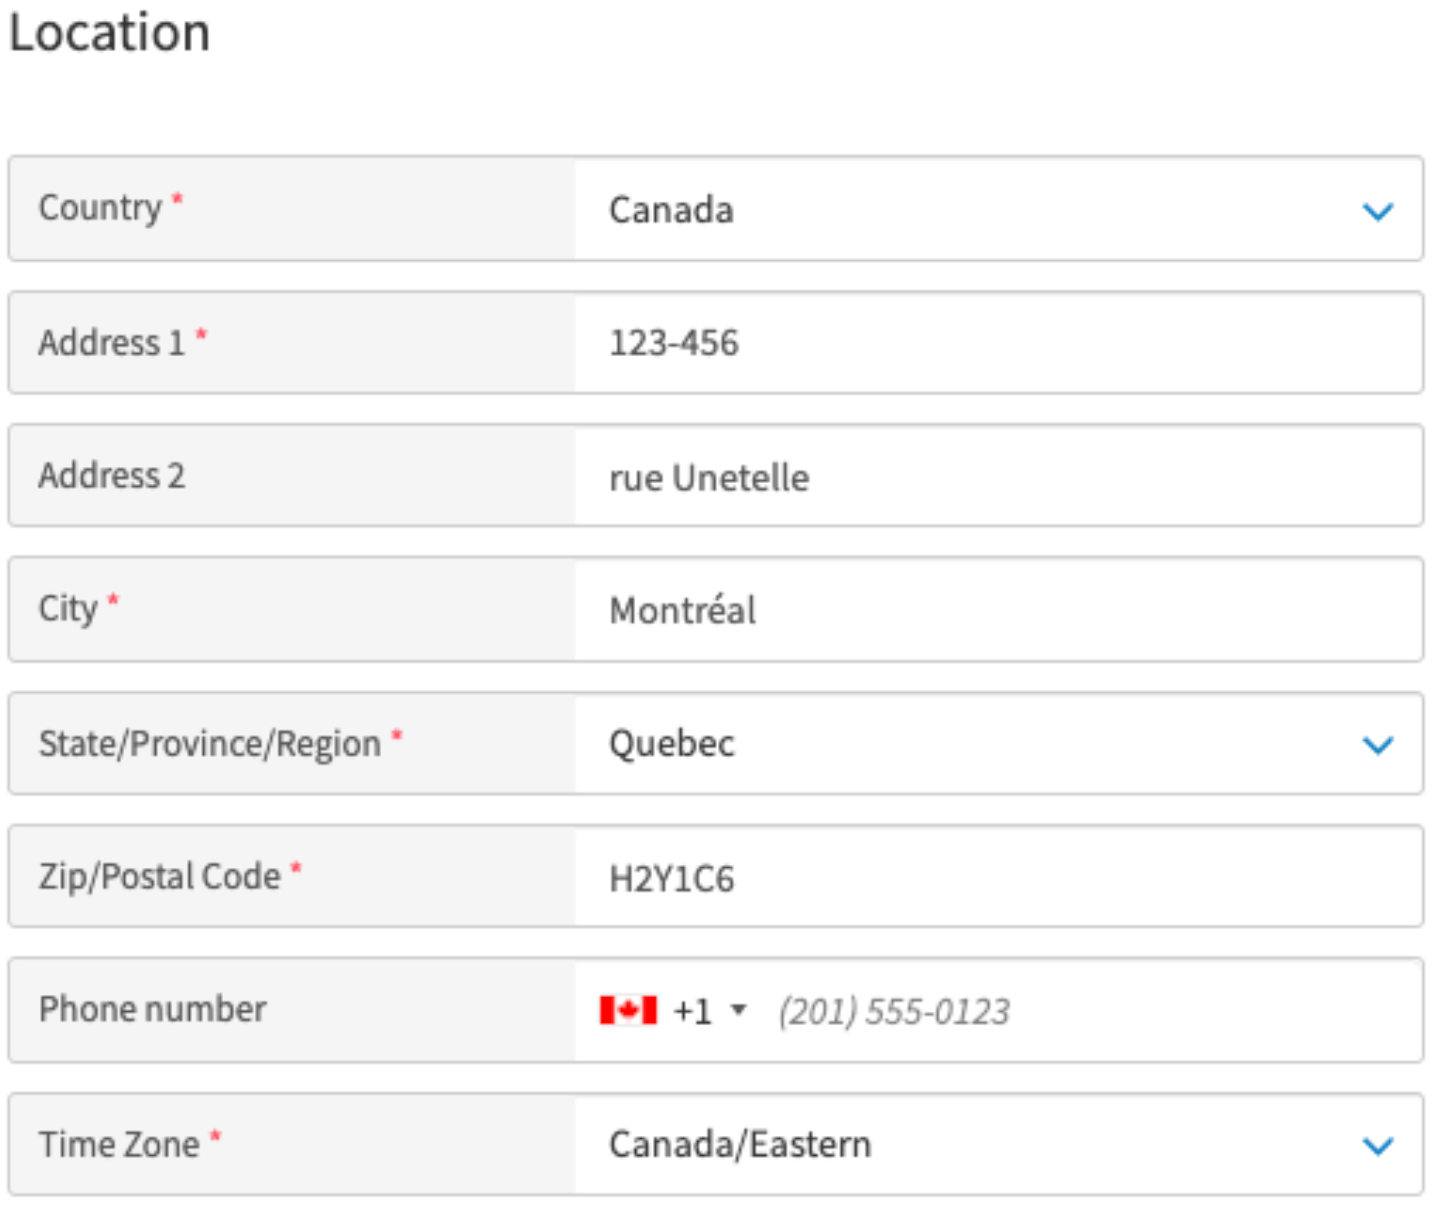
From General → Site Location, define the following:
Field Name
Value
Description
Address 1
The street number.
If there is a unit number, it must come first followed by a hyphen and the street number (e.g. 100-3800).
The address is printed on receipts, the User Report, and sent to the WEB-SRM service in a document request each time the User Report is generated.
Aviso
Address 1 can contain numbers and a hyphen only. It is sent in transaction requests. If it contains some unallowed symbols, sending transactions will fail.
Nota
The full format of address that is sent to the WEB-SRM service: street number, street name, municipality, and postal code.
Example: 123-456 rue Unetelle, Montréal, H2Y1C6
Address 2
The street name
City
The city name
Country
Canada
State/Province/Region
Québec
Zip/Postal Code
The zip or postal code.
Format: A9A9A9.
The following six (6) characters are mandatory: – 1 letter – 1 digit – 1 letter – 1 digit – 1 letter – 1 digit
From General → Identifiers, define the following:
Field Name
Value
Description
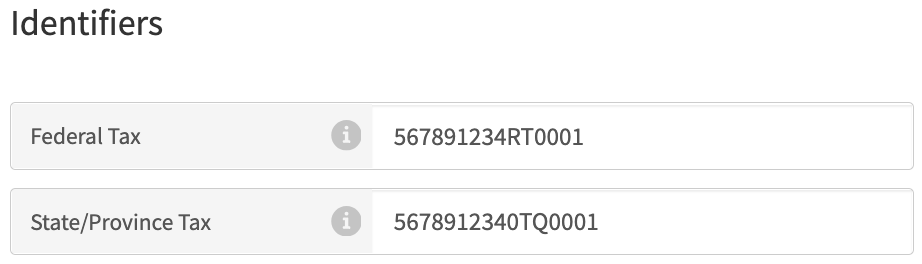
Federal Tax
digitals{9}RT\digitals{4}
Aviso
Do not add any additional symbols or spaces. When the mandatory does not have a GST Registration Number, enter “000000000RT0000”.
Source: Revenu Québec Registration
The value is used in the requests to the WEB-SRM service and printed on receipts. If the value has a mistake or any redundant symbols or spaces, the transactions cannot be sent to the WEB-SRM service, and the site is not allowed to manage orders.
Province/State Tax
digital{10}TQ\digitals{4}
Aviso
Do not add any additional symbols or spaces. When the mandatory does not have a QST Registration Number, enter “0000000000TQ0000”.
Screen Captures
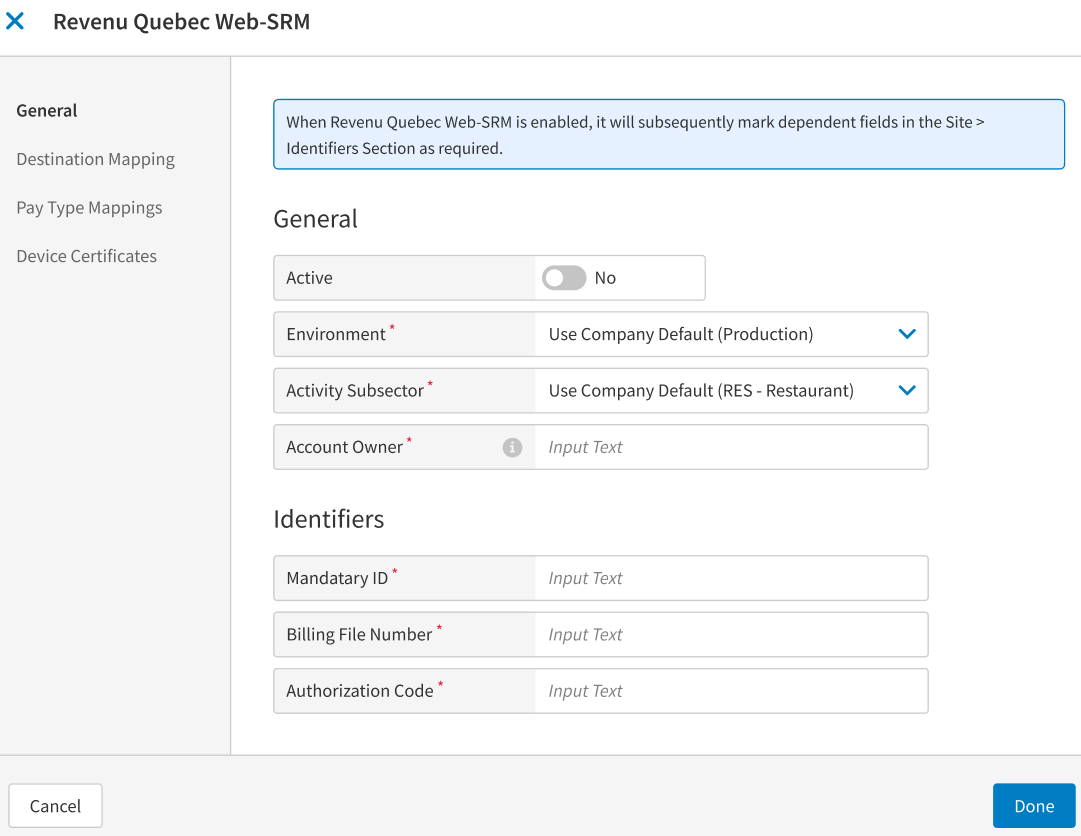
WEB-SRM Service: Site Configuration
Genius Portal → Sites
From Revenu Québec Web-SRM, define the following:
From the General section, define the following:
Field Name
Value
Description
Active
Toggle Yes to enable the Revenu Québec Web-SRM service for the site.
Environment
From the dropdown, select the default environment where the service runs.
The selected environment determines which APIs are used to send requests to the WEB-SRM service.
Use the Production environment for production usage only.
Use the Development environment for quality assurance and testing purposes.
Use the Testing environment for certification only.
The selected environment defines what APIs are used to send requests to the WEB-SRM service.
Activity Subsector
From the dropdown, select the default activity subsector (e.g. Restaurant) for the company.
Bars are not supported or certified.
Each order and item in the order is sent to the WEB-SRM service with the subsector attribute. If a site operates in different subsectors, such as Restaurant or Food Truck, a different order destination is used for each of the subsectors.
The subsector sent to the WEB-SRM service is defined by the default subsector of the site or the subsector of the order destination, which are configured in the WEB-SRM service.
Account Owner
Type the first and last name of the individual who represents the site owner.
The Account Owner name is printed on the User Report.
The Account Owner is printed on the User Report (nomUtil attribute).
From the Identifiers section, define the following:
Field Name
Value
Description
Mandatory ID
Type the Mandatory ID (Number) provided by Revenu Québec without any additional symbols.
This number is primarily used to identify the owner of the digital certificate.
The number assigned by Revenu Québec and used each time a person communicates with Revenu Québec. Under the mandatory billing project, this number is used primarily to identify the owner of the digital certificate.
Billing File Number
Type the Billing File Number provided by Revenu Québec without any additional symbols.
This number is primarily used to identify a sector of activity and, if applicable, the location of the establishment based on its QST registration number.
The billing file number should be in the following format: "ER0001"
The number provided by Revenu Québec to identify a sector of activity and, if applicable, the location of the mandatory's establishment based on its QST registration number.
Authorization Code
Type the Authorization Code provided by Revenu Québec.
This number is primarily used to identify the party using the WEB-SRM service and to obtain a digital certificate. Keep authorization codes confidential.
The authorization code should be in the following format: "X9X9-X9X9"
The code provided by Revenu Québec that is used to identify requesters to the WEB -SRM service and obtain a digital certificate.
Nota
Keep authorization codes confidential.
See Sales Recording System Configuration to obtain the required identifiers and registration numbers from Revenu Québec.
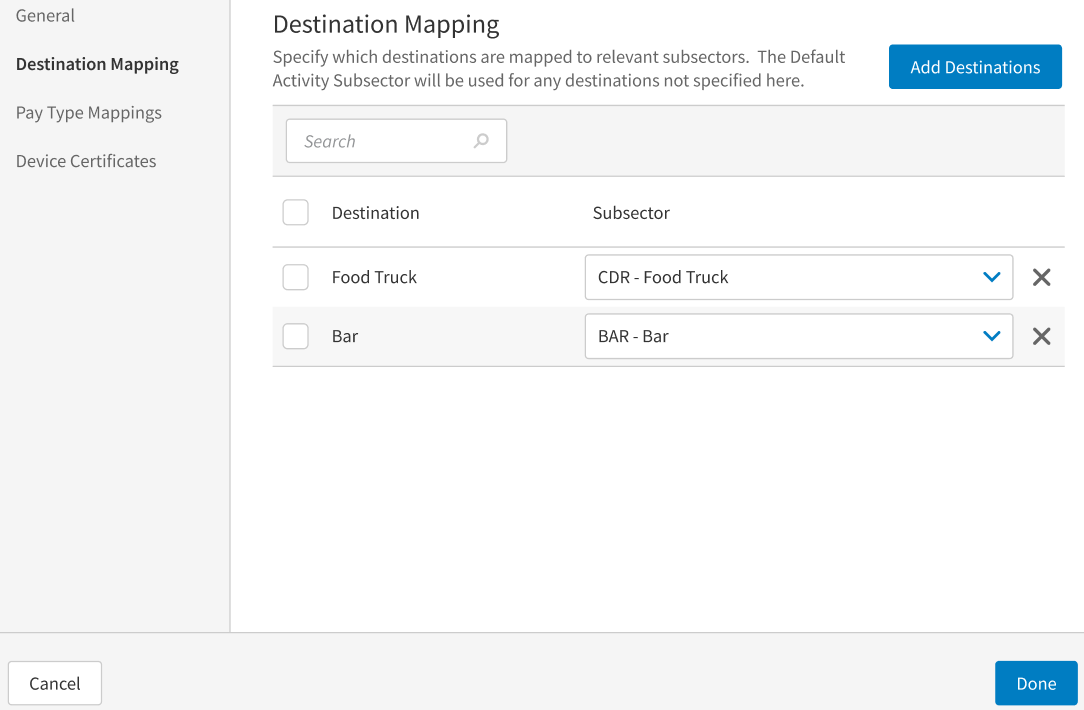
From the Destination Mapping subsection, define the following:
Field Name
Value
Description
Destinations
Specify which destinations are mapped to the relevant subsectors. The Default Activity subsector is used for any destinations not specified here.
Table Service is certified starting from 4.1 version.
See WEB-SRM: Destination Mapping for configuration steps.
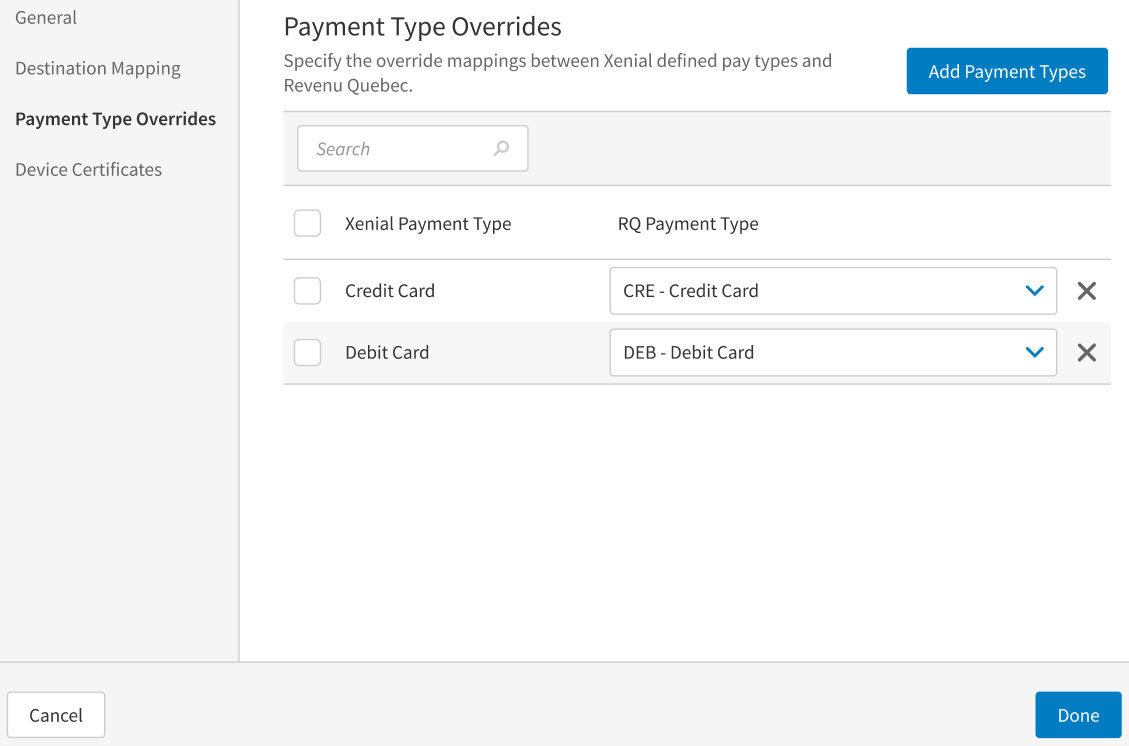
From the Payment Type Overrides subsection, define the following:
Field Name
Value
Description
Payment Types
Specify the override mappings between defined pay types and Revenu Québec.
Aviso
Loyalty, Digital Wallet, and Coupon types are not certified payment types.
When an order is finalized, the payment method used must be transmitted within the transaction to the WEB-SRM service and printed on a bill.
Mapping of the Payment Class to the WEB-SRM service payment methods is hard coded in Genius POS. If a payment method does not match the hard-coded mapping, the WEB-SRM method must be configured in the WEB-SRM service.
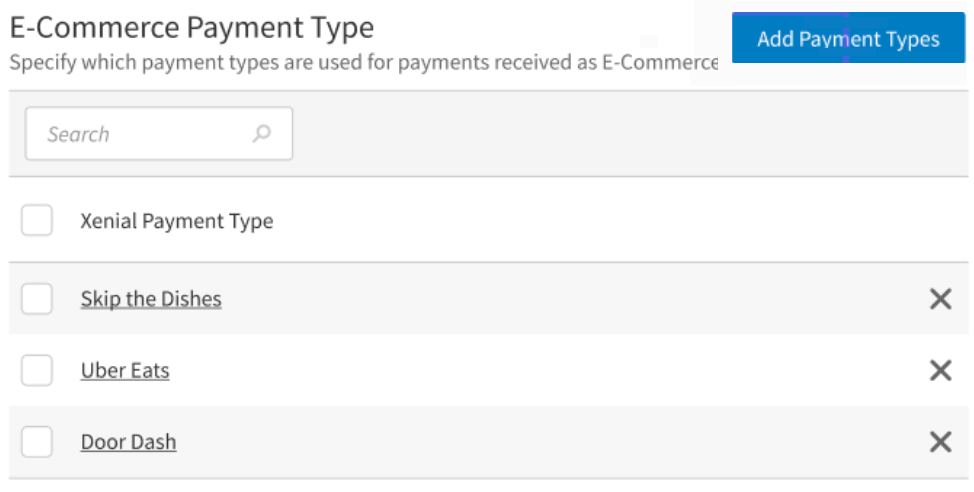
E-Commerce Payment Type
Define which payment types are always used for E-Commerce payments.
An E-Commerce payment is when the device used to pay for the transaction belongs to the customer and the payment is made using the merchant's software.
For example, a payment made through a website using a personal computer or through a mobile app on a smart phone or tablet is considered an E-Commerce payment. However, payments made using a payment service such as Apple Pay, Google Pay, or a virtual payment terminal (VPT) do not constitute an E-Commerce payment.
See WEB-SRM: Payment Type Overrides and WEB-SRM: E-Commerce for configuration steps.
Screen Captures
Refresh POS Terminals
Refresh the POS terminals to receive the latest site, WEB-SRM service, and Data Management configuration.
Obtain Digital Certificates for Genius POS Terminals to Communicate with WEB-SRM Service
To obtain and manage digital certificates for POS terminals communicating with the WEB-SRM service, complete the following steps:
Step | Topic | Description |
|---|---|---|
1 | Review the digital certificate general information as it relates to the WEB-SRM service. | |
2 | Review the roles and responsibilities for the digital certificate management. | |
3 | Steps to add a digital certificate. | |
4 | Steps to update a digital certificate. | |
5 | Steps to delete a digital certificate. | |
6 | Steps to review a digital certificate's status. |
See WEB-SRM: Device Certificates for additional information.
General Information
When obtaining digital certificates for POS terminals to communicate with the WEB-SRM service, review the following information:
Each POS terminal that enables the user to manage orders, such as create, total, cancel/void, refund, print, and reprint, must send transactions to the WEB-SRM service.
A POS terminal must obtain digital certificates and device identifiers through sending a certificates request to communicate with the WEB-SRM service. The POS terminal is not allowed to make transactions or send user requests without a valid certificate.
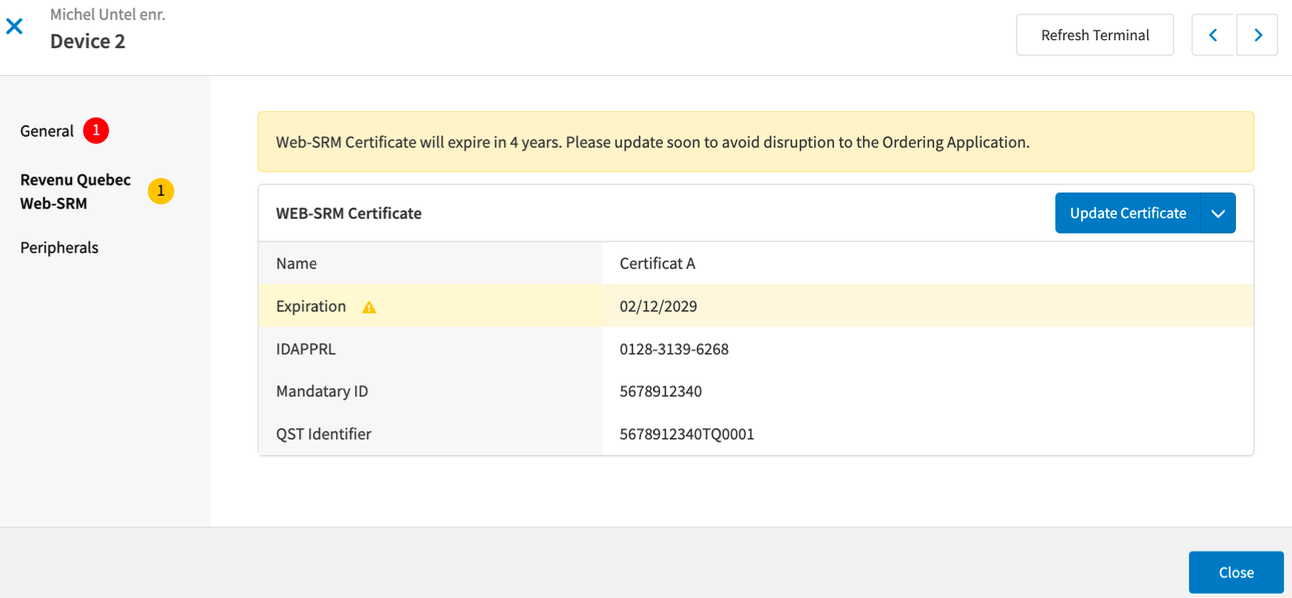
A digital certificate is obtained using the mandatory identifiers and the WEB-SRM service identifiers configured on the Genius Portal. If any of the vital information is changed, the digital certificates must be updated.
Digital certificates live for five (5) years. The expiration notification is configurable on the WEB-SRM service site configuration, however, Revenu Québec recommends users replace their certificates after two and a half (2.5) years.
Each physical device with Genius POS installed must have its own unique identifier, the
IDAPPRLfield. This identifier is obtained through a certificates request. The site owner or manager is responsible for making a best effort to obtain and retain the certificate. If the device ID has been lost, the new device identifier can be obtained in the certificates request.Each certificate has a nickname registered through the certificates request. The nickname identifies the certificate when it is revoked during events such as equipment breakage or theft. The nickname appears in My file for businesses on the Revenu Québec Portal.
Certificate Management Overview
An owner, site manager, or authorized employee must generate and maintain digital certificates for each POS device that is used to create orders, pay orders, and print receipts while using the WEB-SRM service. Digital certificates can be updated or deleted using the following steps:
Add a Digital Certificate - When a POS terminal does not have a certificate.
Update a Digital Certificate - When a POS terminal has an invalid, soon to expire certificate or valid certificate where vital information is changed. For example, the QST and GST of the site is changed.
Digital Certificate Nicknames
Nicknames are mandatory for digital certificates. The current implementation auto-generates the nickname when adding or updating the certificate. Additional nickname information:
The digital certificate nickname formula is <6-digit site id>_T<3-digit terminal number>_<first 9 device id>_<date/time of subscription generation YYMMDDhhmm>.
The nickname values are truncated from the beginning, if needed.
For the testing and development environments, the nickname is prompted on the POS device after the certificate request is initiated.
Screen Capture
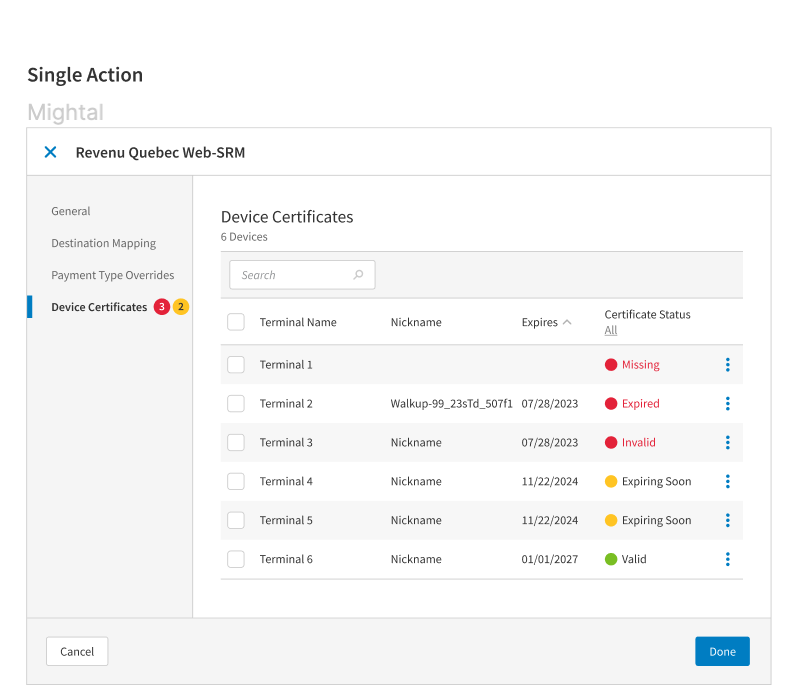
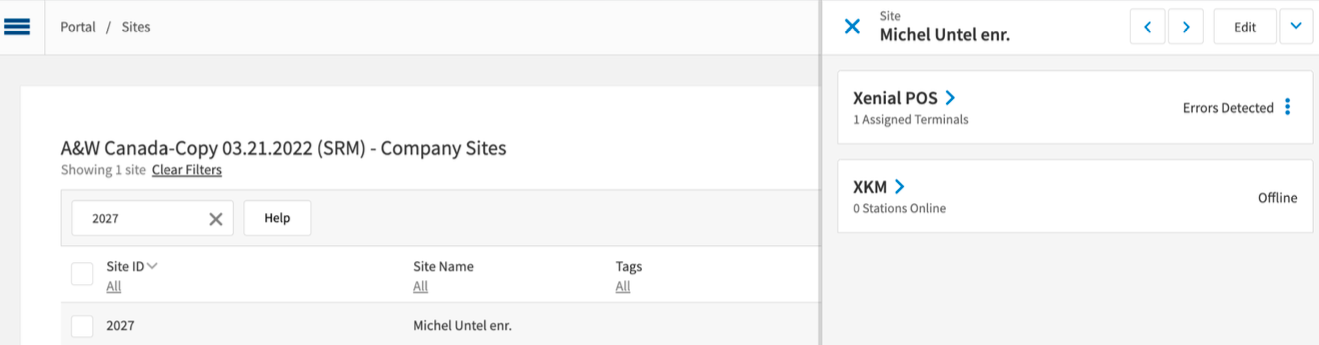
Genius Portal - Device Certificates |
|
Add a Digital Certificate
Genius Portal → Admin → Sites
To add a digital certificate for POS terminal with WEB-SRM service:
From Sites, find the site name, select the 3-dot menu, and select Edit.
From the site page, select Services from the left navigation pane.
From Services, find Revenu Québec WEB-SRM Service, select the 3-dot menu, and select Edit.
From Edit Revenu Québec WEB-SRM Service, select Device Certificates.
From Device Certificates, review the list of terminals and their certificate status.
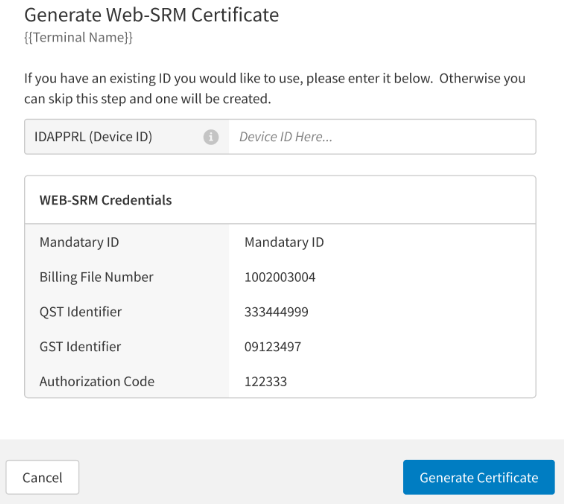
From Device Certificates, find the terminals without a digital certificate, select the 3-dot menu next to the terminal name, and select Generate Certificate.
From the Generate Certificate popup, review the identifiers and fields requested for the digital certificate:
IDAPPRL (Device ID)
Mandatory ID
Billing File Number
QST Identifier
GST Identifier
Authorization Code
From the Generate Certificate popup, enter the Device Identifier to the text entry field if the Device Identifier for the POS terminal is known.
From the Generate Certificate popup, select Generate Certificate. The command is sent to the Genius POS application to send the add certificate request to the WEB-SRM service.
After the Genius POS application receives the command, it sends the add certificates request to the WEB-SRM service.
Nota
This process can take between 30-60 seconds to finish.
Check the result of the add certificates request. If any issues occur, send the add certificates request again. To check the result, refresh the WEB-SRM Service page and check the certificate status.
Confirm that the digital certificate has been added to the POS terminal.
Nota
If any errors occur when sending the digital certificate request to the WEB-SRM service, they are shown in the POS terminal screen. Review and resolve any errors when they occur.
Screen Capture
Generate WEB-SRM Certificate |
|
Update a Digital Certificate
Genius Portal → Admin → Sites
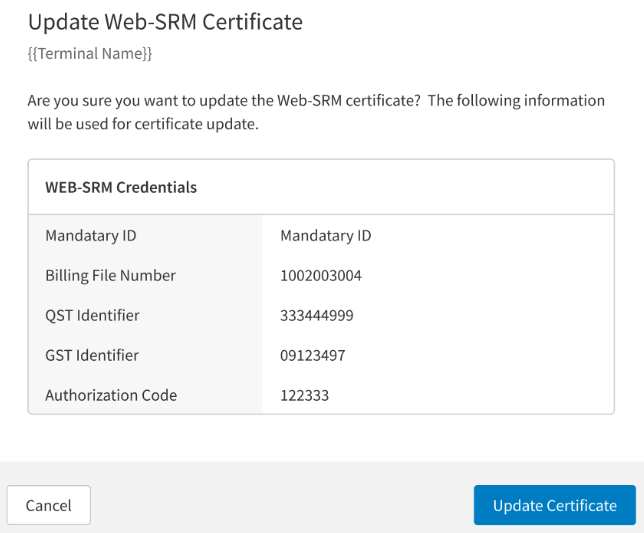
When a digital certificate is expiring soon, expired, invalid, or there is a change in the identifiers of the site, the digital certificates for the POS terminals should be updated.
To update a digital certificate for POS terminal with WEB-SRM service:
From Sites, find the site name, select the 3-dot menu, and select Edit.
From the site page, select Services from the left navigation pane.
From Services, find Revenu Québec WEB-SRM Service, select the 3-dot menu, and select Edit.
From Edit Revenu Québec WEB-SRM Service, select Device Certificates.
From Device Certificates, review the list of terminals and their certificate status.
From Device Certificates, find the terminals with an invalid, expired, or valid certificate digital certificate, select the 3-dot menu next to the terminal name, and select Update Certificate.
From the Update Certificate popup, review the identifiers and fields requested for the digital certificate:
IDAPPRL (Device ID)
Mandatory ID
Billing File Number
QST Identifier
GST Identifier
Authorization Code
From the Update Certificate popup, note the re-generated Nickname and Device Identifier used at this time.
From the Update Certificate popup, select Update Certificate. The command is sent to the Genius POS application to send the Update Certificate request to the WEB-SRM service.
After the Genius POS application receives the command, it sends the Update Certificate request to the WEB-SRM service.
Nota
This process can take between 30-60 seconds to finish.
Check the result of the Update certificate request. If any issues occur, send the Update Certificate request again. To check the result, refresh the WEB-SRM Service page and check the certificate status.
Screen Capture
Update WEB-SRM Certificate |
|
Delete a Digital Certificate
Genius Portal → Admin → Sites
When a digital certificate is expired, invalid, or there is a change in the identifiers of the site, the digital certificates for the POS terminals should be deleted.
To delete a digital certificate for POS terminal with WEB-SRM service:
From Sites, find the site name, select the 3-dot menu, and select Edit.
From the site page, select Services from the left navigation pane.
From Services, find Revenu Québec WEB-SRM Service, select the 3-dot menu, and select Edit.
From Edit Revenu Québec WEB-SRM Service, select Device Certificates.
From Device Certificates, review the list of terminals and their certificate status.
From Device Certificates, find the terminals with an invalid or expired digital certificate, select the 3-dot menu next to the terminal name, and select Revoke Certificate.
From the Revoke Certificate popup, select Revoke Certificate. The command is sent to the Genius POS application to send the Revoke Certificate request to the WEB-SRM service.
After the Genius POS application receives the command, it sends the Revoke Certificate request to the WEB-SRM service.
Nota
This process can take between 30-60 seconds to finish.
Check the result of the Revoke Certificate request. If any issues occur, send the Revoke Certificate request again. To check the result, refresh the WEB-SRM Service page and check the certificate status.
Review Certificate Status
Genius Portal → Admin → Sites
To review a digital certificate for POS terminal with WEB-SRM service:
From Sites, find the site name, select the 3-dot menu, and select Edit.
From the site page, select Services from the left navigation pane.
From Services, find Revenu Québec WEB-SRM Service, select the 3-dot menu, and select Edit.
From Edit Revenu Québec WEB-SRM Service, select Device Certificates.
From Device Certificates, review the list of terminals and their certificate status.
If a certificate is missed, invalid, or expiring soon, the message is shown on the panel.
From Device Certificates, select the terminal name to review the detailed data about the terminal.
From the WEB-SRM Service page, check the certificate status.
Screen Captures
Genius Portal - Sites view |
| |
Genius Portal - WEB-SRM Certificate view |
|
WEB-SRM Service User Management
WEB-SRM User Management is performed by a site owner or an employee with appropriate permissions on Staff for each site. For sites using the WEB-SRM service, employees who create fiscal transactions:
Must first initiate an POS session using a secure login procedure with user code and password. A PIN of at least 4-digits meets Revenu Québec security requirements. Users must initiate an POS session at the beginning of each shift and close the session at the end of each shift.
Must be added as a WEB-SRM service user. Until an employee logged in to the POS application is sent to the WEB-SRM service through a Create a User request successfully, they are automatically forbidden to perform fiscal transactions on the POS terminal.
An employee who is recorded as the owner for an order is written into the fiscal transaction and sent to the WEB-SRM service in the transaction. Revenu Québec requires every employee responsible for a transaction to be registered prior to executing the transaction.
Confirm all employees who are owners are registered as described in Create a User in WEB-SRM Service. Otherwise, an audit by Revenu Québec can be initiated.
To create and manage user accounts, complete the following:
Step | Topic | Description |
|---|---|---|
1 | Steps to send a Create a User request to the WEB-SRM service. | |
2 | Steps to send a Delete a User request to the WEB-SRM service. |
Create a User in WEB-SRM Service
Genius Portal → 4-Dot Menu → Staff → WEB-SRM User Requests
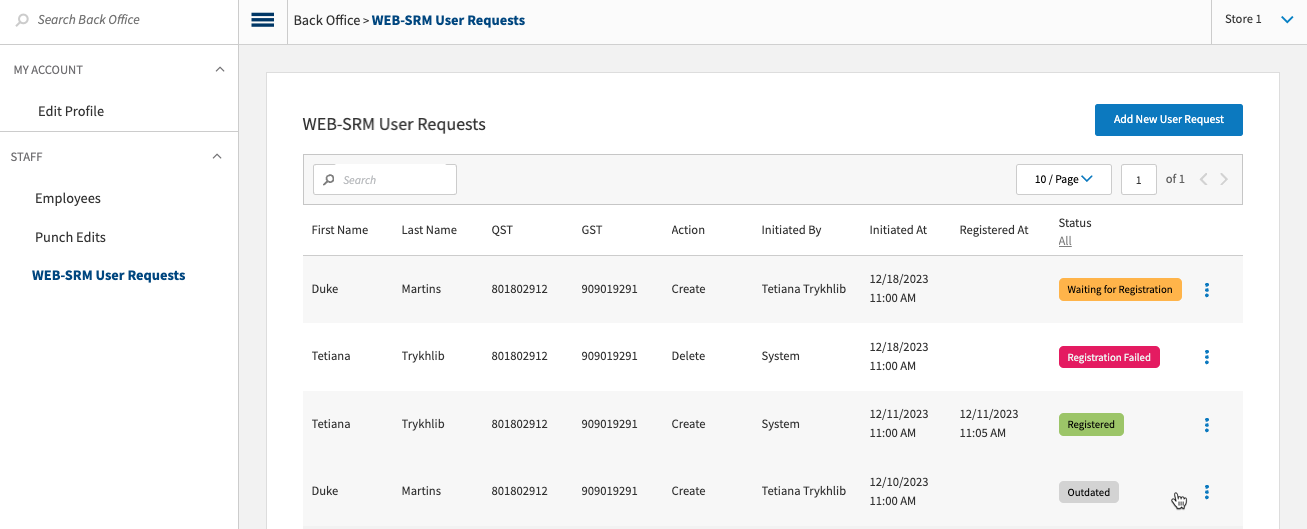
To send the create a user request to the WEB-SRM service for an employee or multiple employees:
From the Staff left navigation pane, select WEB-SRM User Requests.
From WEB-SRM User Requests, select the appropriate site. Without a site selection, the system will not allow WEB-SRM users to be created.
Nota
If any errors occur when sending the create user request to the WEB-SRM service, they are shown in the POS terminal screen. Review and resolve any errors when they occur.
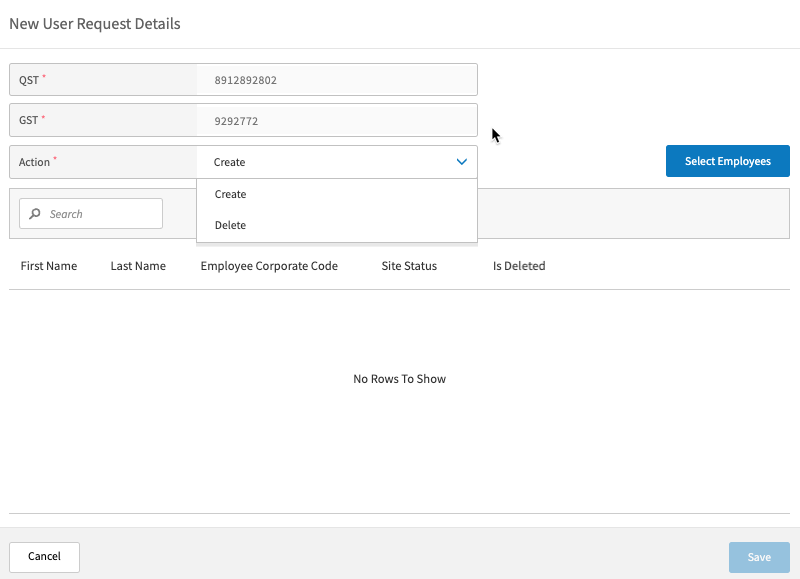
From WEB-SRM User Requests, select Add a New User Request.
From the Add a New User Request popup, select Select Employee.
From Select Employee, select the Search option and enter the employee or employees to be added to the WEB-SRM service request for deletion.
From Select Employee, review the tax identifiers for each user request to be sent.
Nota
Tax identifiers are retrieved from the Site configuration in the Genius Portal. The tax identifiers cannot be changed in the WEB-SRM service.
From Add a New User Request, select Create from the Action dropdown, and save the request.
The command is sent to the POS application to send the user request for the selected employees to the WEB-SRM service.
After an online Genius POS terminal with a valid digital certificate receives the command, the terminal sends the create a user request to the WEB-SRM service.
Nota
This process can take between 30-60 seconds to finish.
Check the result of the create a user request. If any issues occur, send the create a user request again. To check the result, refresh the WEB-SRM Users page and check the user request status.
Screen Captures
Genius Portal - Staff - WEB-SRM User Requests view |
| |
Genius Portal - Staff - New User Request view |
|
Delete a User in WEB-SRM Service
Genius Portal → 4-Dot Menu → Staff → WEB-SRM User Requests
Send a delete a user request for a user previously created in the WEB-SRM service if they:
Are going to stop working in the establishment
Are going to stop creating fiscal transactions
To send the delete a user request to the WEB-SRM service for an employee or multiple employees:
From the Staff left navigation pane, select WEB-SRM User Requests.
From WEB-SRM User Requests, select the appropriate site. Without a site selection, the system will not allow WEB-SRM users to be deleted.
Nota
If any errors occur when sending the delete user request to the WEB-SRM service, they are shown in the POS terminal screen. Review and resolve any errors when they occur.
From WEB-SRM User Requests, select Add a New User Request.
From the Add a New User Request popup, select Select Employee.
From Select Employee, select the Search option and enter the employee or employees to be added to the WEB-SRM service request for deletion.
From Select Employee, review the tax identifiers for each user request to be sent.
From Add a New User Request popup, select Delete from the Action dropdown, and save the request.
The command is sent to the POS application to send the delete user request for the selected employees to the WEB-SRM service.
After an online Genius POS terminal with a valid digital certificate receives the command, the terminal sends the delete a user request to the WEB-SRM service.
Nota
This process can take between 30-60 seconds to finish.
Check the result of the delete a user request. If any issues occur, send the delete a user request again. To check the result, refresh the WEB-SRM Users page and check the user request status.
Use Genius POS with WEB-SRM Service
After the WEB-SRM service is enabled and configured on the site, a valid digital certificate is received by the POS terminal, and user requests are sent for each employee who will manage orders on the Genius POS terminal. The Genius POS terminal then allows the designated users to manage orders.
When creating, updating, finalizing, canceling or voiding, refunding, or printing a receipt or merchant copy for an order, an appropriate transaction is sent to the WEB-SRM service with a digital signature generated using the digital certificate. Additional important information:
The order owner is included in the transaction.
All transactions are logged, including adding and deleting items, and changing prices and quantity.
If an error occurs when sending a transaction, the error is shown on the Genius POS terminal screen. The Genius POS user should review the errors and act to resolve the issue.
Reinitialize Communication with WEB-SRM Service
When a site owner is changed, the QST and GST tax registration and the service configuration must be updated and new digital certificates and user requests initiated:
Initiate deleting certificates for the POS terminals with the current site owner.
Initiate deleting users for the POS terminals with the current site owner.
Refresh the POS Terminals to receive the latest Site, WEB-SRM service, and Data Management configuration.
Obtain digital certificates for Genius POS terminals to communicate with the WEB-SRM service.
Send user requests for employees to the WEB-SRM service.