Order Entry Overview
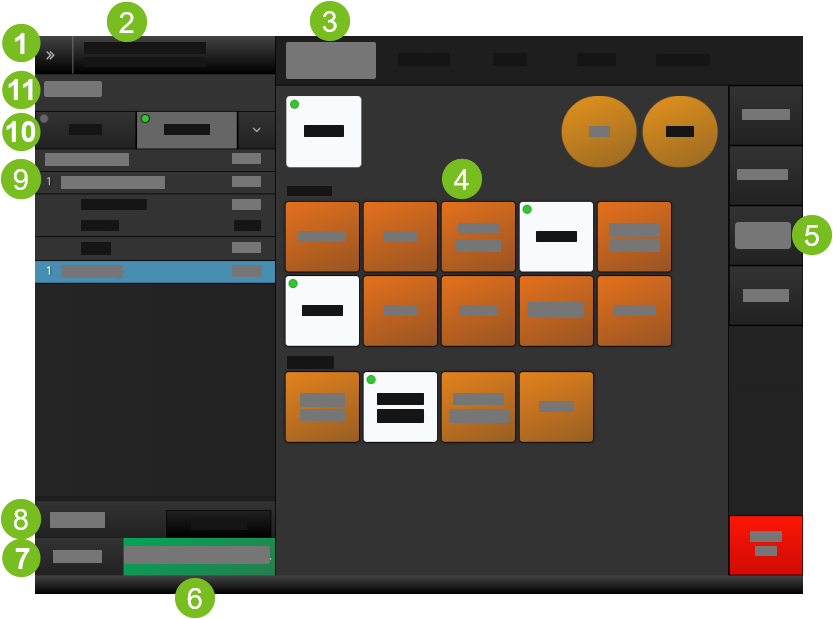 |
1 | System Navigation | Open the System Navigation menu to access:
|
2 | Employee Name | Name of employee assigned to the drawer on this terminal. |
3 | Product Menus | Select a menu from the list to access its products. |
4 | Products | Products on the selected menu are listed here. Select a product to add it to the order. The product quantity added to the order appears in the upper-left of the button. |
5 | Actions Menu | The Actions menu lists the actions you may perform on the item currently selected from the order item listbox. Use the arrows at the top and bottom of the menu to scroll the actions list.
|
6 | Order Total | Total displays the total amount due on the order. This includes tax and discounts. As items are added or removed, the total is updated. Select Summary to view:
Select Total to tender the order. |
7 | Options | Access a list of order options, such as capturing customer information and saving the order. |
8 | Order Segment | Separate order items when multiple guests are added to the same order. The order segment label (Tray, Seat, or Bag) may vary based on the order destination. |
9 | Order Item Listbox | Lists products added to the order. Each line contains:
Select a product to perform an action, such as changing its quantity or applying a modifier. |
10 | Order Destination | Identifies the order destination, such as To Go or Eat In. Select the down arrow next to this field to change the order destination. |
11 | Order Number | Specifies the order number assigned to the order. |
Product Menus
Menus categorize products into major categories, such as Sandwiches, Combo Meals, Beverages, and Desserts.
If you only have three (3) product menus or less, use the menu list button to toggle the menus. An indicator identifies the active menu.
A complex product menu may include subcategories to enable you to locate items more quickly.
When you open a product menu, its subcategories are displayed below. Select a subcategory to access its products.
Depending on how the POS is setup, the product menus may automatically change with a daypart change. You can open a different daypart menu, if needed.
For example, if the menu automatically changes from Breakfast to Lunch at 11:00 AM, you can return to the Breakfast menu if necessary to accommodate guests who want to order items from that menu.
To open a daypart menu:
From the top-left of the menu list, select the down arrow.
Select the menu.
Combined Identical Items
Depending on how the POS is setup, identical items may be combined on the order item listbox to conserve space.
When combined, the item quantity is updated accordingly.
Example
You add two (2) Small Coffee:
1 Small Coffee
1 Small Coffee
After you perform another action, such as adding another Small Coffee, the previous Small Coffee items are combined and the item quantity is updated:
2 Small Coffee
1 Small Coffee
After you perform another action, all Small Coffee items are combined and the item quantity is updated:
3 Small Coffee
Note
Identical order items are NOT combined when:
Different modifiers are applied to the items.
The child items are not identical.
Discount is applied to an item.
Toast Notifications
Toast notifications appear at the bottom of the screen to notify you of a condition that requires attention.
Notifications are automatically dismissed and do not require acknowledgment.
Type | Appearance | Description |
|---|---|---|
Heads Up | Blue with letter "i" | Alert about condition or event |
Success | Green with check mark | Indicates successful operation |
Warning | Yellow with exclamation point | Warning about condition or event |
Critical | Red with exclamation point | Warning about critical issue that may disrupt operations |
Multi-Select Mode
When enabled, you can perform an action on multiple items selected from the order item listbox.
The following actions support Multi-Select Mode:
Add Discount
Change Quantity
Comment
Delete
Duplicate
Resend to Kitchen
Void
To perform an action on multiple items:
From the lower-left of Order Entry, select Options.
From the Options menu, select Multi-Select.
From the order item listbox, select the items.
From the Actions menu, select the action.
Astuce
Touch a selected item again to undo the selection.