Xenial Digital Menu Boards
Indoor Digital Menu Boards | Installation and Training
 |
Welcome!
Congratulations on getting started with Xenial Indoor Digital Menu Boards (IDMB). This document details and directs to all information needed to feel confident throughout the installation and implementation process.
If at any time there are questions or concerns regarding this process, reach out to the Xenial implementation coordinator via email or by dialing 1-800-547-4266 option 7 (monitored Monday-Friday from 8am-5pm EST).
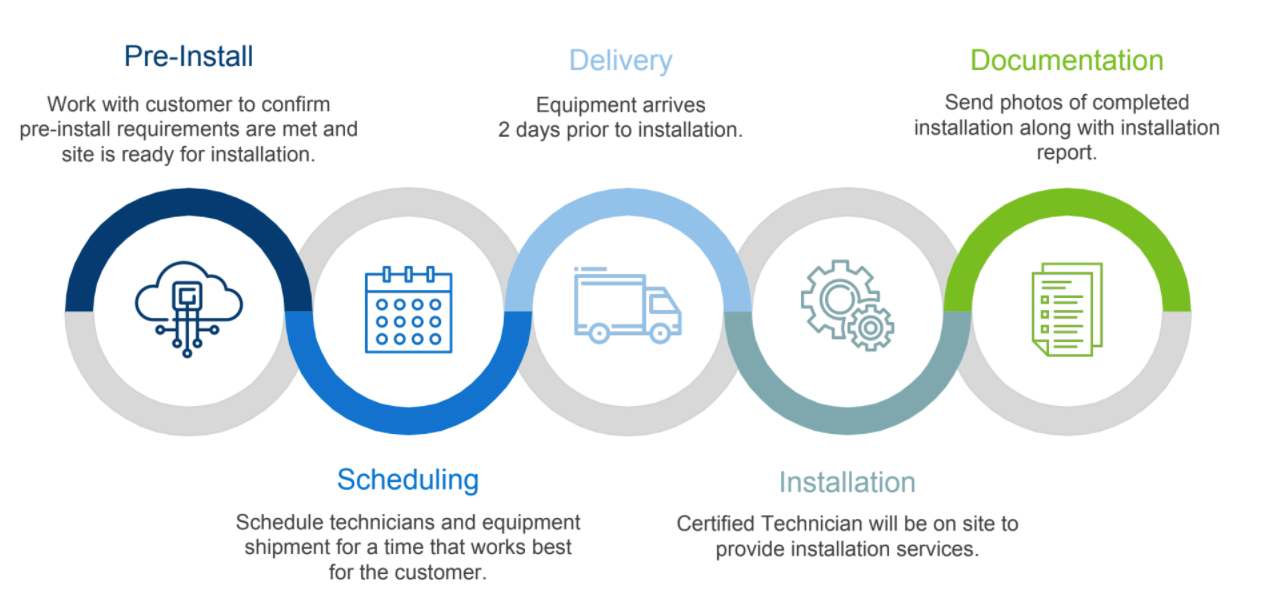
Installation Process Overview
This is a high-level look at the full installation process with the Xenial Team.
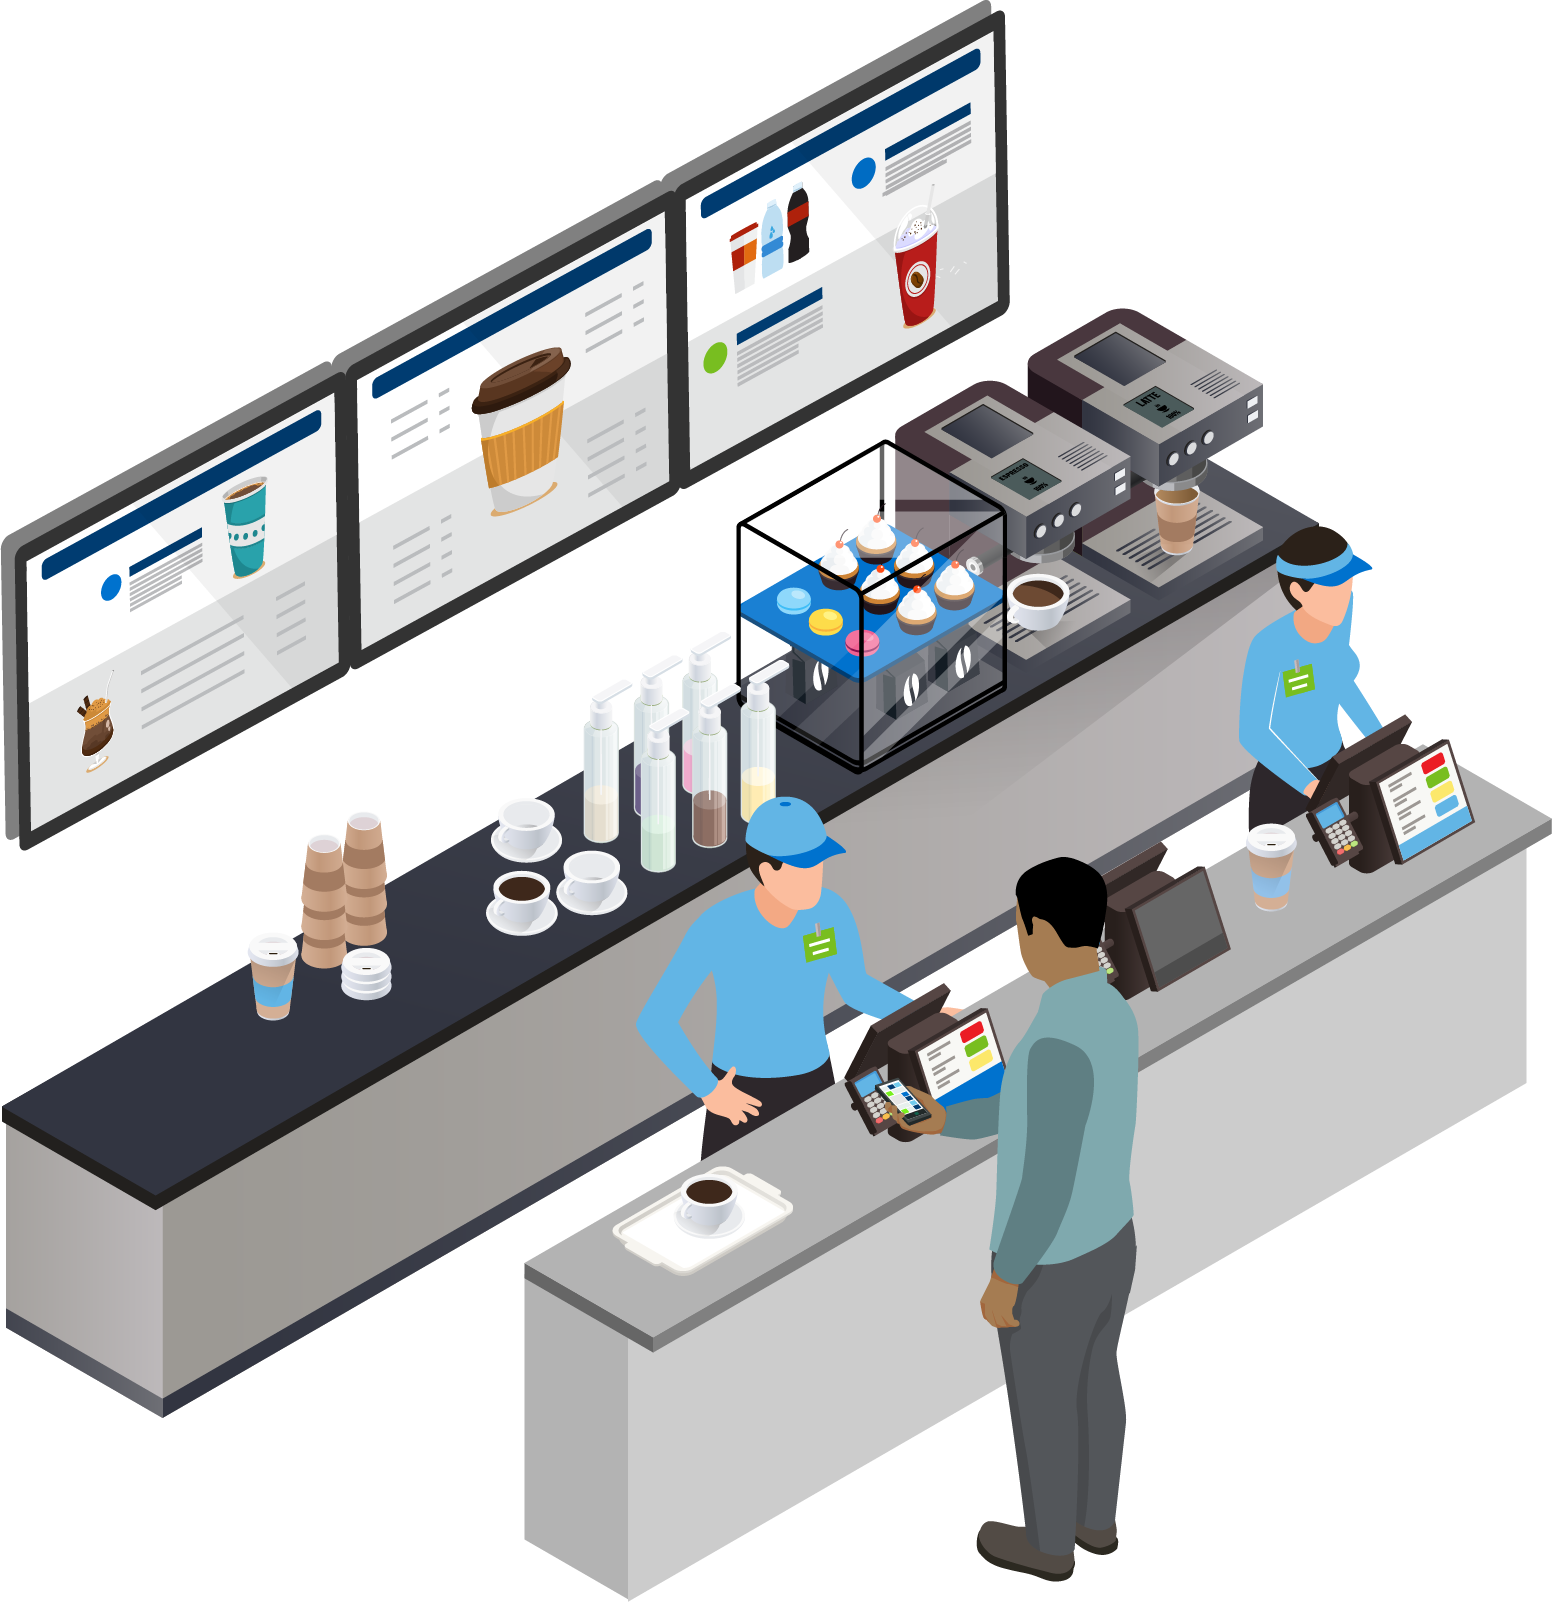
Indoor Digital Menu Board Examples
This section outlines the final product install expectations for Digital Menu Boards. A successful install meets the following criteria:
Indoor Digital Menu Boards
Screen attached securely to bracket, attached securely to wall or ceiling mount
No visible cables
Correct content showing on all displays
IDMB Examples
 |
 |
 |
 |
Electrical Overview and Requirements
Outlet placement varies and depends on the number of displays. For additional information, see Electrical Outlet Placement.
On the breaker panel, clearly label the display(s)—avoid installing the displays on a POS-dedicated circuit.
On the same circuit as the display(s), place the Uninterrupted Power Supply (UPS).
From the office to the menu board wall, run a conduit (at least 2in (50.8mm) in diameter). A pre-drilled hole or conduit box is also needed on the menu board wall. Use the conduit to run the cables from the displays to their designated network ports.
Electrical Outlet Placement
The most common DMB installations are:
Four Screen Layout
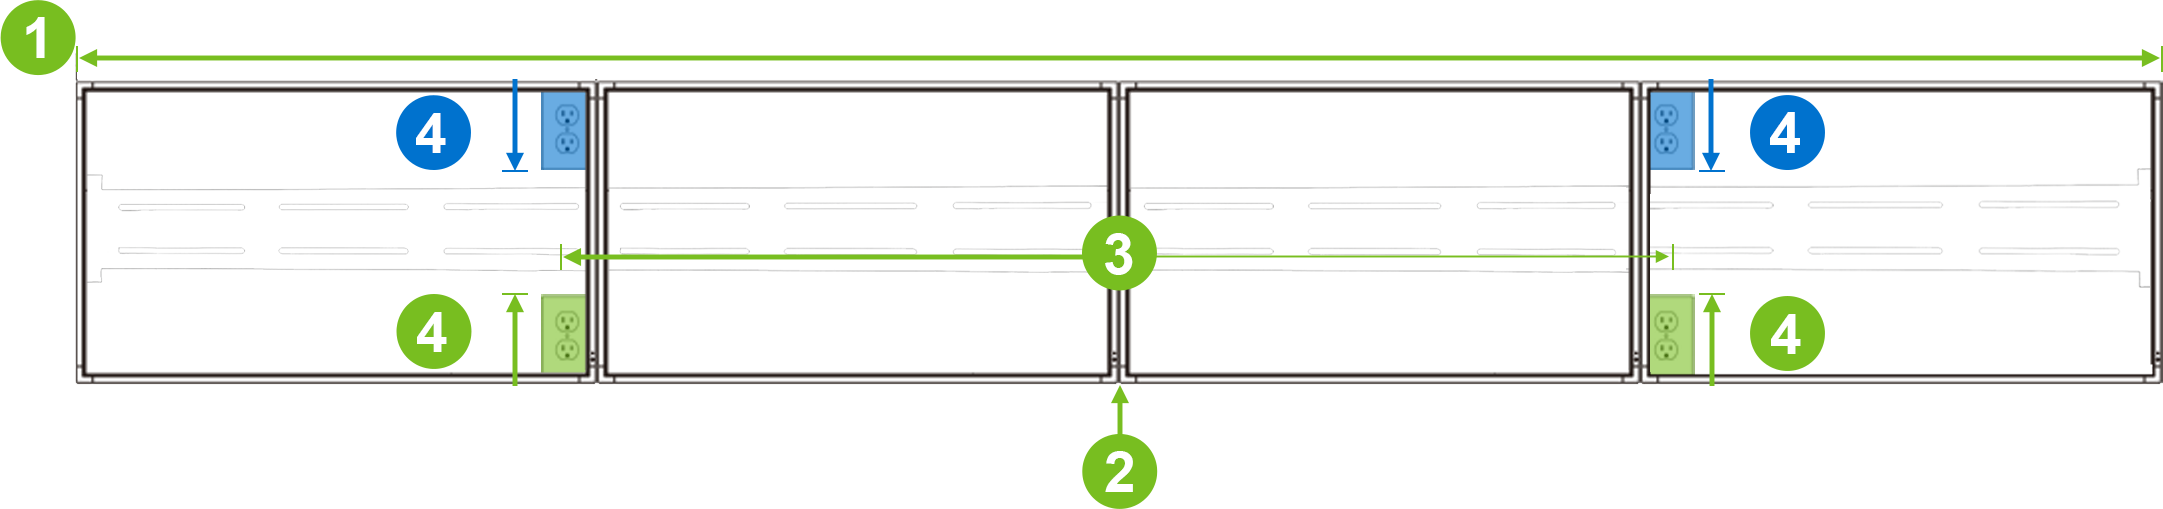 |
Two outlets are required for a four (4) screen layout. The outlet placement is as follows:
Measure the wall for the 4-across screen placement.
For more information, see the Wall Mount Installation: Swivel document.
Mark the vertical center of the above measurement.
Measure to the right and to the left of the center mark:
43" Display - measure 38.17" from the center.
49" Display - measure 43.4" from the center.
55" Display - measure 49.8" from the center.
65" Display - measure 58" from the center.
Measure 8" from the bottom of the display (Green).
Alternatively, if this location is unavailable, measure 8" from the top of the display (Blue).
Three Screen Layout
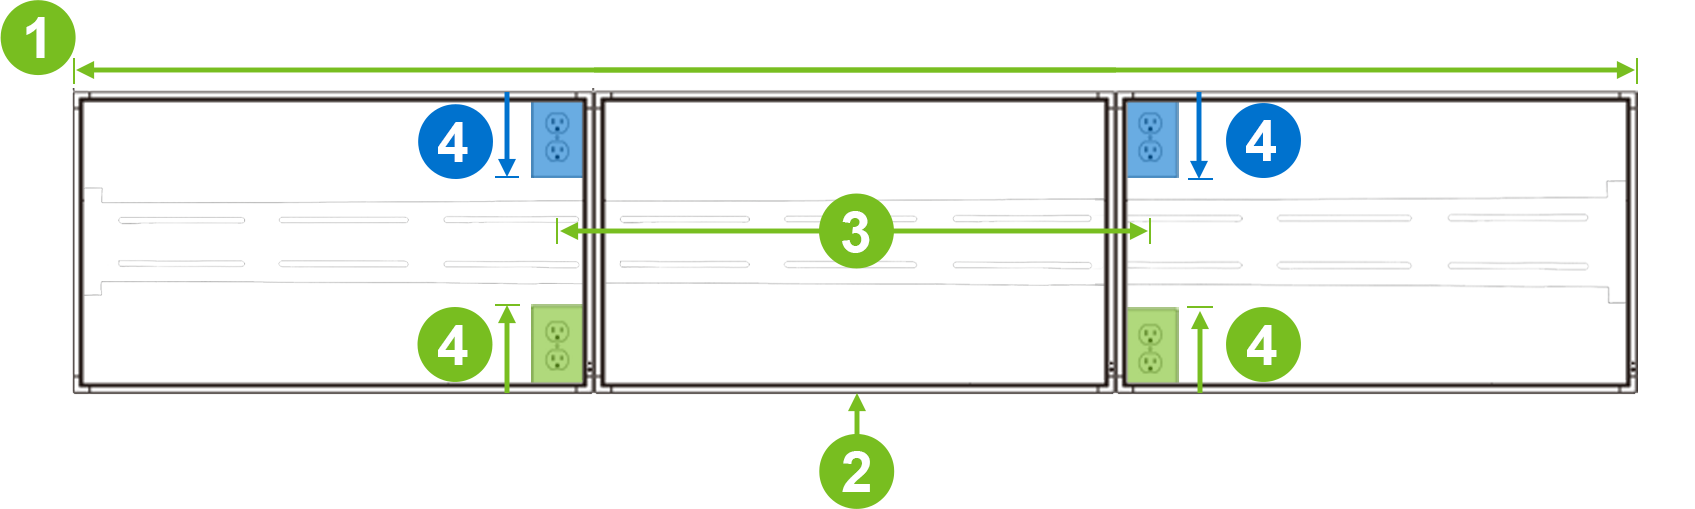 |
Two outlets are required for a three (3) screen layout. The outlet placement is as follows:
Measure the menu board wall for the 3-across screen placement.
For more information, see the Wall Mount Installation: Swivel document.
Mark the vertical center of the above measurement.
Measure to the right and to the left of the center mark:
43" Display - measure 20" from the center.
49" Display - measure 22" from the center.
55" Display - measure 25" from the center.
65" Display - measure 29" from the center.
Measure 8" from the bottom of the display (Green).
Alternatively, if this location is unavailable, measure 8" from the top of the display (Blue).
Three Screen Layout: Alternate Outlet Placement
 |
The alternate outlet placement for a three screen layout requires a quad outlet and a data outlet. The placement is as follows:
Measure the menu board wall for the 3-across screen placement.
For more information, see the Wall Mount Installation: Swivel document.
Mark the vertical center of the above measurement.
From the vertical center mark, measure the bracket height and mark the horizontal center point.
Install the quad outlet to the right of the center mark
Install the data outlet to the left of the center mark.
Side Wall Layout
The side wall display requires its own outlet. Outlet placement depends on screen orientation (portrait or landscape).
Portrait
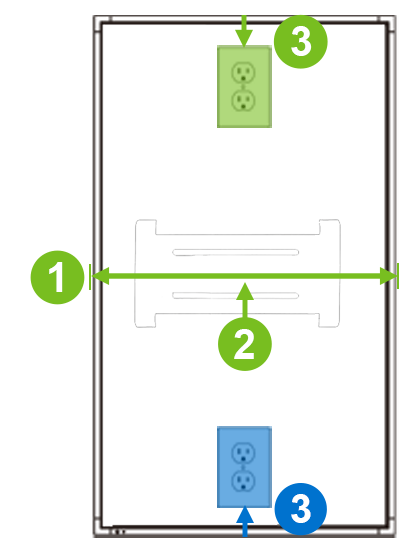 |
Measure the wall for the screen placement.
Mark the vertical center of the above measurement.
Measure 2" from the top of the display (Green).
Alternatively, if this location is unavailable, measure 2" from the bottom of the display (Blue).
Landscape
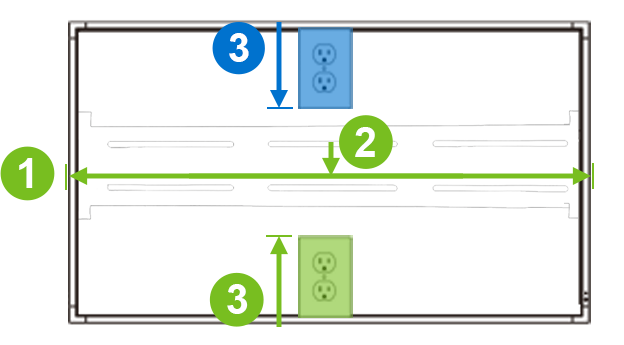 |
Measure the wall for the screen placement.
Mark the vertical center of the above measurement.
Measure 8" from the bottom of the display (Green).
Alternatively, if this location is unavailable, measure 8" from the top of the display (Blue).
Customer and Xenial IDMB Installation Responsibilities
The chart below outlines the specific responsibilities of both the customer and Xenial's installation team.
Customer | Xenial |
|---|---|
Pre-installation
Installation
| Pre-installation
Installation
|
Xenial Networking Worksheet
In order to ensure that the Xenial equipment is able to communicate properly, the following information is required. If possible, it is helpful to reference the Xenial Allowlisting Guide (obtained from the Xenial installation coordinator) and use the listed settings. Copy and paste this list into an email, provide the information requested, and send to your coordinator.
Network IP Range |
Default Gateway IP |
Subnet |
DNS (primary) |
To what network device/firewall port will the Xenial product be connected? |
POS Brand |
Firewall Provider |
Any additional information |
Digital Menu Board Allowlisting
The Xenial Digital Menu Board and its components require specific network settings to communicate with the Xenial Cloud Portal, Point of Sale (POS) system, the Order Confirmation Unit (OCU), and other network-connected devices.
If allowlisting is not configured prior to an installation, the digital menu boards may not be able to download content from the Xenial Cloud Portal or download pricing in a POS integrated system. As a result, the Digital Menu Board information within the Allowlisting Guide should be forwarded to the site's network administrator prior to the installation.
The full allowlisting guide is obtained from the Xenial installation coordinator. Please reach out if a copy is needed.
Site Survey
As a part of the installation process, the customer is asked to submit a site survey that provides details on existing conditions so that proper equipment is ordered and to provide opportunity to address issues prior to installation. To have a technician complete the survey, discuss with the installation coordinator.
Indoor Digital Menu Boards
Site information, including brand, store number, contact, phone number, and email address
Location of the network equipment
Make and Model of Internet router
Confirm Administrator access available to router
Wiring of existing menu boards
Details of main menu board wall and any LTO menu board walls. Provide information for each, such as material, dimensions, wall stud type, recommended bracket type
List special tools required to drill into main menu board wall
Ability for cable to run down menu board wall
In the case of a ceiling mount, provide details about the ceiling structure and dimensions
Photos of existing signage, walls, ceiling, and office area
Confirm understanding of customer's responsibility to obtain all permits
Pre-Install Checklist | Indoor Digital Menu Board
The following identifies the tasks to perform at specific time intervals prior to installation.
Six weeks prior to install |
|
Two weeks prior to install |
|
One week prior to install |
|
Five days prior to install |
|
Three days prior to install |
|
Day of install |
|
Installation Reference Resources
This section details the installation reference materials needed for Indoor Digital Menu Boards. These are provided by the Xenial Installation and Training team and can be resent upon request.
Resource | Description |
|---|---|
Installation and setup guide for Digital Menu Boards | |
Allowlisting Guide | Network configuration information for Digital Menu Boards and other Xenial products |
User access and Digital Menu Board management information | |
Hardware Data Sheet | The technical specifications for various components of the Digital Menu Board hardware |
Getting Help
Need answers? Search product documentation, take a course in the Xenial Academy, or reach out to Xenial Support and communities.
Product Documentation | The Xenial Product Documentation site is accessible via the Help function within the Portal or by accessing this direct link: https://www.xenial.com/product-documentation/?lang=en. Use this site to search or peruse documentation content for Xenial Products. |
Training/Xenial Academy | Access will be provided to our Learning Management System (LMS), Xenial Academy, as your training resource throughout implementation. The Academy allows users to revisit the training materials as often as needed during the process. Access coursework, videos, and supplementary training materials here: Xenial Academy. |
Support | Xenial Support is available through various channels, including SMS, WebChat, Web-to-Case, Phone, and Email. |
LG Digital Display Replacement
The following provides information about service plans offered by the digital display vendors. In the event a display needs replacement, Xenial Support assists with coordinating replacement services with the vendor. Note that these are standard replacement terms. Individual customer account setup may vary based on contracted agreements.
Nota
Shipments are made during regular business hours Monday through Friday, excluding holidays.
LG ExtendedCare Service Plans
LG's ExtendedCare service plan provides repair and services for all LG display products for a term of five (5) years, depending on the initial purchase agreement. Go to www.LGExtendedCare.com to see the extended care guide.
Service Plan | Description |
|---|---|
White Glove Service |
|
For additional warranty options, please reach out to your Xenial Sales Representative.
Additional Fees
Site Readiness Delays, Cancellations, Rescheduling, and Revisits
A Project Coordinator will email you to discuss and confirm your installation date. Once this date is accepted and confirmed, the following fee schedule will apply:
Category | Description | Cost |
|---|---|---|
Installation Rescheduling | Defined as situations beyond the control of Xenial, which may cause a previously confirmed scheduled installation to be rescheduled prior to the installation date. | |
Rescheduling between ten and five business days prior to scheduled installation. | $100 | |
Rescheduling between five and two business days prior to scheduled installation. | 25% of Installation | |
Rescheduling two business days prior to scheduled installation. | 50% of installation | |
Rescheduling within 24-hours prior to scheduled installation—does not include weekends. | 75% of installation | |
Onsite Cancellation | Defined as situations when a technician arrives on site and is unable to install due to issues with customer site readiness responsibilities. | 100% of installation |
Wait Time | Defined as situations in which the installation is delayed due to issues with customer site readiness responsibilities. | $235/hour |
* Wait time in excess of two hours may result in cancellation and rescheduling of the installation. | ||
Installation Revisit | Defined as situations when Xenial is required to return to a site to complete the original installation at a later date, due to issues with customer site readiness responsibilities. | $235/hour + $125 per site travel fee |
* Any warranty revisits that are not billable to the customer will be scheduled and performed as soon as possible. | ||
Expedited Installation | When installation is necessary to take place within 4 weeks of order and/or payment. | 30% of actual install fee may be billed as an expedited install fee |
Expedited Shipping | When shipping is delayed due to customer's lack of payment or required documents. | Customer will pay actual expedited shipping fees. |
Things to Know
- How long is the shipping process?
- Is self-installation an option?
- What are the pre-install and install day responsibilities?
How long is the shipping process? | |
4-6 weeks from the order date. | |
Is self-installation an option? | |
Contact the Xenial coordinator for more information. | |
What are the pre-install and install day responsibilities? | |
Customer and Xenial IDMB Install Responsibilities lists these responsibilities. Contact the Xenial coordinator with any questions. |