Menus
Use Menus to create and manage menus, menu items, menu boards, and menu text language translation. The following is an overview of the Menus homepage.
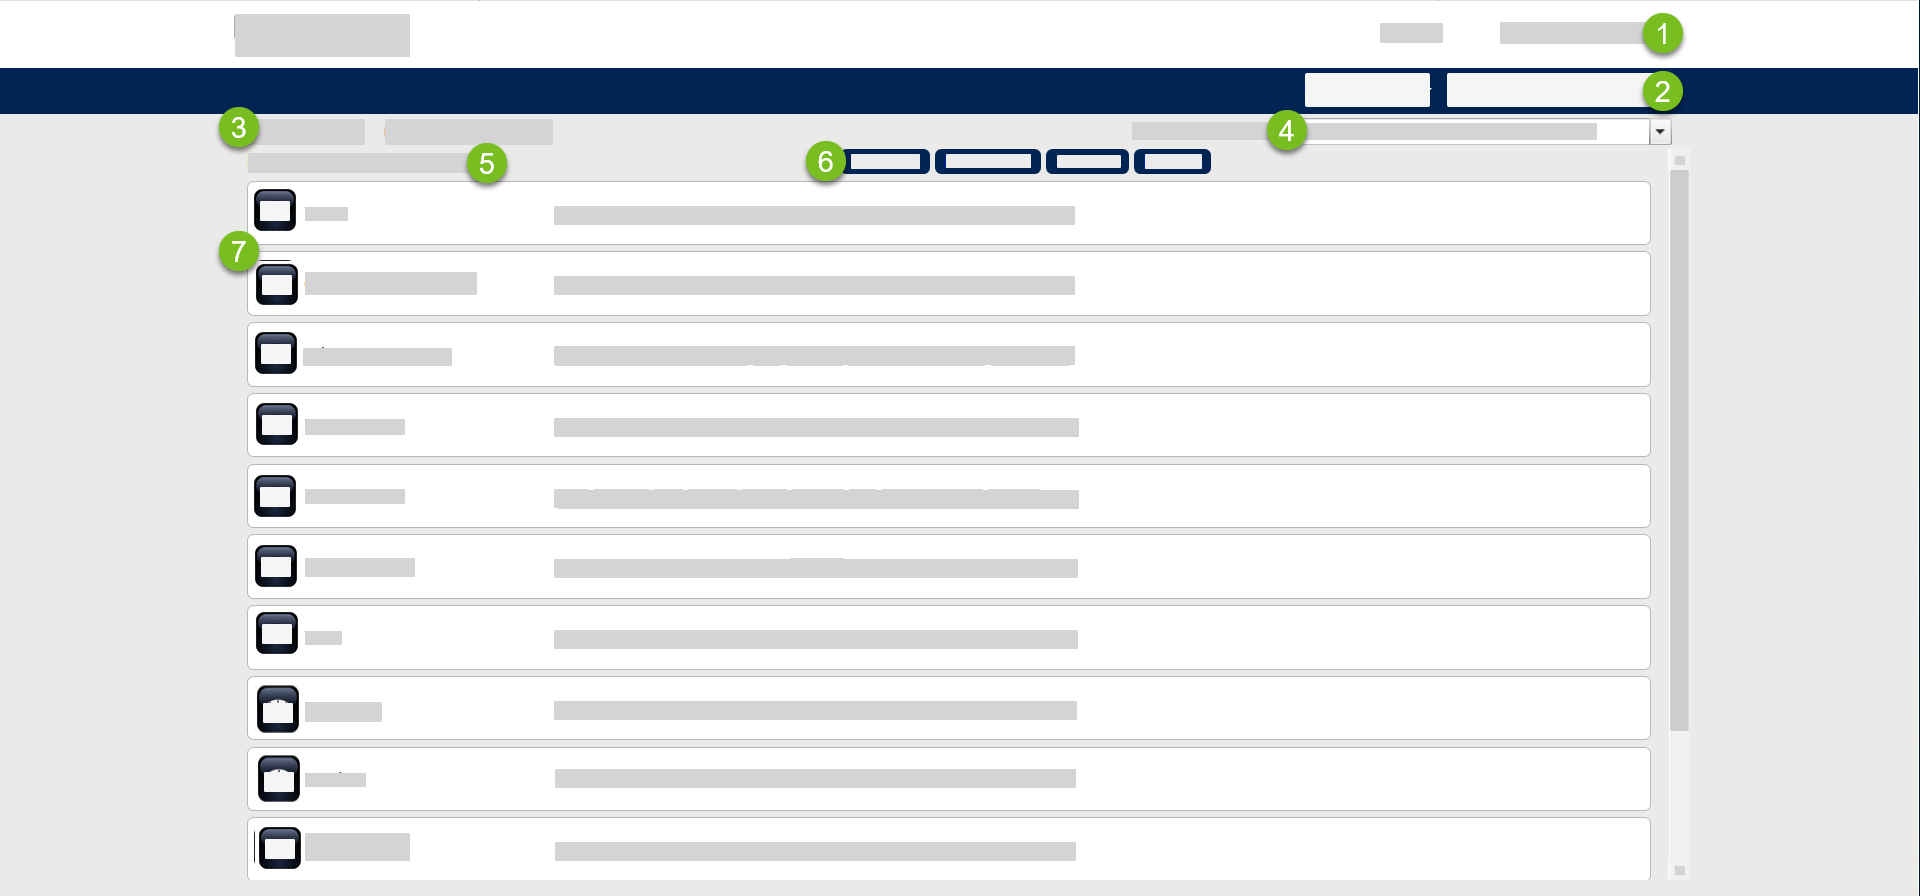 |
1 | User Menu | Access account settings and log out of Foodservice Management. |
2 | Customer | From the dropdown, select the customer information to view. |
3 | Navigate | From the dropdown, select a Foodservice Management module to open, such as Menus, Reports, or OrderHistory. |
4 | Revenue Center | From the dropdown, select the applicable revenue center. |
5 | Menu | Identifies the POS menu that is currently being edited. |
6 | Actions | The available actions include:
|
7 | Modules | The Menus modules are listed here along with a brief description of the module. Select a module to get started. The modules available from Menus include: It may be necessary to scroll down to view the complete list of modules. |
Combo Management
→ →
To add a combo:
In the lower-left of the Combo Management screen, select Add Combo.
From the Combo Editor, define the following:
Field
Description
Language
From the dropdown, select the applicable language.
Combo Name
Combo name.
Combo Price
Combo price. This field is value is determined by the Items Included in Combo selections below.
Day Part
From the dropdown, select the day part when the combo is available for sale. The default is Always.
Receipt Text
Type the combo name to print on the customer receipt.
Image
From the dropdown, select the image to represent the combo on a POS/kiosk menu.
Menu Board Image
From the dropdown, select the the image to represent the combo on a digital menu board (DMB).
Menu Board Text
Type the combo name to display on the a digital menu board (DMB).
Menu Board Description
Type the combo description to display on the a digital menu board (DMB)
Items Included in Combo
To select the items to include in the combo:
From the Item Filter dropdown, select the desired item list filter.
POS ID - Include a specific POS ID in the combo.
Category/Subcategory - Include all items in a specific category/subcategory in the combo.
Attributes - Include all items tagged with a specific attribute/value in the combo.
In the Price field, type the price of the item when included in the combo.
From the dropdown(s), select the applicable value(s).
The provided dropdowns are determined by the Item Filter selection above.
In the lower-left, select +Additional Item to add another item to the list.
From the lower-right of the Combo Editor screen, select Save.
Day Parts
→ →
To add a day part:
From the lower-left of the Day Parts screen, select Add Day Part.
In the Day Part field, type a name for the day part (e.g. Breakfast, Lunch, Dinner).
For each day of the week, specify the Start Time and End Time of the day part.
All Day: 12:00 AM to 11:59 PM
Inactive: 12:00 AM to 12:00 AM
From the lower-right of the Day Parts screen, select OK.
DMD
→ →
To add content to the digital menu display (DMD):
From the lower-left of the DMD screen, select Add Content.
From the DMD Details section, define the following:
Field
Description
Screen
From the dropdown, select the screen to display.
Name
Type the screen name.
Layout
From the dropdown, select the layout or screen orientation to apply to the content.
Daypart
From the dropdown, select the desired day part to display the content. The default is Always.
From the lower-right of the DMD screen, select OK.
Kiosk Menus
→ →
To add a kiosk menu:
In the lower-left of the Kiosk Menus screen, select Add Menu.
Configure the following:
Field
Description
Position
From the dropdown, select the desired numeric position for the menu. This is useful when adding a menu to a series of related menus.
Title
Menu name (non-customer facing).
Menu Tag
Number to tag the menu.
Header
From the dropdown, select the language for the menu header.
Type the text to display in the menu header. This is typically an instructional message to display to the employee (e.g. Choose a Side).
Menu Description
Description of the menu.
Voiceover
From the dropdown, select the audio file to play when the menu opens.
Ad
From the dropdown, select the advertisement media to display on the menu.
Upsell Item
From the dropdown, select the upsell item to assign to this menu. When the user selects an item from the menu, a screen automatically opens that offers this upsell item.
Other Identifiers
Select the applicable identifiers:
Alcohol - Alcoholic beverage menu. The user is prompted to confirm the customer is of legal age to purchase alcohol.
Upsell - Upsell item menu.
Employee - Menu is available exclusively to employees.
Start Menu - First menu in a series; typically used to identify the main POS menu.
Highlight - Highlight menu.
Background
From the dropdown, select the content to display in the background of the menu.
Template
From the dropdown, select the desired menu template.
In the lower-right of the Kiosk Menus screen, select OK.
From the lower-left of the screen, select Save to save the changes.
From the lower-left of the screen, select Publish to publish the changes to sites.
Add Item to Kiosk Menu
→ →
To add an item to a kiosk menu:
From the Title column of the Kiosk Menus screen, select the menu.
From the lower-left of the menu screen, select Add Menu Item.
At the end of the menu item list, locate the new item.
To the right of the item, select Edit.
From the Edit Button screen, configure the following:
Field
Description
Item
From the dropdown, select the item to assign to the button.
To quickly locate an item, type the item name or ID in the provided field.
Show Price
If selected, the item price is displayed on the menu.
Select Quantity
If selected, the user is prompted to select the desired quantity when this item is added to an order.
Highlight
If selected, the button is highlighted.
Sugerencia
From the Edit Button screen, select Use Menu Genie to open the Menu Genie Criteria form, which includes advanced button configuration options.
From the lower-right of the Edit Button screen, select OK.
From the lower-right of the menu screen, select OK.
Menu Boards
→ →
To add a menu board:
In the lower-left of the Menu Boards screen, select Add Menu Board.
From the Detail tab of the Menu Boards screen, define the following:
Field
Description
Position
From the dropdown, select the desired menu board position.
Title
Menu board name (non-customer facing).
Header
From the dropdown, select the language for the menu board text.
Type the text to display in the menu board header.
Background
From the dropdown, select the content to display in the background of the menu board.
Template
From the dropdown, select the desired menu board layout template.
Day Part
From the dropdown, select the desired day part to display the content. The default is Always.
RSS Feed
From the dropdown, select the RSS feed to display on the menu board.
From the upper-left of the Menu Boards screen, select the AD 1 and AD 2 tabs to add and configure advertisement media to the menu board.
From the lower-right of the Menu Boards screen, select OK.
POS Menus
→ →
To add a POS menu:
In the lower-left of the POS Menus screen, select Add Menu.
Configure the following:
Field
Description
Position
From the dropdown, select the desired numeric position for the menu. This is useful when adding a menu to a series of related menus.
Title
Menu name (non-customer facing).
Menu Tag
Number to tag the menu.
Header
From the dropdown, select the language for the menu header.
Type the text to display in the menu header. This is typically an instructional message to display to the employee (e.g. Choose a Side).
Voiceover
From the dropdown, select the audio file to play when the menu opens.
Ad
From the dropdown, select the advertisement media to display on the menu.
Upsell Item
From the dropdown, select the upsell item to assign to this menu. When the user selects an item from the menu, a screen automatically opens that offers this upsell item.
Other Identifiers
Select the applicable identifiers:
Alcohol - Alcoholic beverage menu. The user is prompted to confirm the customer is of legal age to purchase alcohol.
Upsell - Upsell item menu.
Employee - Menu is available exclusively to employees.
Start Menu - First menu in a series; typically used to identify the main POS menu.
Highlight - Highlight menu.
Background
From the dropdown, select the content to display in the background of the menu.
Template
From the dropdown, select the desired menu template.
In the lower-right of the POS Menus screen, select OK.
From the lower-left of the screen, select Save to save the changes.
From the lower-left of the screen, select Publish to publish the changes to sites.
Preview
→ →
To see a preview of a POS/Kiosk menu prior to publishing it:
In the header of the Previewer, define the following:
Field
Description
Day of Week
From the dropdown, select the day of week to view.
Currently Previewing
From the dropdown, select the menu to view.
Time of Day
From the dropdown, select the time of day to view.
Use as Device
From the dropdown, select the applicable device.
In the upper-right, select Reload Preview.
In the upper-right, select Close to close the Previewer.
Price Management
→ →
To manage item prices:
On the item list, locate the item.
In the Price field on the right, type the item price.
In the lower-right, select Save to publish the price changes.
To search for an item:
In the Search field in the upper-left, type the button text or POS ID of the item.
To the right of the Search field, select Search.
To enable/disable a menu item:
On the item list, locate the item.
In the Off/On column on the left, use the toggle to enable/disable the item.
When the toggle is red, the item is disabled (Off).
When the toggle is green, the item is enabled (On).
Splash Screens
→ →
To add a splash screen:
In the lower-left of the Splash Screens screen, select Add Content.
In the Splash section, define the following:
Field
Description
Screen
From the dropdown, select the screen to display.
Layout
From the dropdown, select the layout or screen orientation to apply to the content.
Daypart
From the dropdown, select the desired day part to display the content. The default is Always.
In the lower-right of the Splash Screens screen, select OK.